Goal Circle Shooting Accuracy: Three-Spot Set-and-Shoot Circuit
A progressive, game-relevant shooting circuit that sharpens a GS and GA’s footwork, balance and scoring confidence from three repeatable goal-circle spots.
Equipment Needed
Overview
This 22-minute goal-circle shooting block turns repetition into purposeful scoring practice. It gives your Goal Shooter (GS) and Goal Attack (GA) three repeatable shooting pictures, then asks them to reproduce each after a lead, catch and increasing pressure. Use it after the warm-up, in a finishing block, or as a weekly benchmark: record makes by spot, not volume.
The drill uses one regulation goal third: a full Netball court is 30.5 m × 15.25 m, and the goal circle is a 4.9 m-radius semicircle from the midpoint of the goal line.1 Accurate targets teach a repeatable relationship to post, ring and circle line.
Coaching outcome: By the end of the block, each shooter can lead, land under control, set their base and make an intentional shot from left, centre and right of post.
| Drill profile | Coach decision |
|---|---|
| Recommended group | 6–8 players at one post; use two identical stations for larger squads |
| Primary positions | 1. GA feeder, 2. GS shooter, 3. rebounder, 4. next shooter; add GK/GD later |
| Work:rest | 60 seconds work, 30 seconds coaching/reset; complete three rounds |
| Scoring benchmark | Record made shots / 15 in Round 1 and try to improve the quality, not merely the speed |
Setup
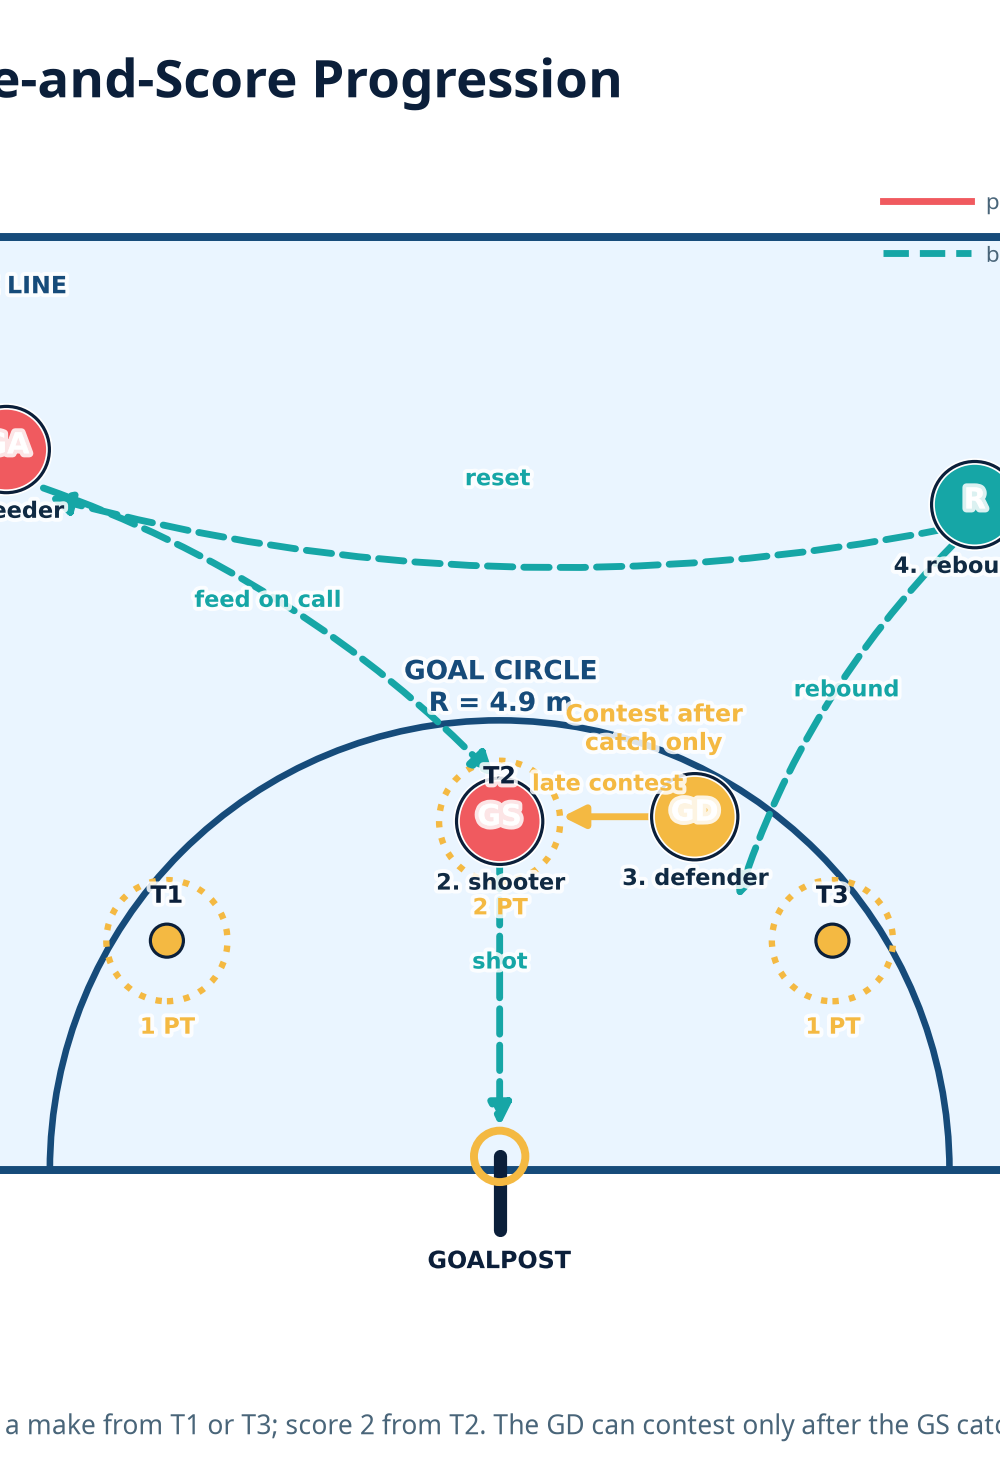
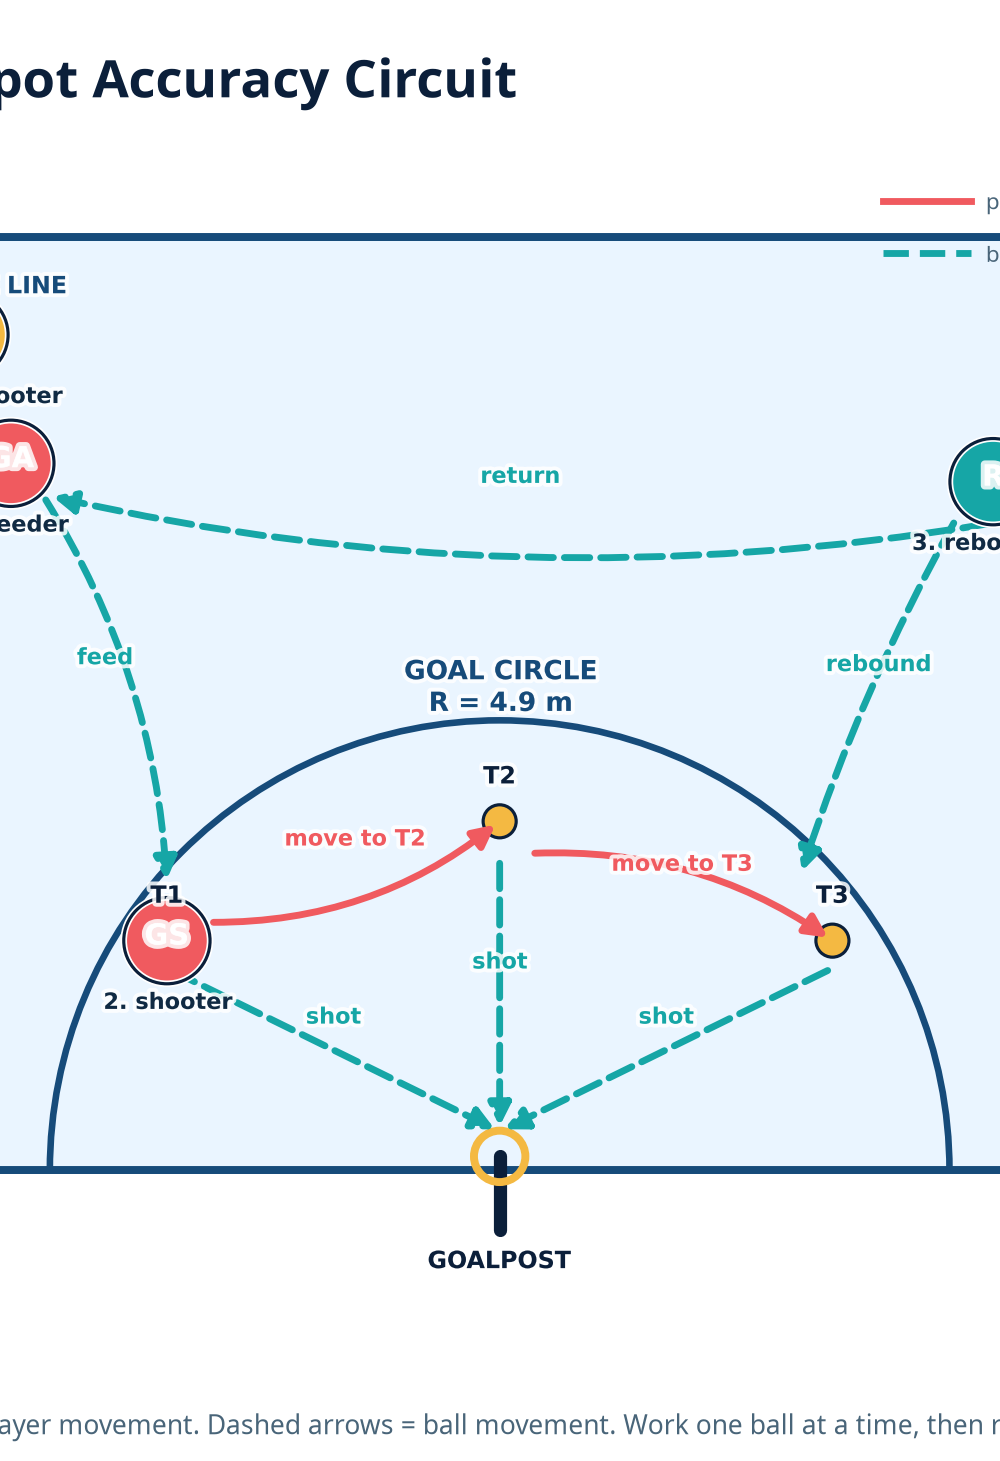
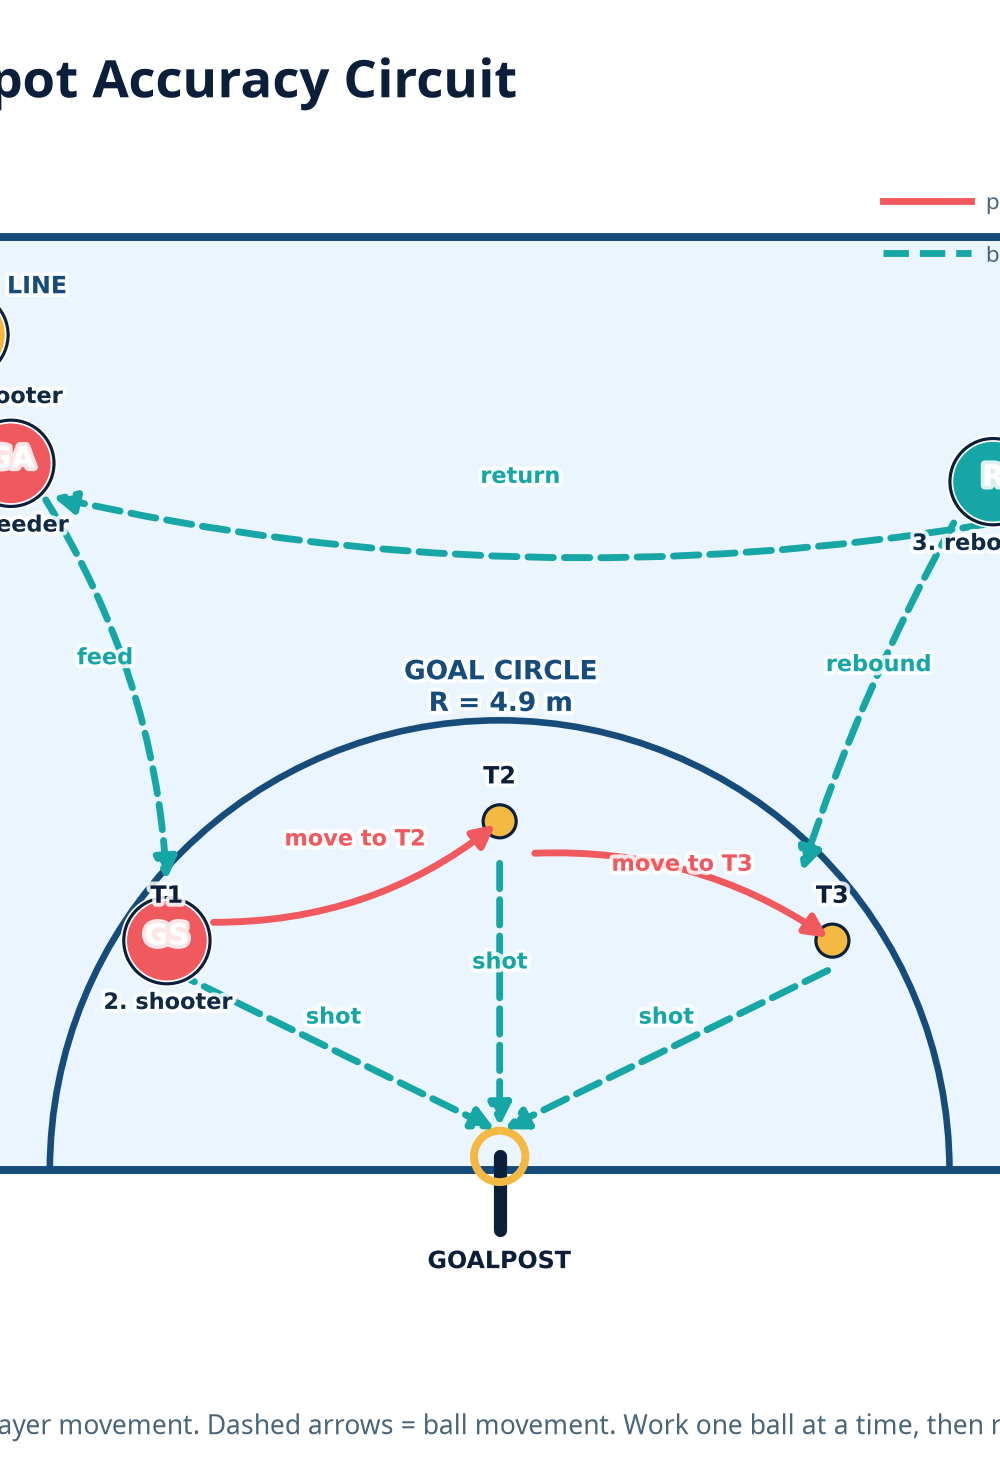
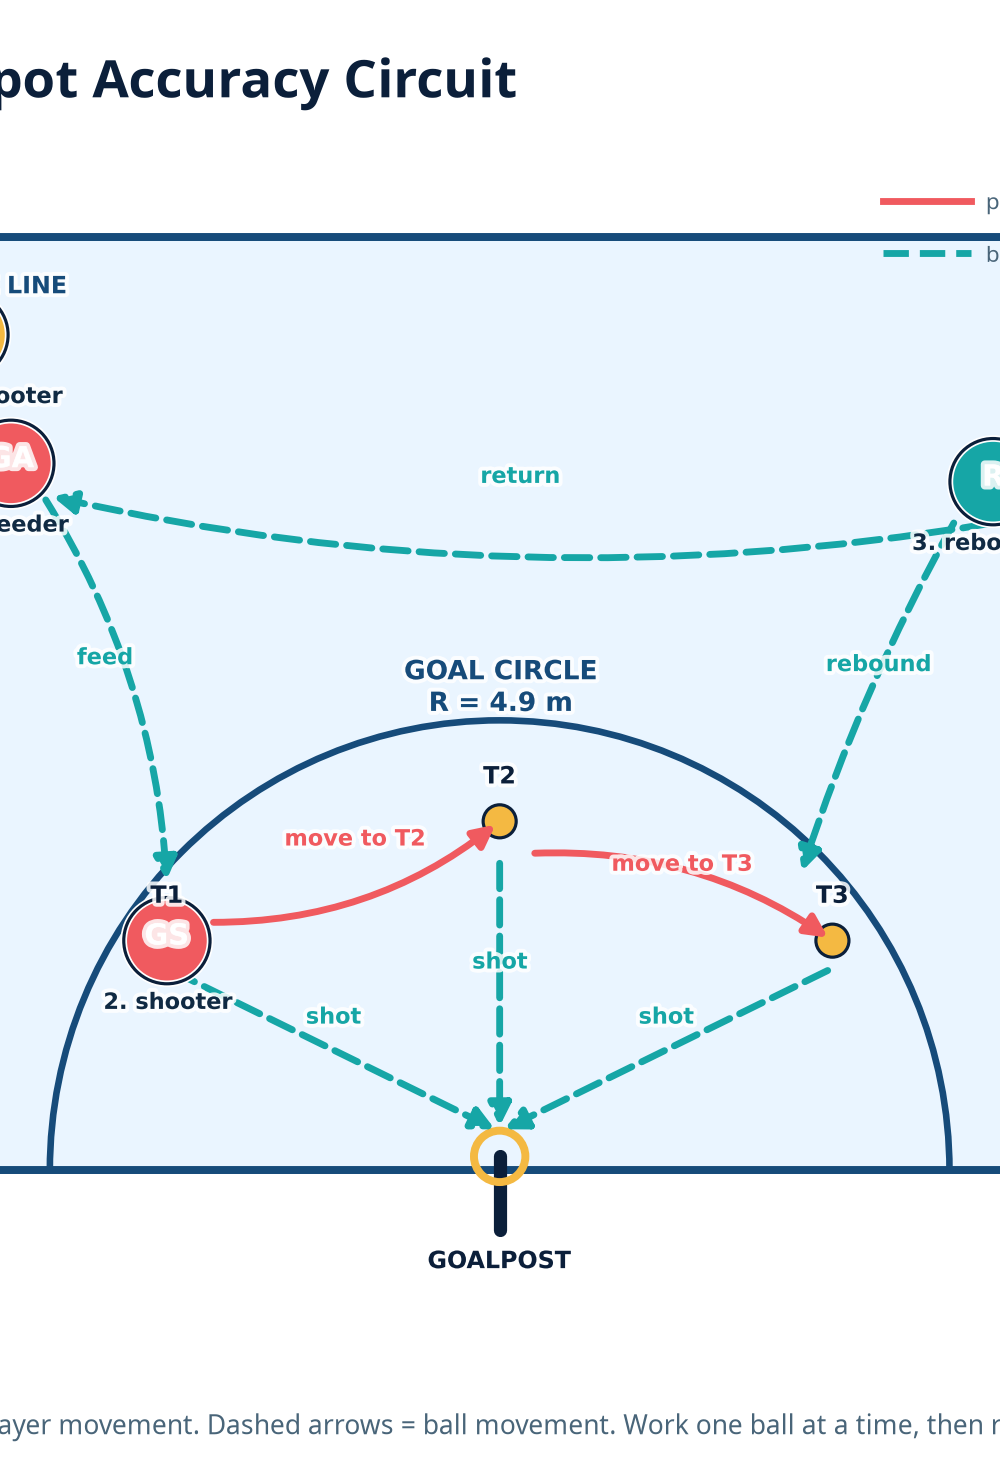
Set up in one goal third, from the goal line to the transverse line (approximately 10.17 m deep). Place a flat marker at T1, 2.5 m from the goal line and 3.6 m left of the post; T2, 3.8 m directly in front of post; and T3, 2.5 m from the goal line and 3.6 m right of post. These are coaching reference points, not fixed game spots. Put the GA 2 m inside the transverse line and 2 m in from the left sideline, facing the circle. Place the rebounder 1 m outside the far edge of the circle so they can collect without standing under the post. Queue the next shooter beside the GA, safely clear of the passing lane.
You need six flat markers or cones, two balls, coloured bibs for GS, GA and defenders, a stopwatch and a simple score sheet. The first diagram is your static accuracy picture; display it before the first repetition so players understand the rotation and the difference between the solid player-movement arrows and dashed ball paths.
Step-by-Step Instructions
Demonstrate the finishing picture. Bring the whole group into the circle. From T1, T2 and T3, show the same sequence: eyes find the ring, feet settle, knees soften, elbows align, ball releases high and the shooter holds the follow-through until the ball reaches the ring. Give every player two unopposed familiarisation shots.
Run the three-spot circuit. On the coach’s whistle, GA feeds GS at T1. GS catches, lands balanced and shoots within four seconds. Regardless of result, the rebounder gathers and returns the ball to GA. GS moves on the coach’s call to T2, receives the next feed and shoots; repeat at T3. The shooter then becomes rebounder, rebounder becomes GA, GA joins the queue, and the next player becomes shooter. Run this continuous pattern for 60 seconds.
Score the process. At each break, record makes and one quality cue, such as ‘base stable’ or ‘released off balance’. This keeps correction specific; a player who scores 8/15 with excellent base and release has a clearer next action than one who simply chases 10/15.
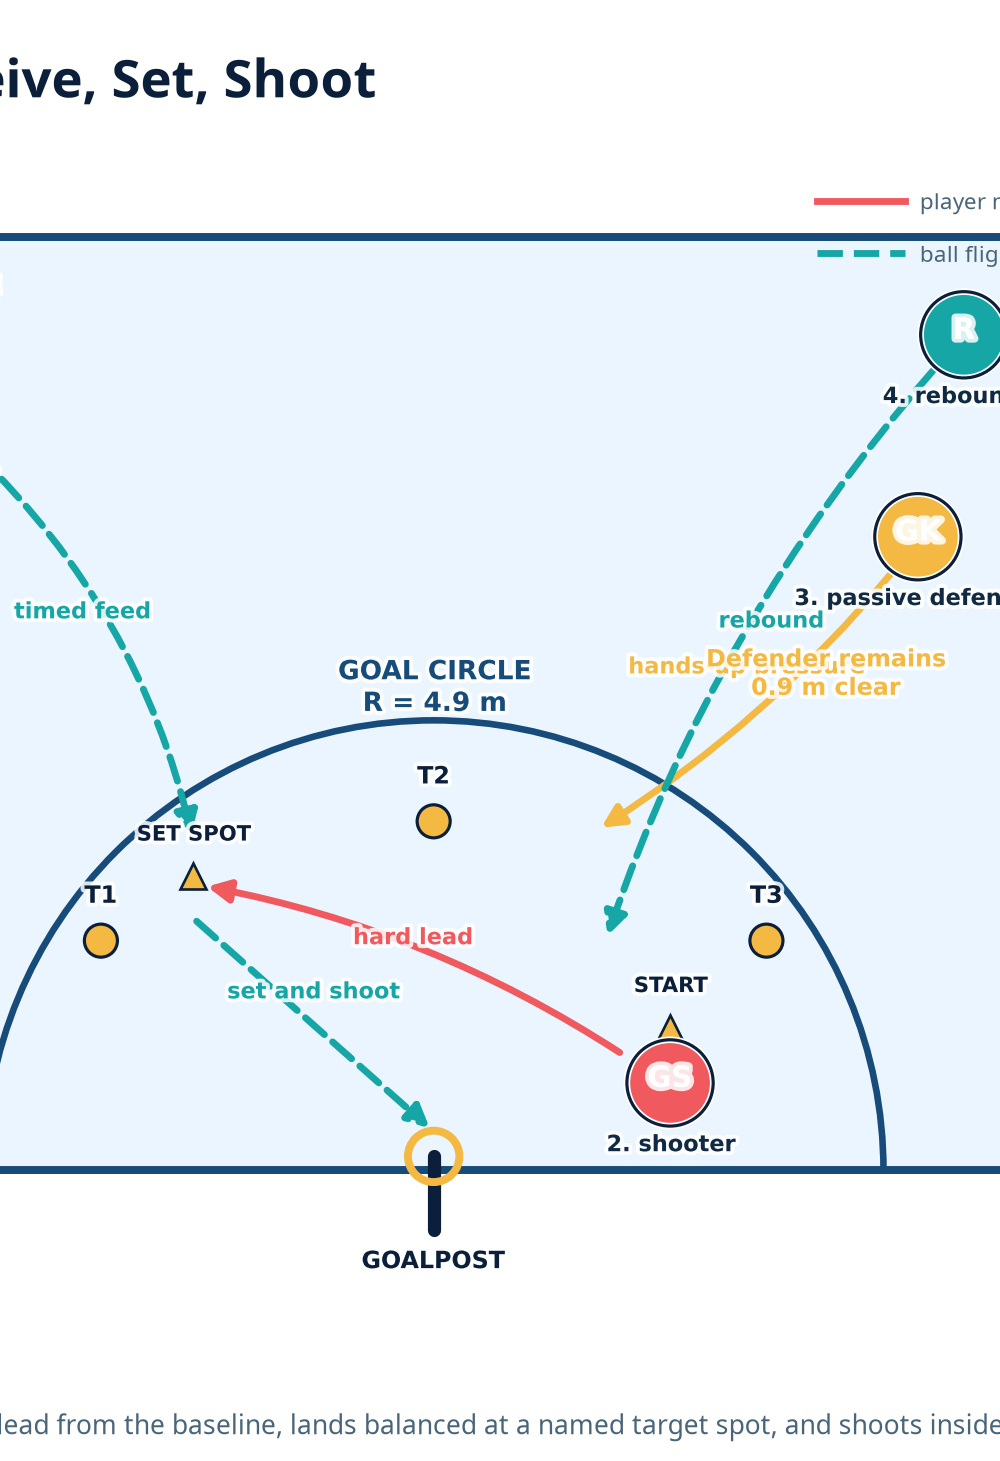
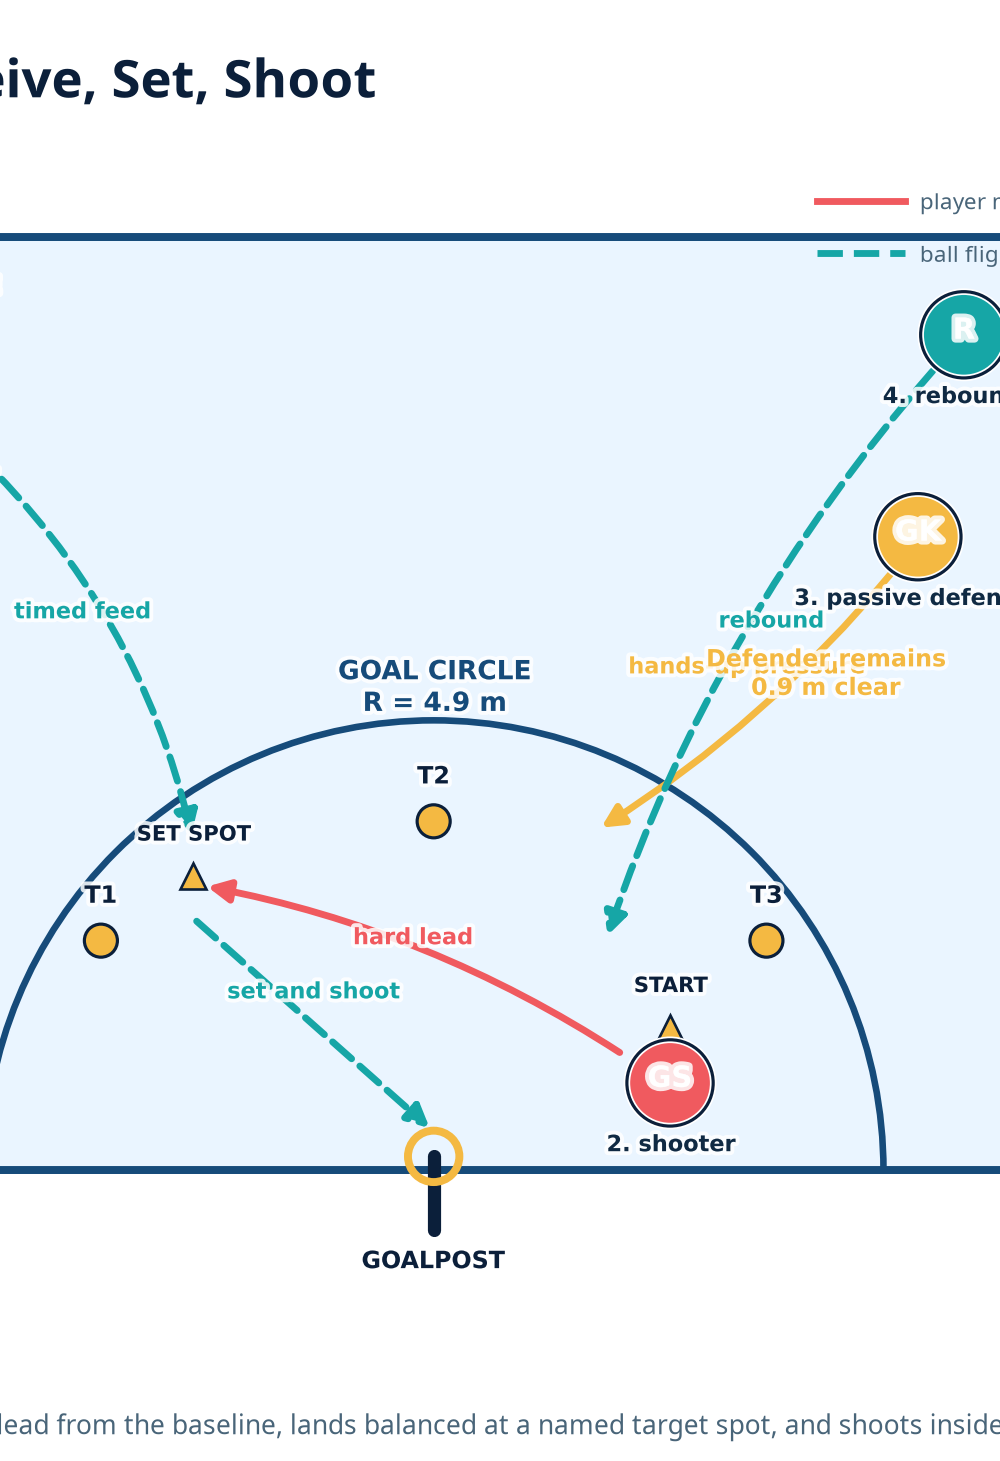
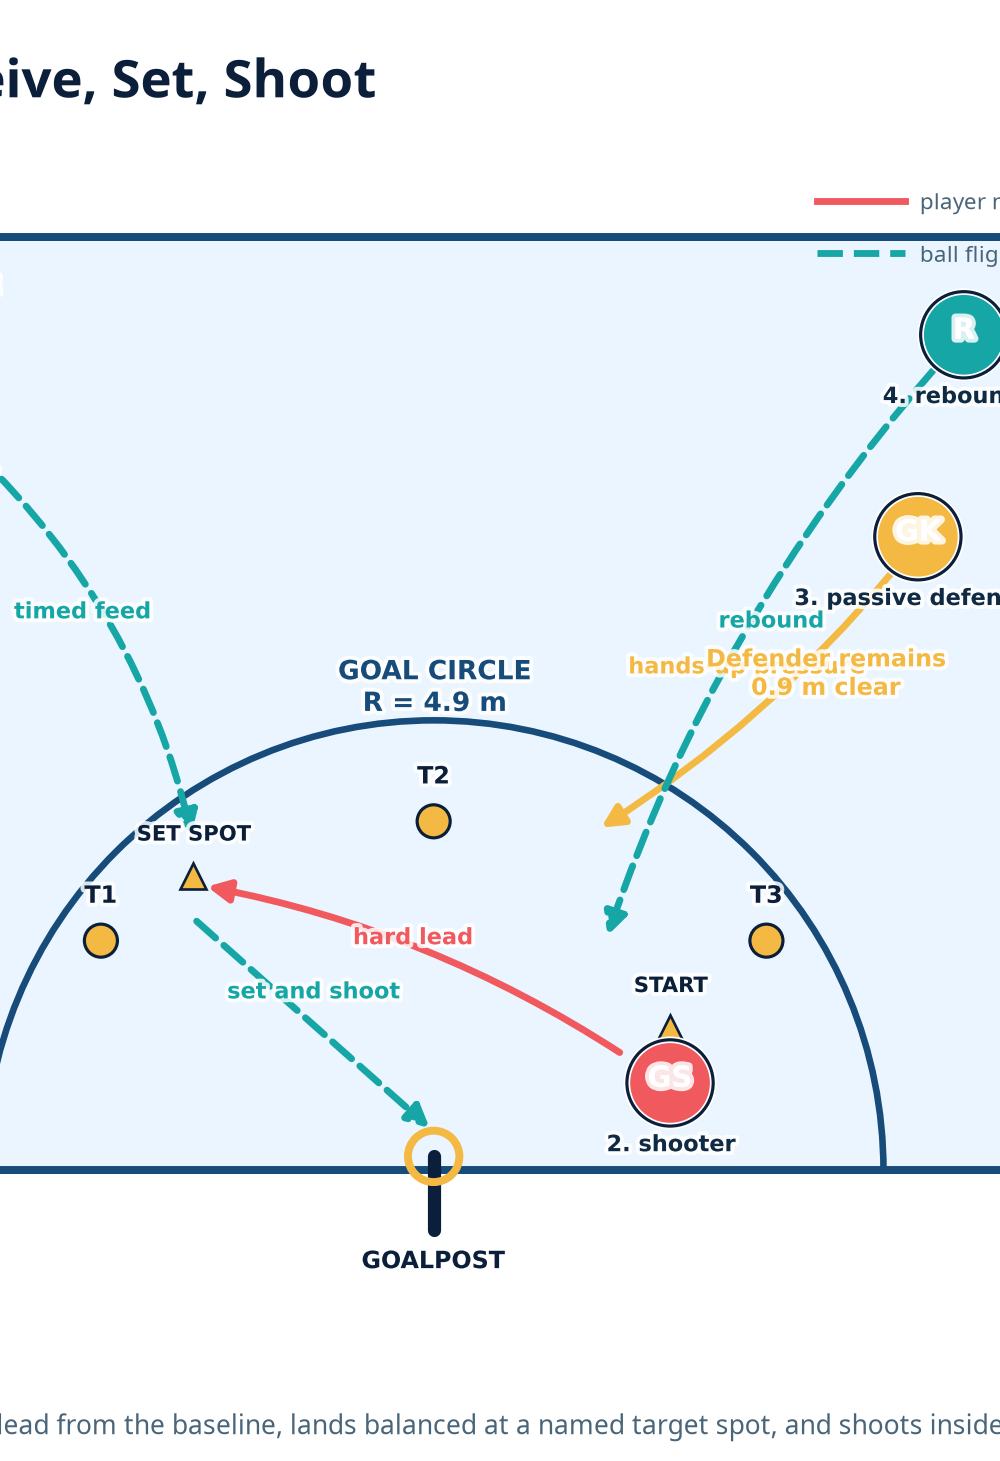
Add the lead into the catch. Use Diagram 2. Start GS on the right side of the goal line, then have them drive on a curved lead to the nominated set spot. GA delays the feed until GS shows hands and is travelling into space. GS must land, absorb momentum and shoot before the coach’s six-second count ends. Complete five leads to T1, five to T2 and five to T3, then swap GS and GA.
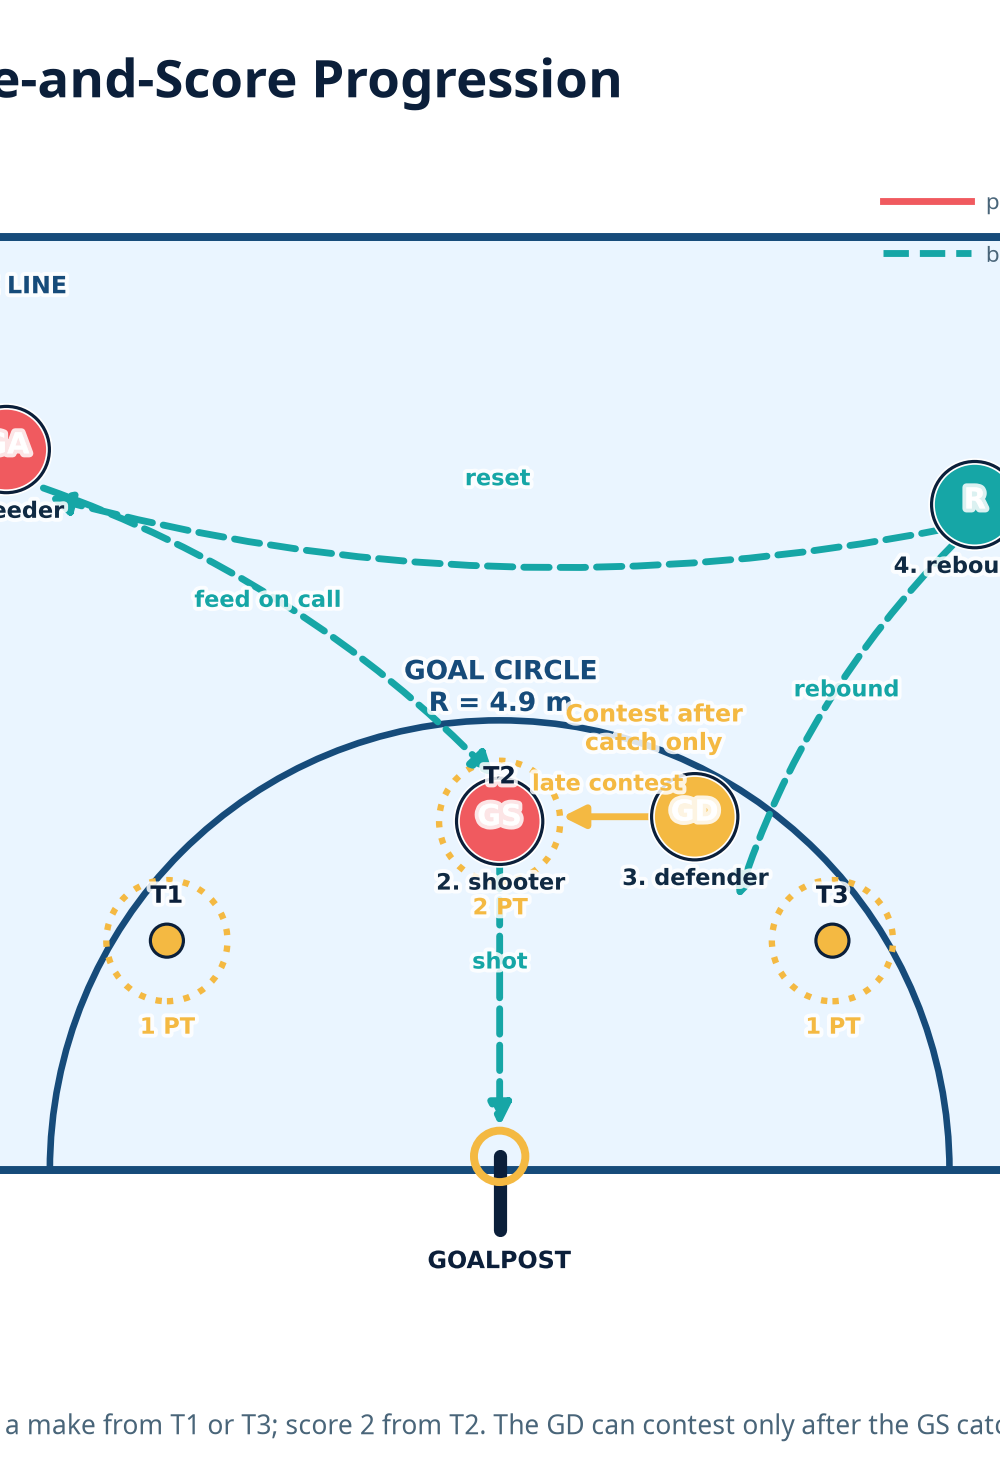
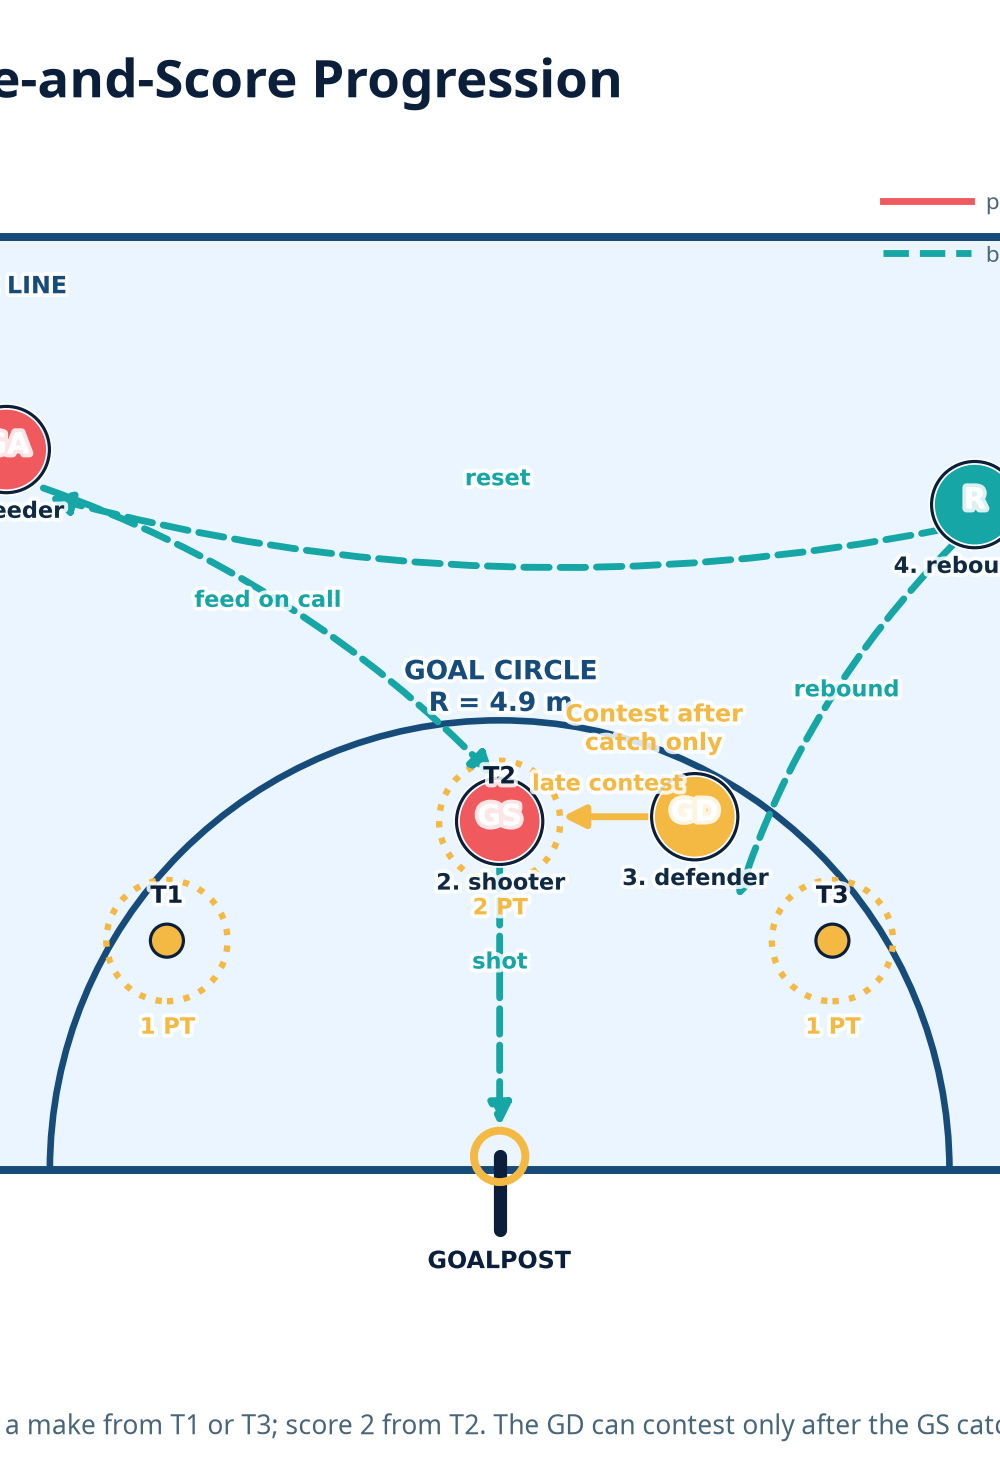
- Introduce measured pressure. In the final round, add a passive GK or GD. The defender begins at least 0.9 m from the shooter’s landing foot and may lift hands only after the clean catch; apply the current local rules of play when you progress the contest.2 The defender’s job initially is to change the visual picture, not to win the ball. Award one point for a make from T1 or T3 and two points from T2. Play to 12 points, rotate every three shots, and finish with one coached shot under pressure rather than a hurried final attempt.
Key Coaching Points
- Win the landing before the shot. Coach a wide, quiet base with weight distributed through the whole foot. If the catch takes the shooter out of their stance, demand a reset rather than rewarding a rushed release.
- Create a consistent visual target. Eyes go to the back of the ring early; the ball travels up through the shooting line rather than being pushed forward from the chest.
- Use the lower body. The knees load first, then extend smoothly. A shooter who ‘arms’ the ball will flatten the trajectory, particularly from T2.
- Keep the release clean and tall. Elbow under ball, wrist relaxed, fingers finish to the ring. Hold the follow-through long enough for the coach to see whether the ball was guided or released.
- Feed to the shooter’s timing. GA feeds in front of the lead, at chest height, and with enough pace to let GS land balanced. Do not rescue a poor lead by floating the ball behind the shooter.
- Protect the learning tempo. The sequence should be brisk, but no player takes a second shot until the rebounder is safe and the feeder has reset. Accuracy work deteriorates when rotation becomes a race.
Common Mistakes
| What you will see | Immediate correction |
|---|---|
| GS catches square and releases while falling sideways | Pause at the landing. Rehearse ‘catch—stick—shoot’ with a two-second hold before adding the ball speed back. |
| Ball leaves from in front of the face with a flat trajectory | Move the player one step closer, cue knees then elbow, and require a visible high follow-through. |
| GA waits too long and feeds to a stationary target | Use the phrase ‘show, go, throw’: GS shows hands, accelerates, then GA passes into the new space. |
| Rebounder stands beneath the ring and blocks the picture | Start rebounder outside the circle arc, then attack the rebound only once the ball has left the shooter’s hand. |
| Defender contests too early or too close | Re-mark the 0.9 m reference, restrict the defender to hands-up pressure after the catch, and build contest intensity gradually. |
Variations & Progressions
Make it easier: Remove the lead and use the three stationary spots. Allow the shooter one grounding catch and a verbal cue from the coach before release. For a confidence group, score a cleanly held follow-through as a process point even when the ball misses.
Make it harder: Call the target colour late, immediately before GA releases the feed. This forces GS to scan, change angle and still land in a shootable base. Alternatively, require five makes in a row at one target before the player can move to the next.
Make it game-like: Give the GA a second feeder option and add a live GD whose only objective is to deny the first lead. GS must re-offer, receive legally in the circle and shoot within six seconds. Maintain a controlled contest: technique remains the non-negotiable before you increase defensive intensity.
Age Adaptations
| Group | Practical adaptation | Coach language |
| --- | --- |
| Under 8 | Work 1–2 m closer than the marked spots; use larger, brightly coloured targets and two-shot turns. | ‘Strong feet, eyes on ring, reach tall.’ |
| Under 10 | Use T1 and T3 only at first; count team makes rather than individual misses. | ‘Catch like a statue, then shoot.’ |
| Under 12 | Introduce all three spots, a lead before the pass and individual 15-shot scorecards. | ‘Land balanced so your hands can finish the job.’ |
| Under 14–16 | Add timed feeds, defender visual pressure and target-specific scoring. | ‘Create the shot you want before you release it.’ |
| Open | Use match-specific spots taken from video review, live re-offers and performance targets under fatigue. | ‘Own the next action: re-offer, receive, set, finish.’ |
Coach’s Finish
Finish by asking each shooter to name their most balanced spot and the cue that improved their last five shots. Record the make count and the cue to revisit next session. Improvement is fastest when players know how they created the shot, not only whether it fell.

