

Rugby
First-Phase Backs: 13-Edge Launch From Ruck
A coach-ready first-phase ruck play that uses a hard 12 decoy and a square 13 to put the wing into space without sacrificing the direct carry.

What you need
4 rugby balls, 40 flat cones, 2 coloured bib sets, 4 tackle shields, 1 stopwatch, 1 full-size 100 m x 70 m rugby pitch or marked 35 m channel
Overview
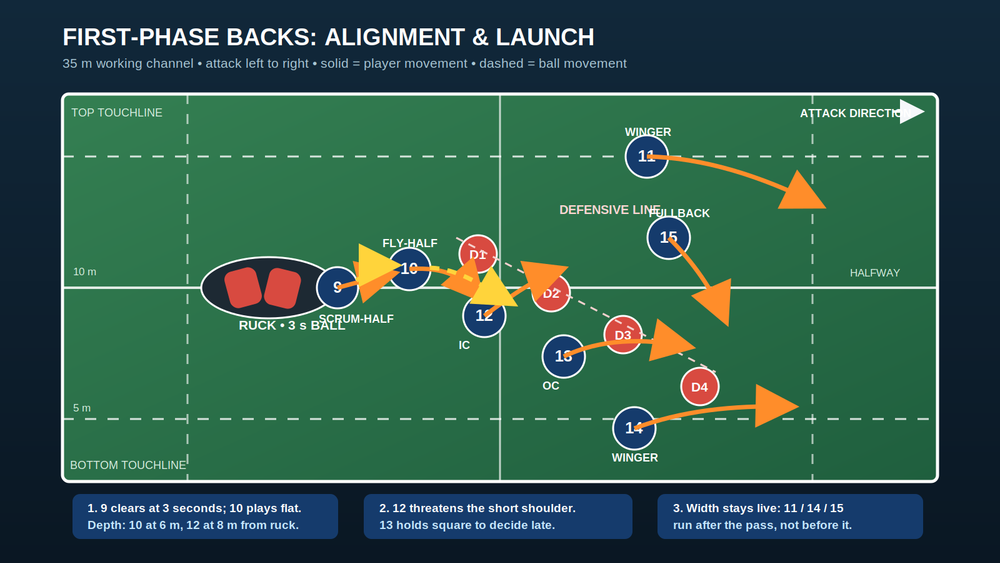
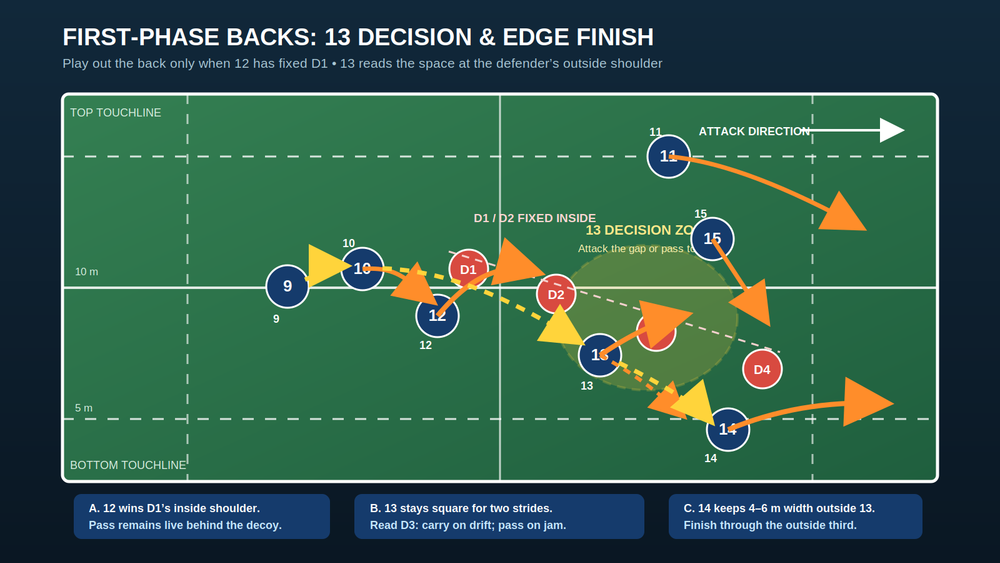
This is a first-phase, ruck-launch play designed to put your backs on the front foot when the defence has set a narrow, hard line around the previous breakdown. The core picture is simple: 9 clears quickly to 10, 12 runs a genuine hard unders line to fix the first defender, and 13 stays square long enough to read the next defender. If that defender drifts, 13 carries into the seam; if the defender jams, 13 releases 14 into the outside third. The far wing and full-back hold the back-field defenders honest and keep the edge alive.
Use it from a stable ruck with the ball presented to 9 and a realistic three-second clearance. Use the marked widths and distances below on a full-size 100 m × 70 m field of play. [1]

Setup
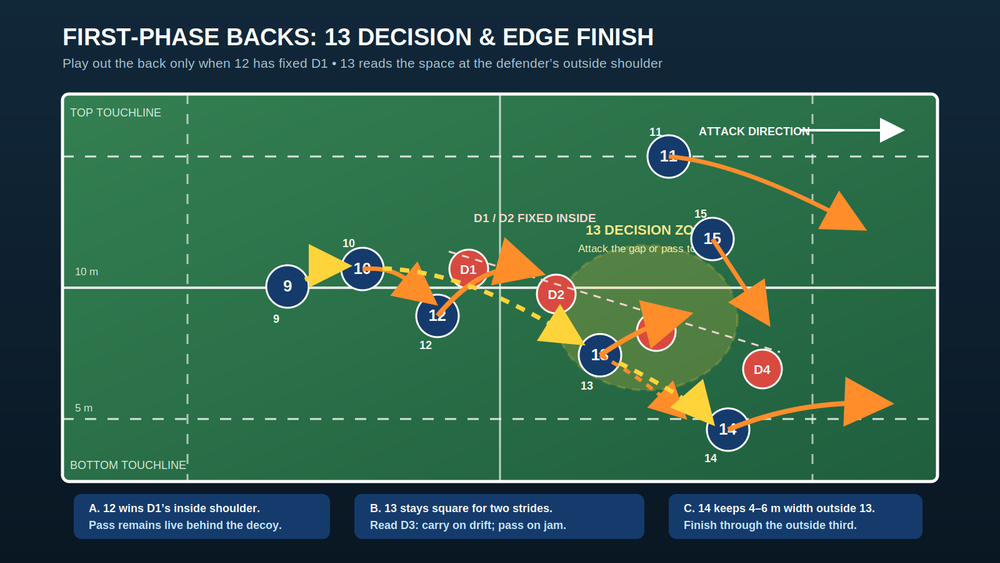
Mark a 35 m-wide working channel across the pitch, with the ruck 12 m in from one touchline and 10 m behind a painted or coned halfway line. Set four defenders 6–8 m beyond the gain line. Start them connected, with D1 opposite 12, D2 opposite 13, and D3/D4 responsible for the edge. Keep a safety player in the back field when you progress to live defence.
| Role | Starting position | Job on the call |
|---|---|---|
| 9 Scrum-half | 2 m from the back foot of the ruck | Clear at three seconds and follow as inside support. |
| 10 Fly-half | 6 m from the ruck, slightly square | Catch early, hold the line, and play behind 12. |
| 12 Inside centre | 8 m from the ruck, 2 m outside 10 | Run a hard unders line at D1’s inside shoulder. |
| 13 Outside centre | 10 m from the ruck, 3–4 m outside 12 | Stay square, make the late carry/pass decision. |
| 14 Right wing | 4–6 m outside 13 | Hold width, then accelerate onto a late pass. |
| 11 Left wing and 15 Full-back | Far edge and 12–15 m deep | Maintain opposite-edge threat and sweep support. |
You need 15 players for the full version: a front-five ruck unit, 9–15, and four defenders. For a teaching version, use 9, 10, 12, 13, 14, 15 and four defenders; place cones as the ruck and as non-participating support runners. Bring four rugby balls, flat cones, two coloured bib sets, and a stopwatch. Run this as a 30-minute block after your handling preparation.
Step-by-Step Instructions
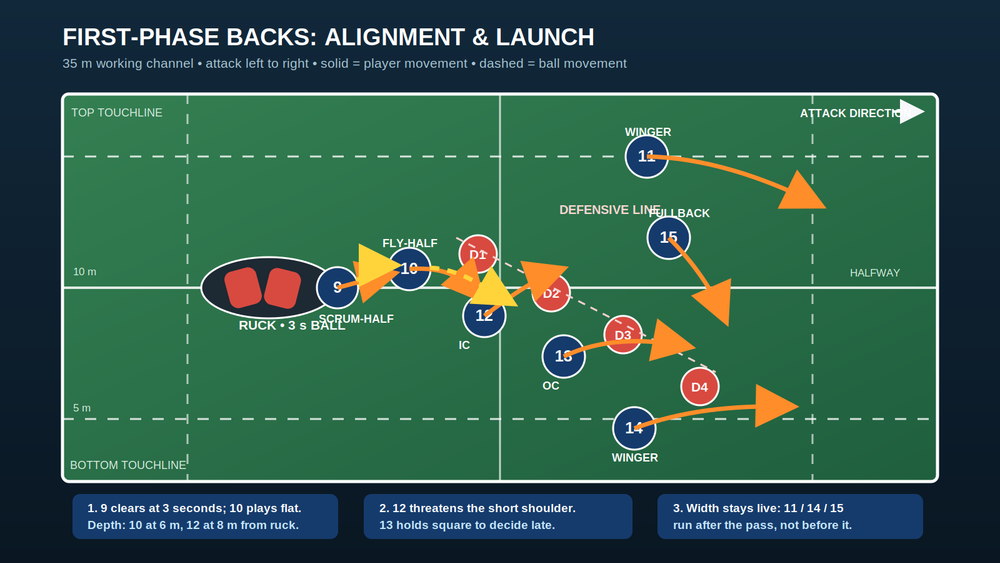
Build the ruck picture. Place the ball on the attacking side of the ruck, parallel to the touchline. The ruck unit calls “set” only when the ball is visible and 9 has a clean two-metre exit. Tell 9 to count “one, two, three” quietly; the play begins on the third beat, not on a shouted sprint.
Set the backs before the ball moves. 10 stands at six metres, with hands available and hips facing the gain line. 12 begins two metres outside 10 and a half-step deeper. 13 is three to four metres outside 12, while 14 holds four to six metres beyond 13. Do not drift into a deep arc.
Make 9’s pass the tempo cue. At three seconds, 9 passes firmly to the front shoulder of 10. 9 then tracks inside the ball as the first support option. Do not let 9 drift sideways; a lateral clear makes 10 catch behind the gain line and advertises the play.
Ask 10 to play flat but not frantic. 10 takes one quick adjustment step and passes out the back of 12. The pass should leave 10 before D1 can close the space, but 10 must hold the ball long enough to make D1 look at 12. Coach 10 to show hands and eyes to 12 so the decoy is believable.
Make 12 a real threat. 12 runs a hard unders line across D1’s inside shoulder, aiming to arrive on the gain line at the same moment 13 receives. If D1 over-chases or 10 is under immediate pressure, 10 may give 12 the ball. The direct carry protects the play and stops defenders ignoring the unders line.
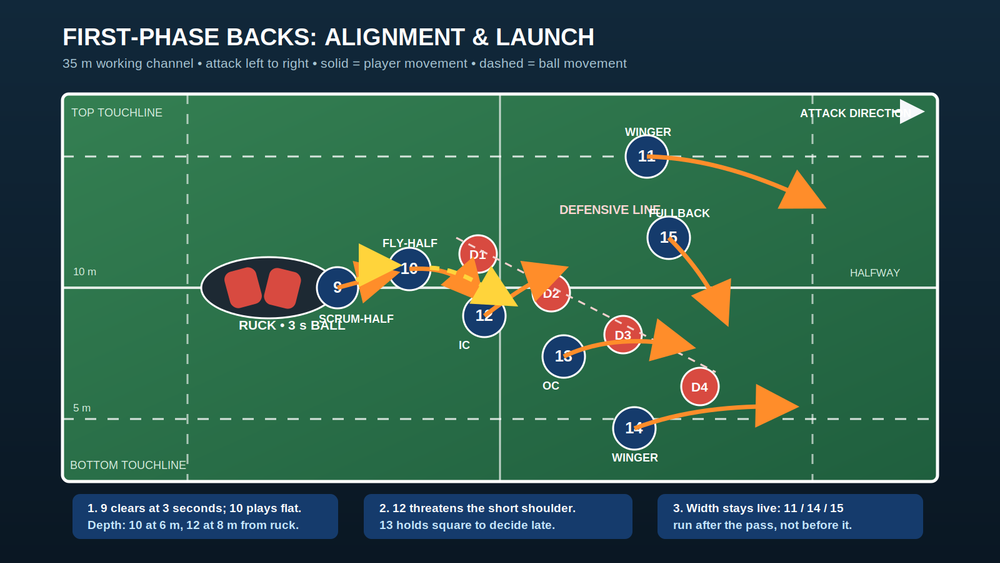
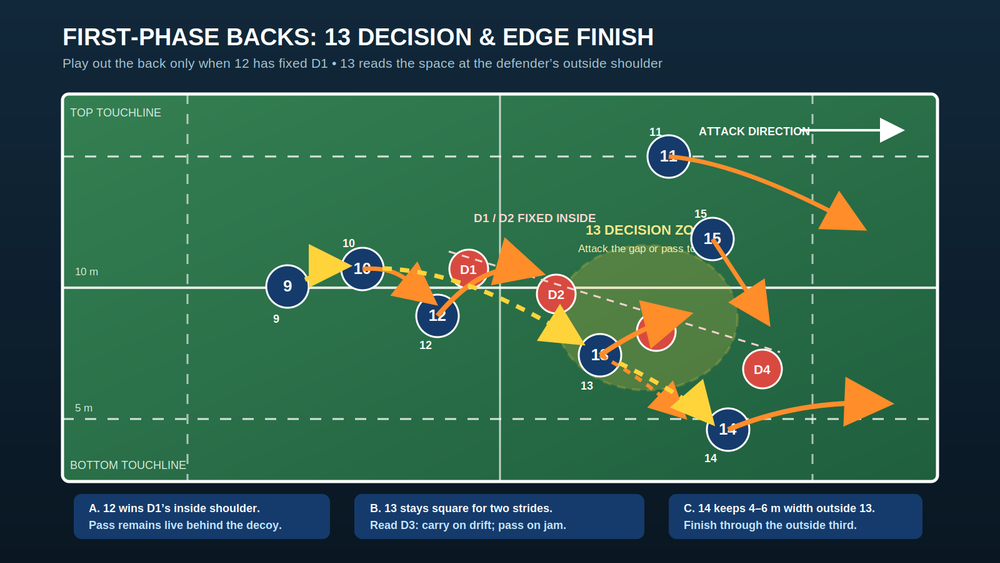
Give 13 a two-stride decision. 13 catches with the chest and hips square, takes two strong strides, and reads D2/D3. If D2 drifts and the seam opens, 13 carries through the near hip of D2, fights for a dominant contact, and presents long. If D2 jams hard at 13, 13 transfers a late, soft pass to 14. The rule is: carry on drift, pass on jam.
Finish beyond the edge. 14 does not run early. They hold width until 13’s second stride, then accelerate onto the pass and attack the outside shoulder of D3 or D4. 15 sweeps behind at 12–15 m to field a kick or recycle a broken break; 11 stays wide on the opposite edge so the defence cannot fold without consequence. Finish by winning the collision or edge, then reload within six seconds.
Key Coaching Points
| Coaching point | What you should see |
|---|---|
| Tempo before shape | 9 clears on the third beat with a firm, accurate pass. |
| Flat, connected alignment | 10, 12 and 13 are close enough to threaten together, not strung out. |
| Credible 12 decoy | 12 attacks a defender’s shoulder at pace and keeps hands available. |
| Square 13 | 13 presents two running/pass options until the defender commits. |
| Late wing acceleration | 14 holds width first, then hits the pass at speed. |
| Reload discipline | The ball carrier presents long; 9 and nearest forwards create the next platform. |
Coach it from the inside out. Correct 9 and 10 first, then the timing between 12 and 13, and only then the wing finish. When the line breaks down, freeze the picture and ask, “Which defender did we fail to occupy?”
Common Mistakes
The first mistake is 12 jogging a decorative line. A soft decoy lets D1 drift straight to 13; correct it by setting a tackle shield on D1’s inside shoulder and requiring 12 to threaten it at full pace. The second is 13 receiving too deep or turning out early. Reset 13 one metre flatter and demand two square strides before any pass.
A third error is 14 chasing the ball before 13 has fixed the defender. The winger then crowds 13 and presents the same picture to the defence. Start 14 behind a hold cone and release them only when 13 crosses it. Finally, coaches often allow an inaccurate 9-to-10 pass to become normal. If 10 has to reach behind their body, stop the rep immediately: the timing of every runner is built on that first pass.
Variations & Progressions
Begin with walk-through to semi-opposed. Defenders track their assigned attacker at 60 percent, allowing the backs to learn exact depth and timing. Then move to a live-read progression: D1 can jam or drift, and 10 must choose whether to use 12 or play out the back. This makes the hard unders line functional rather than scripted.
For an advanced progression, add a 15 sweep and kick-pass option. If D4 over-folds to 14, 13 carries or tips to 15 sweeping behind; if the winger sits high and the edge is vacant, 10 may use a controlled cross-kick to 11. Only add the kick after players consistently protect the direct carry and the next ruck.
Age Adaptations
For Under 8–Under 10, use three attackers (9, 10, 12) against two defenders in a 15 m × 12 m channel. Remove the out-the-back pass and coach catch-pass, forward footwork and support. For Under 12, add 13 and 14 but use passive defenders initially; cap the instruction at “run hard, stay wide, pass late.”
For Under 14–Under 16, run the full 35 m channel with live drift/jam choices, but keep contact controlled and make the ruck a touch-and-present rather than a contest if player welfare or numbers require it. At open age, use a live breakdown, genuine fold defenders and a back-field kicker. Review whether 12 fixed D1 and 13’s decision matched D2’s behaviour.
Coach’s Final Check
A successful rep is not simply a line break. It has 9 supplying tempo, 10 holding the defender, 12 creating a short threat, 13 deciding late, and 14 receiving space rather than standing in it.
References
[1]: https://passport.world.rugby/laws-of-the-game/laws-by-number/1-the-ground/ "World Rugby, Law 1: The Ground"
