

Rugby
Mastering the Lineout Maul: Formation and Forward Drive
Build a connected forward pack that can secure lineout ball, form a legal low maul, and drive five metres with control, force, and a clear scoring threat.

What you need
2 rugby balls, 10-12 cones, 3-5 contact shields (optional), lineout lifting blocks or marked landing zone (optional)
1. Overview
A dependable lineout maul gives a side far more than a five-metre scoring option. It can win front-foot ball, compress the defence, draw penalties, and create a clean launch point for the next phase. This Maul Formation and Drive drill teaches the sequence that decides whether the maul is functional or fractured: secure the catch, land balanced, transfer the ball behind the front edge, build a tight wedge, and drive together.
Run it after a lineout warm-up, particularly in the 15m channel or close to the try-line. Prioritise a legal, stable unit in which every forward knows their first job and moves on one command; adapt all contact and lifting elements to local age-grade regulations.
Session outcome: By the final repetition, the attacking pack should secure a clean throw, form the maul within two seconds of landing, transfer the ball to No. 8, and drive a controlled five metres without losing its square shape.
2. Setup
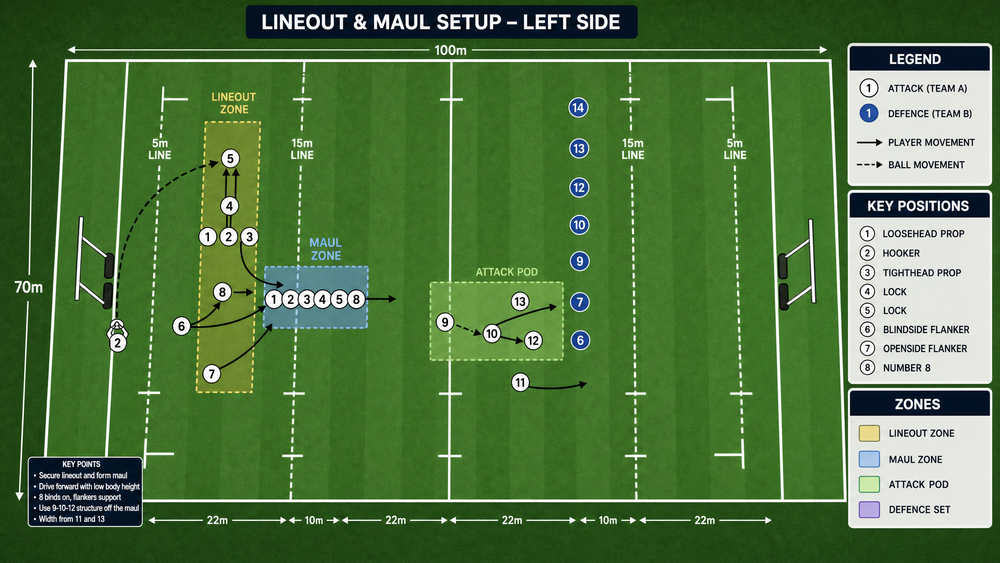
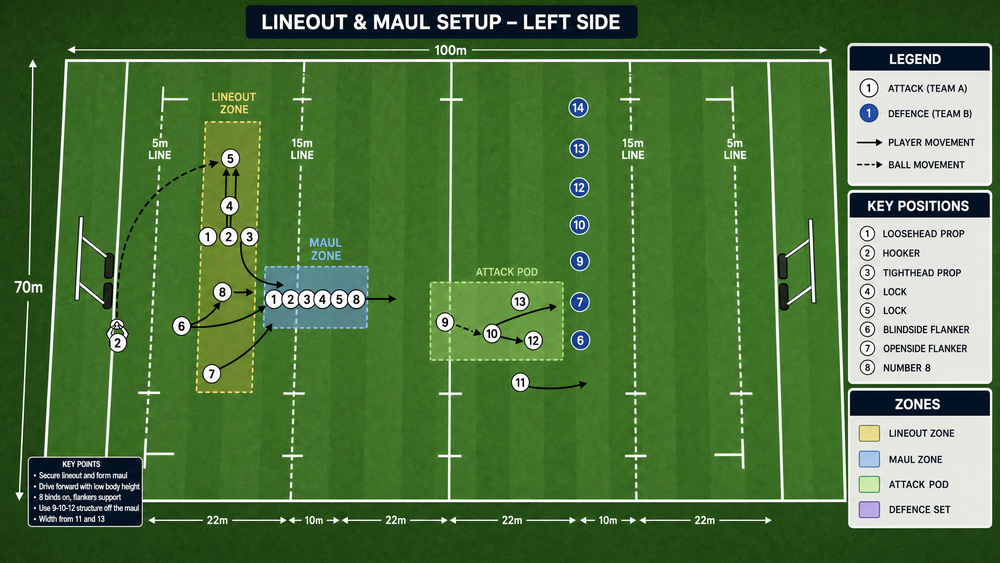
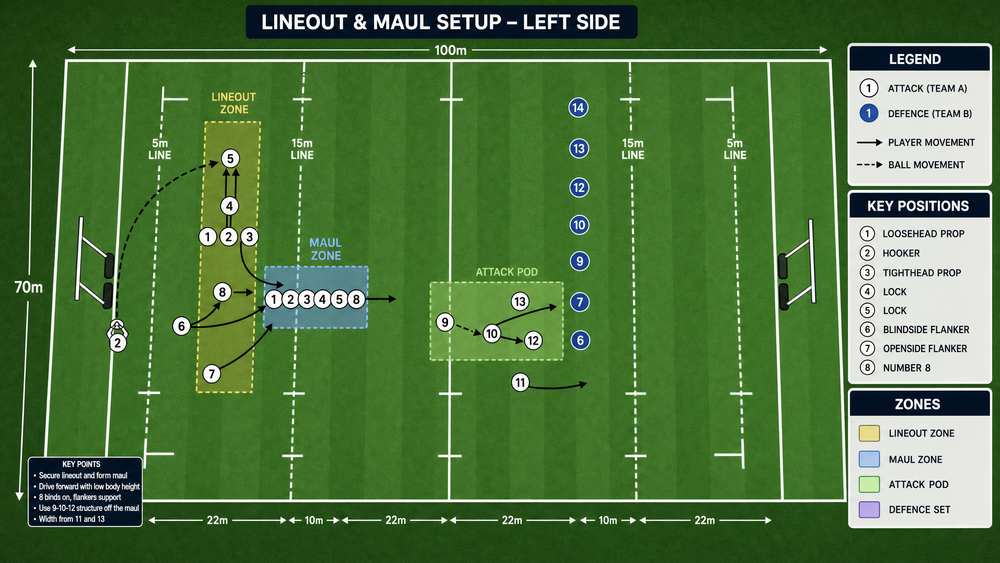
Use the left touchline of a regulation 100m x 70m pitch. Mark the 5m and 15m lines, then set a 15m-long drive lane infield. Put target cones at five and 10 metres to give every drive a clear finish.
| Item | Requirement | Coaching use |
|---|---|---|
| Players | 8 attackers, initially 5 defenders; progress to 8 defenders | Full attacking pack and a credible defensive picture |
| Balls | 2 | Keep work rate high; a second ball resets the next repetition |
| Cones | 10-12 | Mark 5m, 15m, drive lane, and 5m/10m targets |
| Contact shields | 3-5 optional | Useful for a first-contact or youth progression |
| Duration | 20 minutes | 4-minute technical build, 12-minute live work, 4-minute review |
The attacking unit is numbered conventionally: 1 Loosehead Prop, 2 Hooker, 3 Tighthead Prop, 4 and 5 Locks, 6 Blindside Flanker, 7 Openside Flanker, and 8 Number 8. Start with 4 as the jumper; 1 and 3 are the primary lifters. The Hooker throws, then becomes the first organiser at the front of the wedge. The Scrum-half, No. 9, is optional in the early phase, but add them when you want a clean exit or a continuation phase. Defenders align opposite the intended maul, with their front line set square and their remaining players ready to join legally.
3. Step-by-Step Instructions
1. Establish the lineout picture
Set the attacking pack between the 5m and 15m lines. No. 4 is the jumper, with No. 1 and No. 3 as lifters; No. 5, 6, 7, and 8 hold compact support positions one to two metres away. Use non-contesting defence for the first two throws.
2. Throw, lift, and secure the catch
On the Hooker’s call, No. 4 is lifted by 1 and 3, catches with two hands, calls mine, and lands with feet beneath the hips. Demand a balanced, square landing; a sideways landing immediately compromises the maul.
3. Turn, present, and transfer
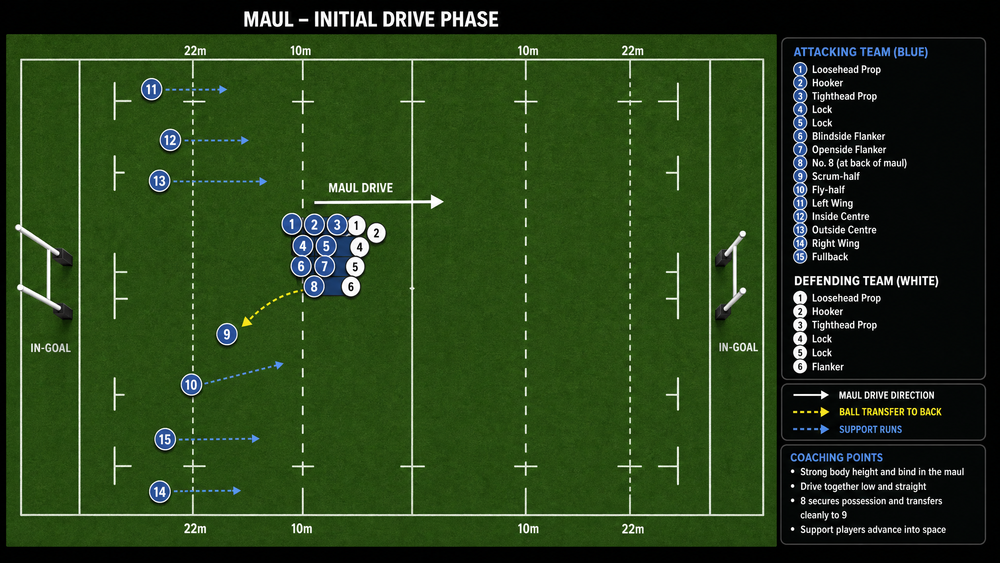
As No. 4 lands, they turn their hips toward the attacking goal line and present the ball backward. No. 1 and No. 3 drop their lifting grip into a strong bind around the jumper’s trunk and upper legs, creating the front wedge. No. 8 arrives under control, takes the ball, and keeps it at the rear of the formation. Set the requirement: transfer is completed within two seconds of the landing. If the ball remains in sight at the front, stop, reset, and repeat.
4. Build the maul around the ball
No. 5 and No. 6 attach through the middle; No. 7 closes the far side; the Hooker joins immediately after the throw and communicates the shape. Every joining player must enter from behind the hindmost teammate, bind to a teammate’s body, and arrive with head and shoulders above the hips. The pack’s first target is a compact square block, not forward movement. Count one, two after the formation; if the maul cannot hold its shape stationary for two seconds, it is not ready to drive.
5. Drive on a single command
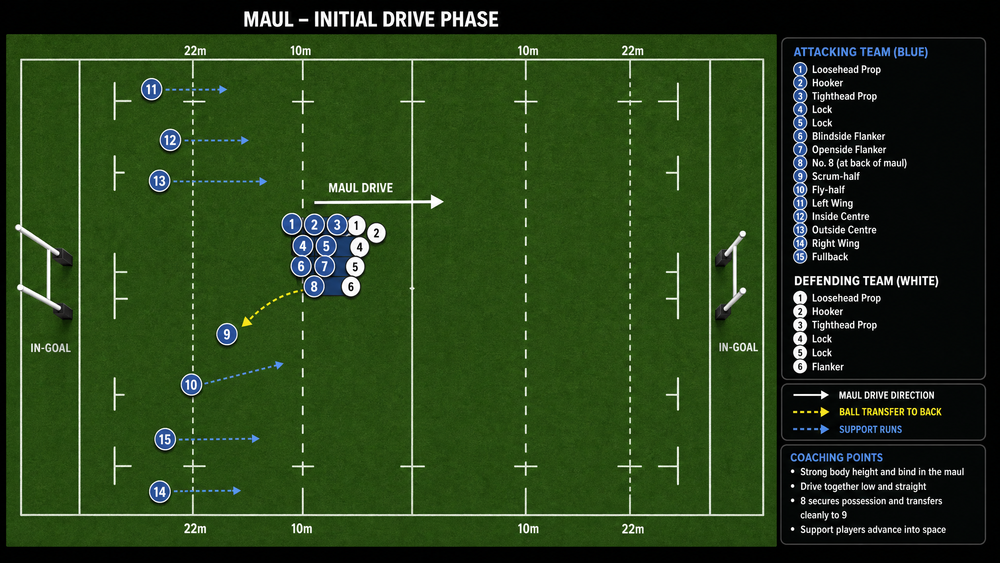
The captain, Hooker, or designated caller gives the command: Set—drive. All players lower together and use short, quick steps. The front wedge stays square to the goal line; No. 8 stays connected at the back and keeps the ball protected between thighs and torso. Drive only five metres on the first live repetition. Stop the unit at the scoring cone, assess the shape, then walk the players back without breaking the order of the maul.
6. Add defence and decision-making
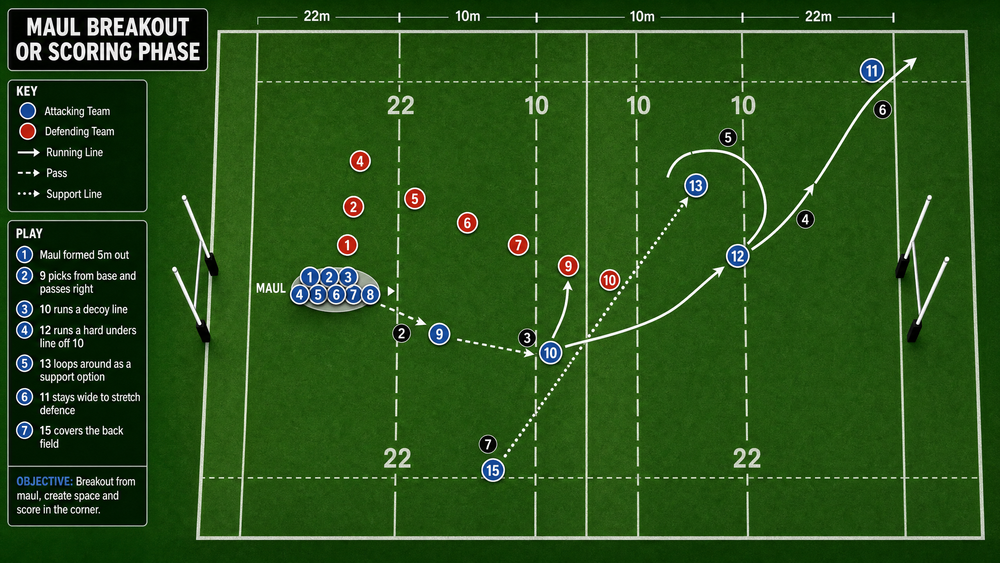
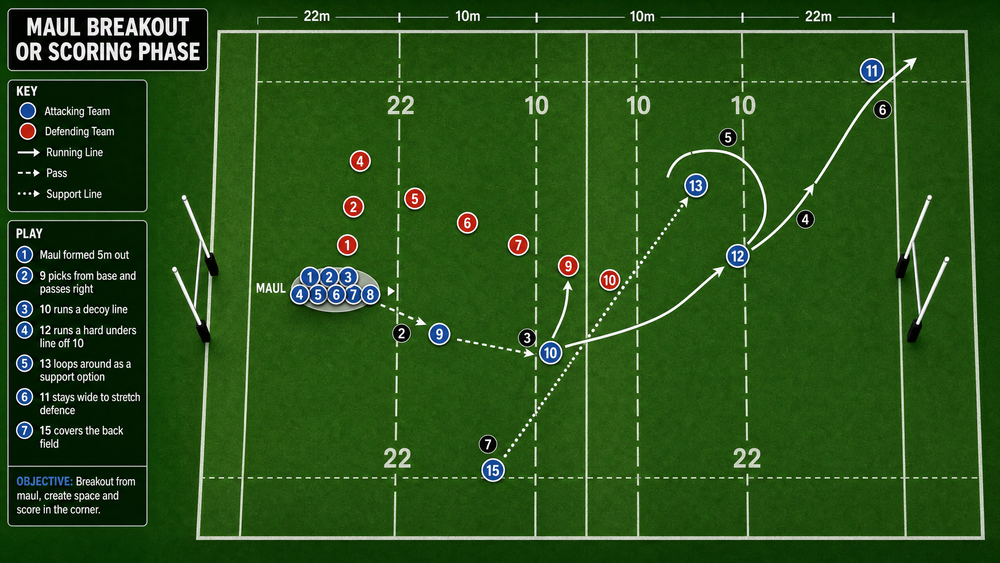
Once the attacking pack can make the five-metre target three times in succession, allow defenders to contest at 60%, then at match intensity. The attackers must identify whether the defensive front is square, whether an edge is soft, and whether a short drive, angle shift, or clean exit is the best option. Add No. 9 after the maul crosses the five-metre cone: No. 9 calls use it, receives from No. 8, and either plays a short forward runner or launches the backline.
4. Key Coaching Points
| Coaching point | What good looks like | Coach cue |
|---|---|---|
| Body height | Hips are below shoulders, backs stay flat, and feet remain alive | Low to win; long spine. |
| Bind quality | Players grip body mass at torso or shorts, not loose fabric | Chest to back, lock the door. |
| Ball position | No. 8 owns the ball at the rear, hidden from the front defence | Ball back before power. |
| Entry discipline | Every supporter arrives from behind and attaches before driving | Build it, then move it. |
| Collective timing | The pack steps together on one command, not in separate surges | One sound, one drive. |
| Shape and direction | The maul remains square and attacks the planned shoulder | Square first; squeeze second. |
Coach from the side and slightly behind the attacking pack, where you can see the ball, the back foot, and the players who are arriving late. Praise the connection that makes the drive possible rather than merely the five metres gained. If the shape is correct but the maul does not move, reinforce body height and step rhythm; if it moves but splinters, reinforce the bind and entry order.
5. Common Mistakes
The first recurring error is rushing the drive before the bind is complete. The fix is to make the two-second stationary hold non-negotiable. A second error is a high, narrow formation, where players stand upright and push with their shoulders rather than their legs. Stop the group, lower the starting height, and rehearse three synchronized steps without opposition. A third error is an exposed ball at the front or side of the maul. Make No. 8 call secured only when the ball is at the rear; no drive begins before that call.
Also correct side entries, props pulling off the jumper, and any turn toward touch. Rebuild the wedge rather than coaching through a poor repetition.
6. Variations & Progressions
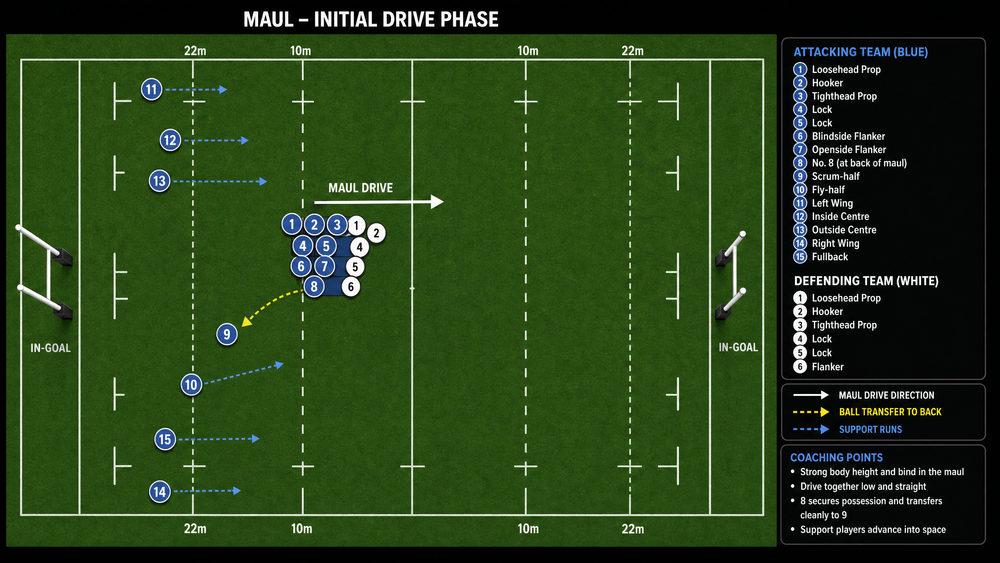
Begin with a shield-drive progression: use three shield holders instead of a contested defence and drive five metres at 60% intensity. This is ideal when teaching the catch-to-wedge transition or when integrating players who are new to lifting. Next, use a live six-versus-six contest. The defence can resist and attempt to halt momentum, while the attack must remain square and earn the five-metre target.
For an advanced progression, call an exit decision at five metres. The coach points left or right; No. 9 calls early, No. 8 presents, and the attack sends a pod around the corner or feeds the backs.
7. Age Adaptations
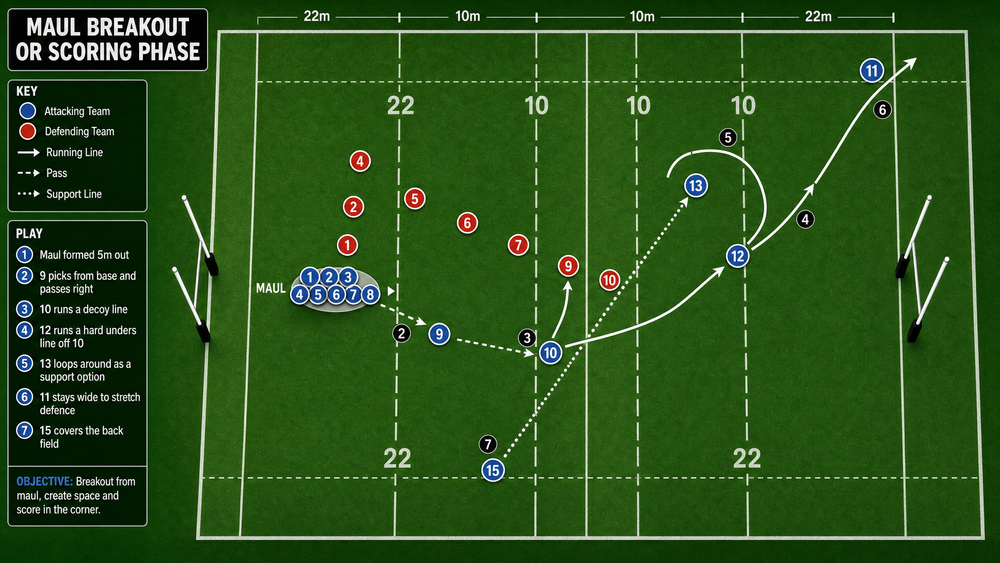
For Under 8 and Under 10, do not run a lifting or contested maul. Use a three-player body-shape and bind activity with bags, teaching low legs, safe connection, and a collective walk forward. For Under 12 and Under 14, introduce the catch and static wedge only where local regulations allow it; keep resistance passive and emphasize safe landing, correct binding, and a clear stop command. For Under 16, use controlled live resistance, a five-metre drive target, and a simple No. 9 exit. At open age, run the full sequence with contested lineout pressure, legal defensive disruption, drive-direction calls, and exit options.
Finish with a 60-second player review: ask No. 4 where the ball became secure, ask No. 8 whether the rear was protected, and ask the caller whether the pack moved as one. Their answers tell you whether the next session needs more detail on catch, bind, or drive.
