Basketball Drills
8 Beginners Rugby Drills for Confident Young Players
Build confident young players with 8 beginners rugby drills covering passing, footwork, tackling, support play, kicking and game decisions.

A chilly training evening begins with a familiar sight. A few young players hold the ball tightly against their chest, some call too late, and others rush forward without looking up. After a few encouraging repetitions, hands come up earlier, passes travel smoothly, and players start moving for one another. The group that arrived as separate individuals begins to look like a team.
That change is the purpose of well-planned beginners rugby drills. Young players need a pathway that starts with simple ball confidence, adds movement and evasion, introduces contact carefully, and finishes with support play and decisions in a game-like setting. The drills below follow that order. Each one includes a clear goal, setup, steps, progression and coaching cues, so you can adapt the session to your players rather than forcing every child into the same level of challenge.
England Rugby's coaching pathway begins children with touch and tag activities before contact progression and set-piece work, while World Rugby's children's activity list includes games such as Rob the Nest, Sharks and Fishes, End Ball, Relay Races, Ball Familiarisation, Simple Passing, 4 v 2 Continuous Touch and Overload Touch. That progression supports confident learning through repetition, evasion and small-sided play. Contact work must always have qualified supervision and an age-appropriate approach.
1. Pass and Catch Progression
A clean pass gives a young player more than a technical skill. It gives them a reason to look up, communicate and trust a teammate. Start with pairs standing a short distance apart, each pair sharing one ball. Players show their hands, call clearly, receive the ball in front of the body and return it with a controlled pass.
The first stage should feel easy. Ask players to keep their shoulders facing the target, move their hands towards the ball and pass towards the receiver's outside shoulder. Once the pairs find a steady rhythm, place cones along a straight passing lane and have them walk laterally while passing. Keep groups small, ideally two to four players, so everyone gets frequent touches.

Build rhythm before speed
Players often throw harder when they feel uncertain. Slow the drill down and reward a catch that is prepared early, followed by immediate movement. A loud call helps the passer know that the receiver is ready.
- Hands early: Present the hands before the ball arrives.
- Call loudly: Use the receiver's name or a clear “here”.
- Pass in front: Give the teammate time to catch and continue.
- Move after passing: Don't stop and admire the pass.
- Add pressure gradually: Increase movement only when accuracy stays reliable.
Use the rugby passing drills resource for further drill ideas and video-supported technique practice. Vanta Sports drill cards can also help you record the progression from stationary handling to passing on the move.
World Rugby's children's activities place simple passing alongside ball familiarisation and small-sided games, reinforcing the value of repeated, accessible handling practice. A passing session can finish with a gentle challenge, such as counting consecutive accurate passes, but keep the focus on communication and support rather than speed alone.
2. Footwork and Agility Ladder Drills
Lay an agility ladder flat on the ground and invite players to step through it with control. Begin with one foot in each space, then progress to two feet, lateral shuffles and high knees. The ladder creates a clear route, but the lesson is balance, body control and the ability to change direction without losing shape.
Demonstrate each pattern slowly. Young players should keep their chest lifted, bend slightly through the knees and place their feet with control. Speed can come later. If a player clips the ladder while trying to rush, reset the movement and praise the controlled attempt.

Turn footwork into rugby movement
Create a small circuit with a ladder, cones for a change of direction and a ball-handling station. Players might step through the ladder, collect a ball, accelerate to a cone, decelerate under control and pass to a partner. This keeps the exercise connected to rugby rather than treating footwork as an isolated test.
Control comes first. A balanced player who changes direction well is learning more than a player who races through the ladder and loses their posture.
Short intervals keep attention high. Give players time to recover, then rotate them through different patterns so the session feels varied. You can use the footwork and landing technique drill as a reference when planning movement quality and safe changes of direction.
Equipment doesn't need to be complicated. A ladder, cones and rugby balls are enough, and an agility equipment guide from SoccerWares can help clubs compare suitable training equipment. Finish with a playful reaction cue. Call “left”, “right” or “turn”, and ask players to respond with their feet while carrying the ball. That simple change makes them scan and react instead of memorising a pattern.
3. Evasion and Sidestep Drill
A young ball carrier doesn't need to overpower a defender to create space. They can change speed, shift their weight and step into a better lane. Set up a compact grid, using cones to mark a channel. Players run towards a cone or stationary marker, plant one foot, move laterally and accelerate into space.
Start without defenders. Ask players to approach under control, lower their centre of gravity, keep the ball secure and push away from the planted foot. The sidestep should be a change of direction, not a large jump. Players should finish by running through the space rather than stopping after the step.
Add opposition in layers
Once the movement is comfortable, use a passive defender who holds position and gives the attacker a visual target. Later, the defender can drift or offer semi-active opposition, but the exercise should remain controlled. Rotate players through attacker and defender roles so they learn how both sides read space.
- Eyes up: Look at the defender's hips and available space.
- Change pace: Approach calmly, then accelerate after the step.
- Stay balanced: Keep the feet underneath the body.
- Protect the ball: Carry securely through the change of direction.
- Praise technique: A well-executed step matters even when it doesn't beat the defender.
A small grid keeps repetitions frequent and reduces long runs or collisions. Use positive language such as “show the space”, “plant and push” and “finish the run”. If you record a few examples with Vanta Sports video capture, review the player's balance and foot placement rather than focusing only on whether the defender was beaten.
England Rugby's age-grade resources use Game Zones and Skill Zones to build confidence and core skills progressively. That approach fits evasion work well. Players can learn to move around opposition before they're asked to solve a full defensive situation.
4. Tackle Technique and Contact Drill
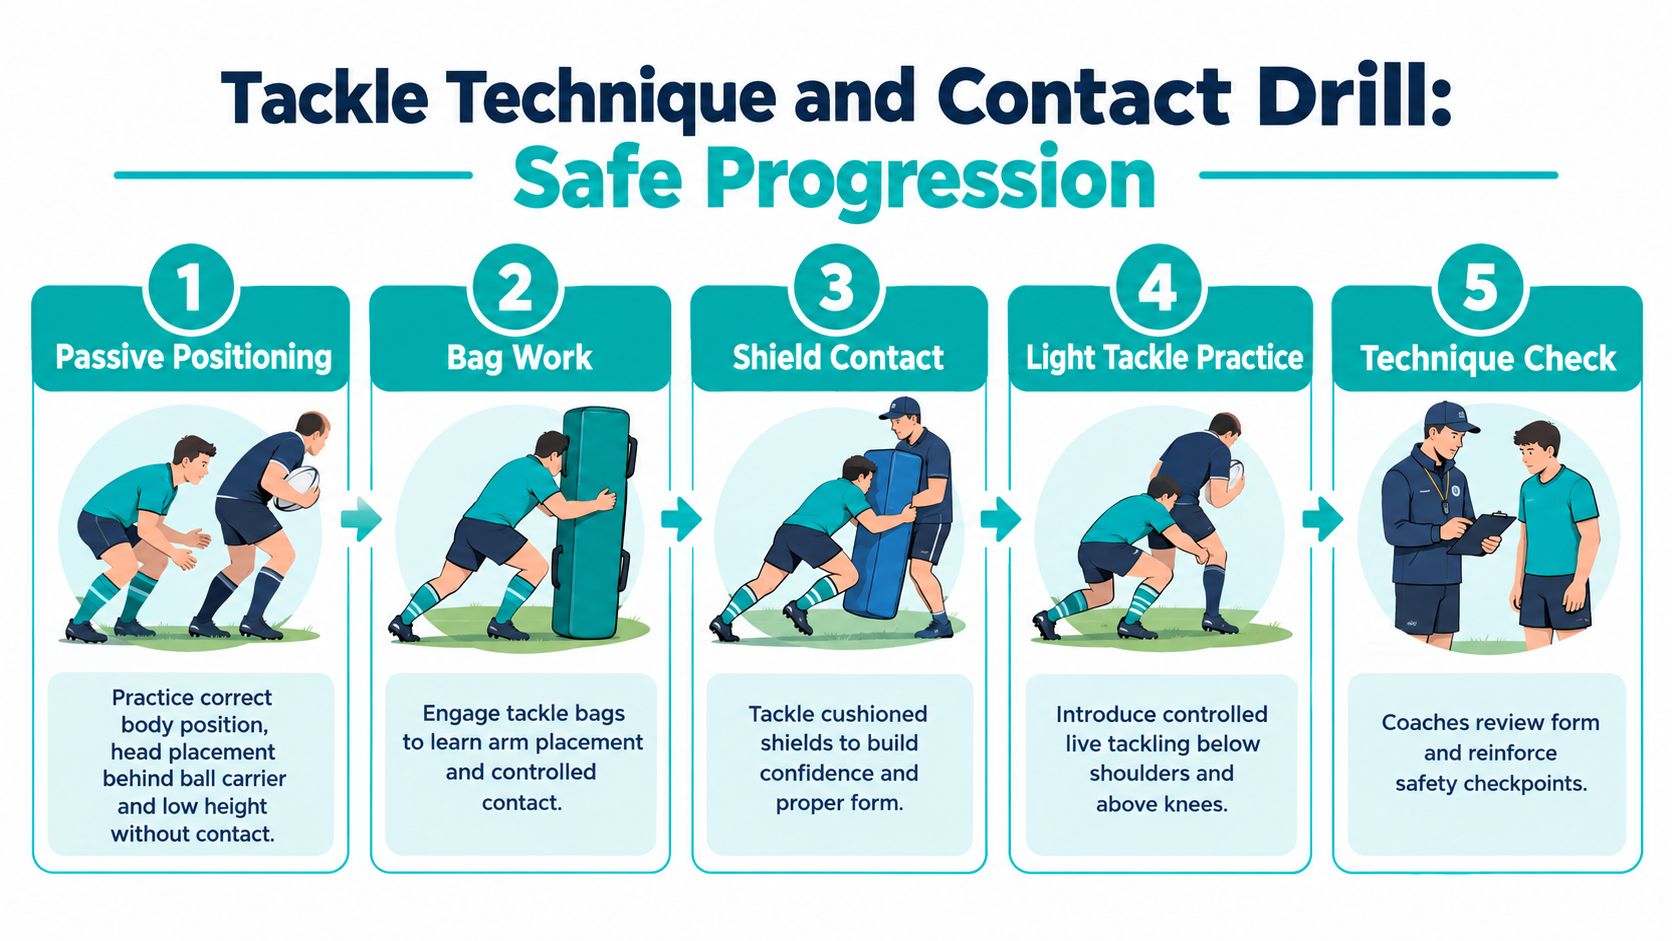
A player reaches a tackle bag, lowers their body and pauses before contact. That pause gives the coach time to check the shape. Begin with rehearsal rather than live tackling. Players move towards the bag, bend through the knees and hips, place the head safely to the side and wrap both arms around the target while keeping the neck stable.
Use tackle bags or cushioned shields for the next stage. The ball carrier walks, then jogs at a controlled pace. The tackler practises alignment, shoulder contact and a secure wrap. Progress to light, age-appropriate tackle work only after players understand the movement, close supervision is available and the environment is suitable.
Coach the sequence before adding pressure
Teach the tackle as a sequence, like lowering a strong, balanced bridge: set the feet, lower the body, place the head safely, make contact and complete the wrap. Keep the head behind the ball carrier, make contact below the shoulders and above the knees, then drive through under control. Praise the shape and finish, not the noise of the collision.
- Strong neck: Keep the head stable and protected.
- Head behind: Place the head behind the ball carrier, away from the impact point.
- Low body height: Bend through the knees and hips.
- Safe contact area: Tackle below the shoulders and above the knees.
- Controlled finish: Complete the wrap without reckless force.
Keep early repetitions slow enough for players to identify each stage. The coach can call “feet, head, wrap” as a simple rhythm, then remove the prompts as technique becomes more reliable. Rotate roles so players practise carrying, tackling and observing. The observer can identify one safe action before the next repetition.
England Rugby's player-welfare guidance includes Activate as part of training preparation, with a recommended fifteen-minute add-on and a phased six to eight week progression. England Rugby's Activate guidance can help coaches build movement preparation into youth sessions.
Start with non-contact or tag activities before progressing to contact. Suspected head injuries require immediate removal, and any return to rugby must follow the appropriate medical and age-grade process. Community rugby uses a minimum twenty-one-day return-to-play process after concussion, with phased activity and concussion-awareness education through the relevant pathway. Early practice should favour unopposed passing, shadow running and touch or tag games. Use this technique progression with qualified coaching and current welfare guidance.
5. Support Play and Off-Ball Movement Drill
A ball carrier rarely has a useful option alone. Set up three attackers with cones marking inside, middle and outside channels. One carries the ball while the other two run at different depths, learning how support creates the next pass.
Begin at walking pace. The carrier moves towards a cone, while the support players adjust to offer one inside and one outside option. Stop after each repetition and ask, “Which pass was safest, and why?” Players begin to connect their running line with the space around them, rather than chasing the ball.
Let the picture guide the run
A support player should stay slightly behind the carrier, communicate early and change direction as the defence shifts. Use a simple picture: the carrier is the front of a moving triangle, while the support players form the two rear points. If one point disappears, the carrier has fewer safe choices.
- Create width: Use open space instead of bunching together.
- Keep depth: Stay behind the carrier so a pass remains available.
- Call early: Tell the carrier where support is coming from.
- Change the line: Run inside, outside or directly behind as space changes.
- Rotate positions: Let every player carry, pass and support.
Start with cones or stationary players. Then introduce moving teammates and a passive defender. The defender should provide a clear picture without creating pressure that makes young players rush. Pause when the group loses shape, reset the positions and repeat the same decision at a slower speed.
Vanta Sports' tactical diagram tools can show the intended shape before practice begins, helping players see why width and depth give the carrier more choices.
England Rugby's Game Zones and Skill Zones offer an age-appropriate model for linking confidence with skill development. Support play builds on passing by turning an individual technique into a shared attacking habit. Finish with a three-on-two activity. Ask the attackers to fix one defender before passing, then praise the player who creates the option as well as the player who receives the ball.
6. Breakdown and Ruck Preparation Drill
A player falls on the ball, and two teammates arrive at different speeds. Beginners often rush straight in, lose balance or reach for an opponent. Slow the picture down first. Place the ball carrier on the ground with the ball presented safely behind them. The support player walks in, lowers their body and rehearses safe foot and hand placement while protecting possession.
Build the skill in layers:
- Position first: Approach from the correct direction and keep a stable base.
- Arrival next: Reach the breakdown under control, with eyes on the ball area.
- Pressure later: Add a shield or controlled opposition only when players can hold good shape.
A stationary defender can act as a visual obstacle. Ask the support player to work over the ball area without grabbing around the opponent or making unsafe contact. Keep the pace slow enough for immediate coaching. Explain that securing possession and attacking a person are different actions, with technical and legal requirements for each.
“Arrive balanced, protect the ball and make the next decision.”
Use a short practice block, then return to a less physical skill. Rotate the carrier, support player and defender roles so each player understands the job and the safety responsibility attached to it. Stop the repetition if body position breaks down, reset the picture and try again at a slower speed.
Useful coaching cues include:
- Approach legally: Enter from the correct direction.
- Stay low and stable: Build a strong base before engaging.
- Use safe hands: Focus on the ball and the legal contest.
- Communicate clearly: Call whether the ball is available or needs protection.
- Reset poor shape: Quality and safety come before speed.
The ruck clear-out and clean-out drill can help coaches plan this introduction. Apply current age-grade laws and welfare guidance, and supervise every progression stage. Vanta Sports can record observations such as arrival angle, body position and engagement control, giving coaches practical feedback for the next repetition.
7. Kicking Fundamentals Drill
Start with a target gate and a stationary ball. Players can focus on balance, foot placement, contact and follow-through without managing a run at the same time. Ask them to kick through the gate for accuracy, then gradually increase the distance when control remains consistent.
Place the ball in the same position for each attempt. The non-kicking foot points towards the target, while the eyes stay on the ball through contact. Players should finish with their body moving towards the target. Keep the activity away from a power contest. A short kick through the gate teaches more than a long kick that loses direction.
Give the kick a reason
After the stationary practice, introduce a punt from a moving ball. Players take a few controlled steps, drop the ball cleanly and follow through into a marked channel. Practise both feet where appropriate, while limiting corrections to one or two clear points at a time.
Pause between repetitions for a quick scan. Ask, “Where's the space?” or “What's behind the defence?” The answer should shape the kick. A player might seek territory, apply pressure or move the ball into open space. Keep the explanation practical: look up, identify the picture and connect the technique to that choice.
Use these cues during short practice blocks:
- Aim before kicking: Pick a target and keep the eyes focused.
- Prioritise accuracy: Build repeatable technique before distance.
- Follow through: Finish towards the target, not across the body.
- Use both sides: Develop comfort kicking in different directions.
- Keep the session brief: Reset before concentration turns into rushed attempts.
Change the target gate or channel to make progress visible. Vanta Sports performance records can help coaches track individual practice and recognise consistency. A friendly target challenge can add energy, with each player comparing control with their own earlier attempts rather than feeling embarrassed by misses. Rotate the kicker and reset the ball promptly, so the drill stays active while technique remains the priority.
8. Game Awareness and Decision-Making Drill
A player can pass, sidestep and kick, yet still struggle to choose the best option. Small-sided games turn that challenge into a visible learning moment. Mark a reduced area and begin with three attackers against three defenders or four against four. Use simple rules and give the group one clear problem to solve.
Start with a passing condition before adding more choices. For example, the attacking team must pass before scoring. Next, reward a run into space. Later, let players choose to pass, carry or kick. These stages work like a set of training wheels: they limit distractions first, then give players more control as their understanding grows.
Pause briefly when a decision deserves attention. Ask, “What did you see?” or “Why did you choose that option?” Keep the question open, then let the player explain before offering one practical cue.
Praise the thinking, not only the scoreboard. A sensible pass can create space without producing a try. A run can hold a defender in place, while keeping possession can be the right choice after the space closes.
Use these coaching adjustments:
- Reduce the space: Give more players frequent chances to attack and defend.
- Set one challenge: Keep the learning target easy to remember.
- Rotate positions: Help players read the game from both sides.
- Pause with purpose: Ask about what they noticed, not only what happened.
- Review key moments: Discuss the choice and its result together.
Children's activity guidance from World Rugby includes small-sided formats such as 4 v 2 Continuous Touch and Overload Touch. These formats give beginners repeated practice in passing, evasion and support without starting with full-contact play. England Rugby's Kids First Skills Series also uses age-grouped Game Zones and Skill Zones to build confidence gradually.
Record a short game with Vanta Sports and review one or two decisions with the group. Ask, “Where was the space?” and “Who could support?” Coaches can use this rugby training drills resource to connect isolated techniques with game-based practice. Keep the tone positive. A thoughtful mistake gives the team a useful question to solve next time.
8-Drill Comparison: Beginner Rugby Skills
| Drill | Implementation Complexity 🔄 | Resource & Setup ⚡ | Expected Outcomes ⭐📊 | Ideal Use Cases | Key Advantages & Tips 💡 |
|---|---|---|---|---|---|
| Pass and Catch Progression | 🔄 Low → Moderate, linear progression, coach-led | ⚡ Minimal (1 ball), small groups, moderate space | ⭐⭐⭐ Improves passing accuracy, timing, communication 📊 | Beginners, warm-ups, large-group skill sessions | 💡 Start stationary → add movement; use cones; keep groups 2–4 |
| Footwork and Agility Ladder Drills | 🔄 Moderate, pattern repetition, coach oversight | ⚡ Agility ladders, cones; compact setup; timed intervals | ⭐⭐⭐⭐ Boosts foot speed, balance, injury prevention; measurable gains 📊 | Speed development, warm-ups, conditioning circuits | 💡 Demonstrate slowly; combine with ball-handling; track progress |
| Evasion and Sidestep Drill | 🔄 Moderate, progressive (passive → semi-active) | ⚡ Cones/markers, space; optional passive defenders | ⭐⭐⭐ Enhances evasive footwork, explosiveness and confidence 📊 | Attacking skill work, small groups, decision-making under pressure | 💡 Begin with cones, rotate defender role, emphasize balance |
| Tackle Technique and Contact Drill | 🔄 High, safety-first progression, close supervision required | ⚡ Tackle bags/shields, protective gear, experienced coaches, clear space | ⭐⭐⭐⭐ Teaches safe tackling biomechanics; reduces injury risk 📊 | Contact preparation, defensive coaching, older beginners | 💡 Never skip non-contact phase; short focused reps; coach oversight |
| Support Play and Off-Ball Movement Drill | 🔄 Moderate → High, conceptual, requires explanation | ⚡ Cones, space, tactical diagrams; whole-team or small groups | ⭐⭐⭐ Improves spatial awareness, timing, team cohesion 📊 | Team sessions, teaching attacking systems, transition to play | 💡 Simplify concepts first; use diagrams; rotate positions to build understanding |
| Breakdown and Ruck Preparation Drill | 🔄 High, technical and safety-critical progression | ⚡ Minimal kit but high coaching expertise and space | ⭐⭐⭐ Prepares legal ruck technique and contested possession skills 📊 | Forward development, contact preparation, older juniors | 💡 Progress slowly; focus on hand placement and positioning; short focused drills |
| Kicking Fundamentals Drill (Punt and Place Kick) | 🔄 Moderate, technical repetition, individualized coaching | ⚡ Open space, cones/targets, balls; can be solo practice | ⭐⭐⭐ Improves accuracy, kicking decision-making and consistency 📊 | Specialist skill training, free practice, position-specific work | 💡 Start with place kicks, prioritize accuracy over distance; track metrics |
| Game Awareness and Decision-Making Drill | 🔄 Moderate → High, scenario-based, coach-guided feedback | ⚡ Reduced fields, cones, small groups; video review helpful | ⭐⭐⭐⭐ Develops rugby IQ, integrates multiple skills under pressure 📊 | Small-sided games, tactical learning, progression to match play | 💡 Use constraints, pause to coach decisions, reward smart play rather than outcomes |
Turn Eight Drills into a Positive Training Path
These eight drills work best as a pathway, not as eight disconnected activities. Begin with passing and catching while players are fresh. Add footwork and evasion so they can move with the ball and find space. Introduce tackle technique only when the group is ready, the progression is controlled and qualified supervision is present. Then connect the skills through support play, breakdown preparation and a small-sided game.
A practical session can open with ball familiarisation and passing, followed by movement through cones or an agility ladder. Players can then practise a sidestep against a cone or passive defender before returning to a handling activity. If the group is ready for contact, use a short tackle-bag progression with clear technical cues. Finish with support lines and a small-sided game that gives players a reason to pass, run and communicate.
A sample junior minis session uses a sixty-minute structure with five minutes for welcome and head count, ten minutes for a fun warm-up game, ten minutes for movement work, three minutes for water, twelve minutes for handling and fifteen minutes for a small-sided game. That format keeps players active while building in a deliberate break. You can adapt the order and timings to the age, weather, facilities and experience of the group.
Choose one observable focus per session. You might look for hands presented early, a balanced sidestep, a safe tackle shape, a support runner staying behind the ball carrier or a player explaining why they chose to pass. One focus gives young players a target they can understand, and it gives coaches a clear way to provide feedback.
Praise brave attempts and useful communication. A child who calls for the ball, tries a new running line or resets after a dropped pass is already developing. Confidence grows when players feel that mistakes are part of practice rather than a reason to stop trying.
Keep mixed-experience groups moving by adjusting the challenge rather than separating players from the whole session. Beginners can work with stationary targets or touch defenders, returning players can add movement, and confident players can solve a more demanding decision. That approach gives everyone repetitions without exposing less-ready children to unnecessary contact.
Safety remains part of every drill. England Rugby's Headcase guidance supports concussion awareness and a phased return after injury, while current age-grade rules determine when and how contact can be introduced. In England, the RFU's age-grade tackle-height guidance uses the imagined line between the armpits for under-nine to under-fourteen rugby and extends the same height to under-fifteen to under-eighteen rugby. World Rugby's community law wording describes tackle height at the waist or base of the sternum, with match organisers able to choose the applicable line within their jurisdiction, so coaches must follow the rules governing their competition.
Vanta Sports can help organise drill cards, attendance, feedback and player development records across the season. Coaches can plan sessions, record observations and keep families informed, while players can see progress through performance tracking and other development features. The system should support your coaching, not replace your judgement.
The most important result is simple. Young players should leave training feeling more confident, more connected and eager to return. With clear progressions, frequent touches, positive cues and consistent practice, beginners can grow from tentative ball handlers into teammates who see space, support one another and make brave decisions.
Vanta Sports gives rugby coaches drill cards, session planning, attendance tools, feedback records and player development tracking in one connected platform. Visit Vanta Sports to organise your beginners rugby drills and give young players a clearer, more encouraging path through the season.
Tags