

Basketball
High Pick-and-Roll Execution: Create the Advantage and Read the Help
A progressive half-court practice sequence that teaches ball-handlers, screeners and spacers to create a two-on-one and make the correct coverage read.
What you need
3 basketballs, 10 pinnies, 6 flat cones, stopwatch or visible timer
Pick-and-Roll Execution: Create a Two-on-One, Then Punish the Help
Overview
This is an intermediate, 20-minute half-court drill that gives coaches a repeatable way to teach the pick-and-roll as a connected five-player action rather than a two-player trick. The objective is simple: No. 1, the point guard, and No. 5, the centre, must force the first defensive decision; Nos. 2, 3 and 4 then hold usable spacing and move only when their defender commits. Use it after your players know basic dribbling, passing and screening mechanics, and before you install live five-on-five continuity or late-clock actions.
The drill begins with a high ball screen and progresses from guided reads to a live finish. The court markings in the diagrams reflect a FIBA playing court: 28 m long by 15 m wide, with the free-throw line 5.80 m from the endline and the three-point arc at 6.75 m from the basket centre.1 This gives players real reference points for screen location, driving lanes and corner spacing.
Coach’s outcome: Create a quality first advantage, read the screen defender before the ball sticks, and deliver a pass that arrives on time and on target.
Setup
| Item | Coach setup |
|---|---|
| Players | 10 players: offence Nos. 1–5 and defence D1–D5. With fewer numbers, start in 2-on-2 and use coaches or passers in the perimeter spots. |
| Court | Use the frontcourt of a 28 m × 15 m FIBA floor. Start No. 1 one step above the centre circle, directly in line with the basket. |
| Equipment | 3 basketballs, 10 pinnies, 6 flat cones and a stopwatch or visible timer. |
| Cones | Place two cones 1 m apart at the screen location, just above the top of the key. Mark the right corner and left slot with cones if players drift. |
| Rotation | 1 → 2 → 3 → 4 → 5. Defenders rotate with their offensive partner. Run 4 reps each, then change screen side. |
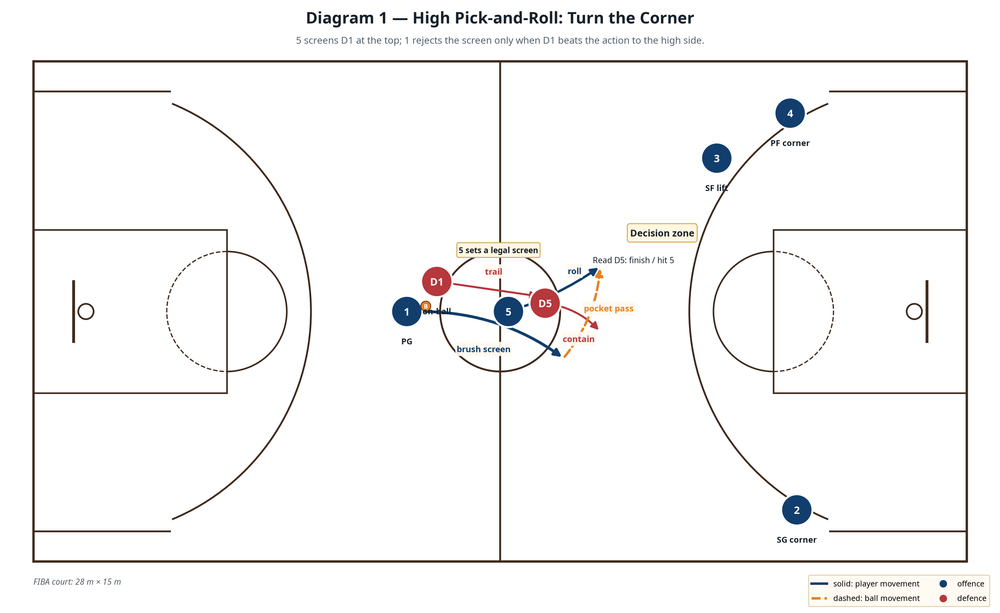
Place No. 5 at the right shoulder of D1, ready to screen with a legal, balanced base. No. 2 is in the right corner, No. 3 starts on the weak-side wing, and No. 4 is in the weak-side corner. D1 guards the ball; D5 begins at screen level. For the first two minutes, tell D5 which coverage to play. After that, let D5 choose the coverage but require clear communication.
Step-by-Step Instructions
Teach the starting picture. No. 1 dribbles to the cone at a controlled pace and approaches No. 5 with the defender on their hip. No. 5 arrives before the ball, is stationary before contact, plants both feet outside the defender’s path, and presents a wide, stable target. Do not allow a casual screen set from 2 m away; make No. 5 sprint into the action, stop, then screen.
Win the shoulder. On the coach’s whistle, No. 1 uses a tight shoulder-to-hip path past No. 5. The ball-handler should take one decisive dribble off the screen, getting the defender behind their shoulder. If D1 jumps above the screen, No. 1 rejects to the open side; otherwise No. 1 comes off tight enough that D1 cannot slip through the gap.
Make the first read early. No. 1’s eyes find D5 before the second dribble. Against drop coverage, No. 1 attacks downhill to the free-throw-line area and reads the pocket pass to No. 5. Against a switch, No. 5 seals the smaller defender inside the lane. Against a hard show or hedge, No. 1 keeps the dribble alive long enough to create a passing angle, then hits the short roll.
Roll with purpose. As soon as No. 1 clears the screen, No. 5 opens the chest to the ball and rolls on a direct line to the rim. No. 5 shows a target hand, keeps a passing window between the defender and the body, and finishes with two feet whenever possible. One dribble by the roller is the limit in the guided phase.
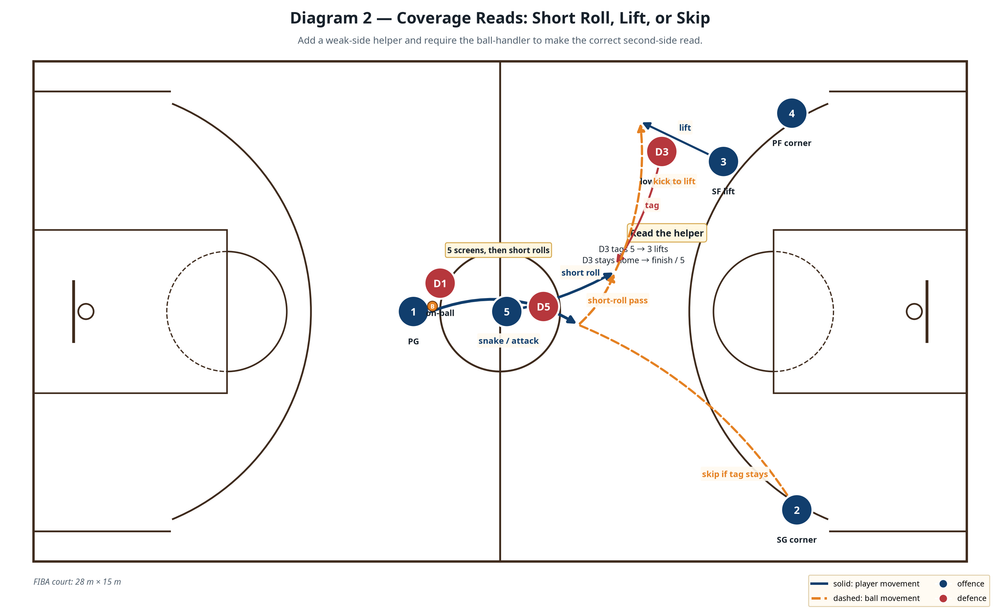
Hold spacing, then react. No. 2 stays ready in the strong-side corner; No. 4 stays low on the weak-side corner; No. 3 is the weak-side lift option. Perimeter players do not drift toward the ball. When D3 tags the roll, No. 3 lifts two or three steps to create a visible passing lane. This is not an automatic movement: the lift happens because help has committed.
Finish the possession. Begin with a 6-second clock from the moment No. 5 sets the screen. The offence must create a lay-up, paint touch, roller finish, or catch-and-shoot three before the horn. Score one point for a correct read and one point for a made shot. Award the defence one point for a stop, deflection or forced low-value shot.
Key Coaching Points
- Screen angle decides the action. No. 5 should screen D1’s route, not merely stand near the ball. The inside foot points toward the defender’s path; the chest stays square and the hands are visible. Correct illegal movement immediately.
- The ball-handler owns the pace. Slow down to set up the screen, then explode through the hip. A fast approach with a wide turn gives D1 a clean route over the screen.
- Read the low defender, not the pass you planned. No. 1 should name the coverage aloud in the learning phase: “drop,” “switch,” “show” or “under.” Verbalising the read teaches scanning before the ball is trapped.
- Make the pocket pass flat and early. The ball should travel into No. 5’s chest-level window before D5 can recover, not bounce at the roller’s feet.
- Punish the tag with spacing discipline. No. 3 lifts only after D3 tags. No. 2 and No. 4 stay deep enough to keep their defenders out of the ball-handler’s driving lane.
- Train the second decision. If the roller catches at the foul-line area, No. 5 must make a finish, floater, kick-out or one-more pass within one second.
Common Mistakes
| Mistake | Immediate correction |
|---|---|
| No. 5 moves into D1 or leans at contact. | Freeze the screen. Rehearse sprint–stop–screen, with both feet set before No. 1 uses it. |
| No. 1 turns the corner too wide. | Place a cone 30 cm from No. 5’s outside hip. Demand that the first dribble clears the cone. |
| No. 1 reads D1 only. | Put a coach behind D5 holding up a coloured card. No. 1 must call the colour before passing or shooting. |
| Perimeter players drift toward the action. | Mark the two corners and weak-side lift spot. Stop the rep if a helper can guard two players without moving. |
| The roller runs underneath the basket. | Teach No. 5 to roll through the front of the rim and present the target hand in the pocket window. |
Variations & Progressions
Start with 2-on-2 guided coverage. Keep Nos. 2, 3 and 4 as stationary passers and call D5’s coverage before each rep. This is the best entry point when players are learning screen angle and the pocket pass.
Progress to 3-on-3 with the low helper. Add No. 3 and D3 on the weak side, then allow D3 to tag the roller or stay home. The ball-handler must identify the helper’s decision and choose roller, lift or finish.
Finish with live 5-on-5, 8-second constraint. Play from a high pick-and-roll, but the offence scores only when the possession includes a paint touch, a roller touch or a clean catch-and-shoot created by the action. Rotate the defensive coverage every two possessions so the ball-handler cannot pre-plan the answer.
Age Adaptations
For Under-10, run 2-on-0 and 2-on-2. Use a softer “screening wall” coaching cue, stop the ball-handler at the screen to point out the route, and allow one extra dribble for the roller. Avoid teaching complex coverage vocabulary; use “defender stays back” and “defender comes up.”
For Under-12, use 2-on-2 plus a corner passer. Keep the screen 1–2 m above the three-point line, limit the decision to drive or roll, and require the ball-handler to use the screen on the correct side. Do not over-coach the skip pass until players can deliver the pocket pass cleanly.
For Under-14 and above, use the complete 5-on-5 version. Add switches, ICE/blue side coverage, weak-side tags and late-clock constraints. Demand that No. 1 calls the coverage, No. 5 communicates the screen side, and the weak-side wing identifies whether the tag has created the lift or the skip.
Coach’s Debrief
End with two questions: “What told you to pass to the roller?” and “Who moved when help committed?” If players can answer those precisely, the drill has trained a transferable decision. If not, shorten the action, return to guided coverage, and teach the picture again before adding speed.
