

Football
Mastering the 4-3-3 Build-Up: Attracting the Press to Break Lines
Learn how to orchestrate a composed build-up from the back, using the goalkeeper and No. 6 to attract the press and release your full-backs into space.
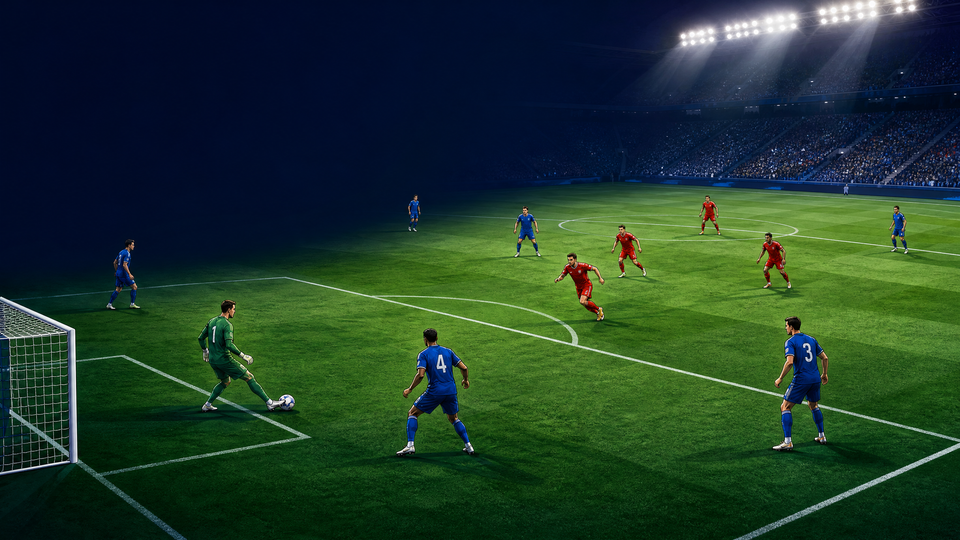
What you need
Full-size pitch, Standard match balls, Flat markers (optional for zones), Bibs (2 colours)
Overview
Building from the back in a modern 4-3-3 shape is designed to draw the opposition press forward, create numerical superiorities deep in your own half, and sequentially break lines to find attacking players in isolated 1v1 situations. This set play focuses on using the goalkeeper (No. 1) and the holding midfielder (No. 6) to orchestrate the first phase of possession, baiting an aggressive high press, and rapidly exploiting the vacated space via the full-backs and advanced midfielders.
It is highly effective against teams that press with a front three, as it forces their wingers to make difficult decisions between jumping to the centre-backs or staying attached to the full-backs.
Setup
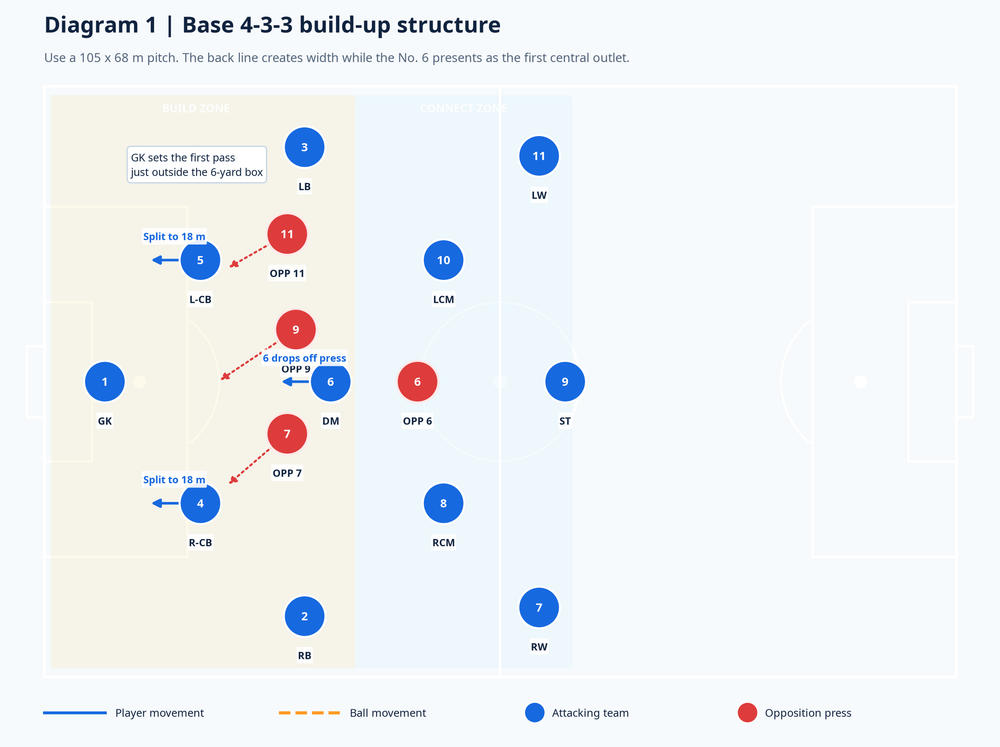
For this pattern, you will need a full-size pitch (ideally 105m x 68m) or a scaled equivalent that preserves the tactical distances. Set up a standard 11v11 scenario.
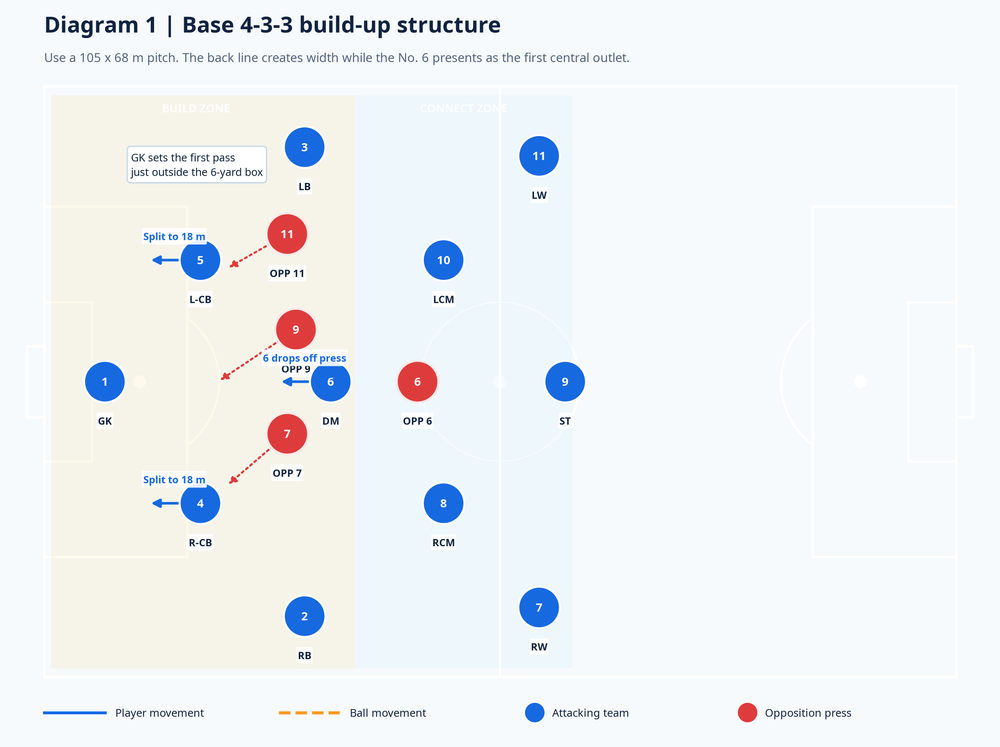
Your team will start in an expansive 4-3-3 structure:
- Goalkeeper (1): Positioned centrally, just outside the six-yard box, acting as the primary pivot.
- Centre-backs (4 & 5): Split wide to the edges of the penalty area, approximately 18 metres apart.
- Full-backs (2 & 3): Pushed high and wide, hugging the touchline to stretch the first line of pressure.
- Holding Midfielder (6): Positioned centrally, ready to drop into the space between the centre-backs or offer an angle to the side of the pressing striker.
- Advanced Midfielders (8 & 10): Positioned in the half-spaces, behind the opposition's midfield line.
- Wingers (7 & 11): High and wide, pinning the opposition full-backs.
- Striker (9): Occupying the opposition centre-backs to maintain depth.
Provide standard match balls, and use flat markers to define the "Build Zone" (the defensive third) and the "Connect Zone" (the middle third) if your players need visual cues.
Step-by-Step Instructions
Phase 1: Establishing the Structure
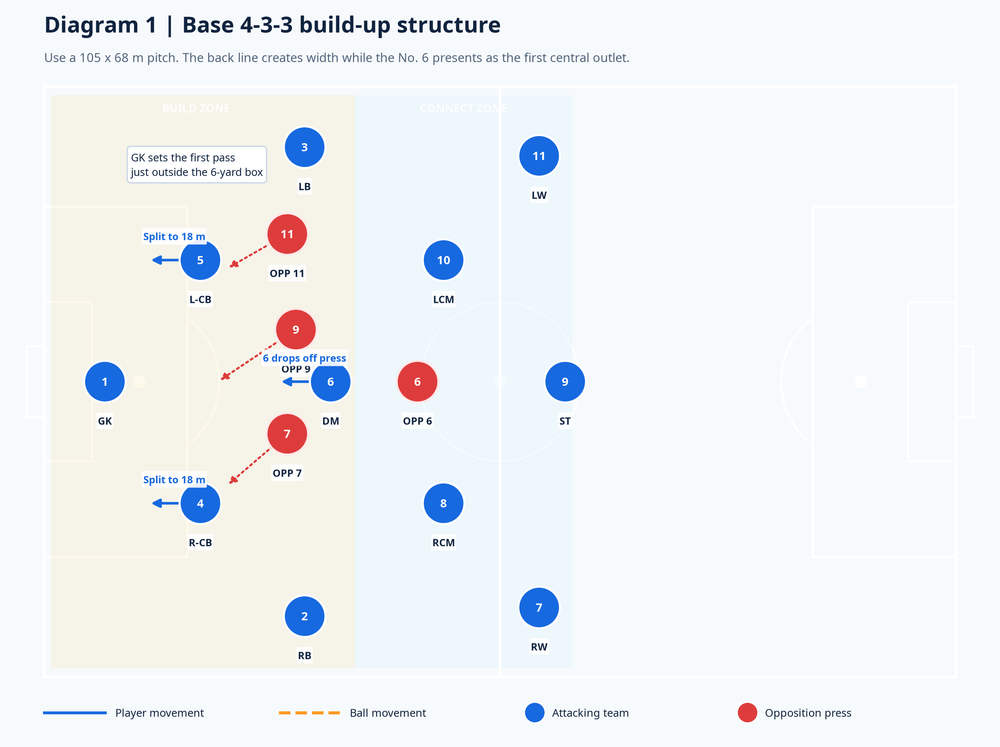
- The goalkeeper initiates the play with the ball at their feet, central and just outside the six-yard box.
- The centre-backs immediately split to the edges of the penalty area, creating maximum width across the backline.
- The holding midfielder (No. 6) drops off the opposition marker to present a clear, central passing lane, while the full-backs hold their width to stretch the defensive block.
Phase 2: Attracting the Press
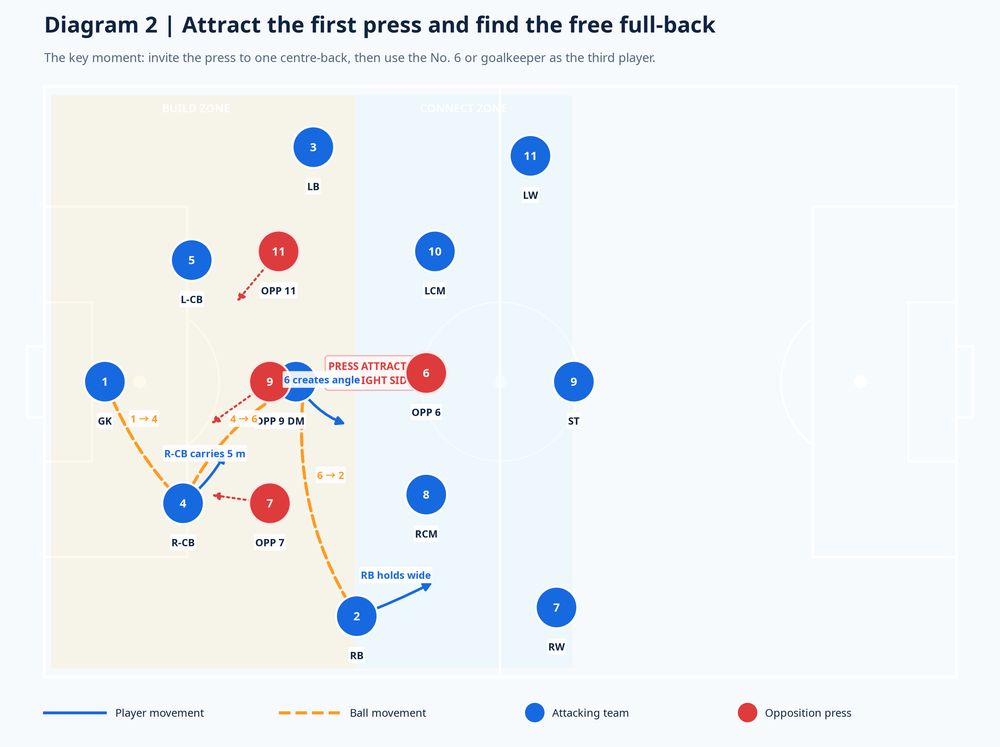
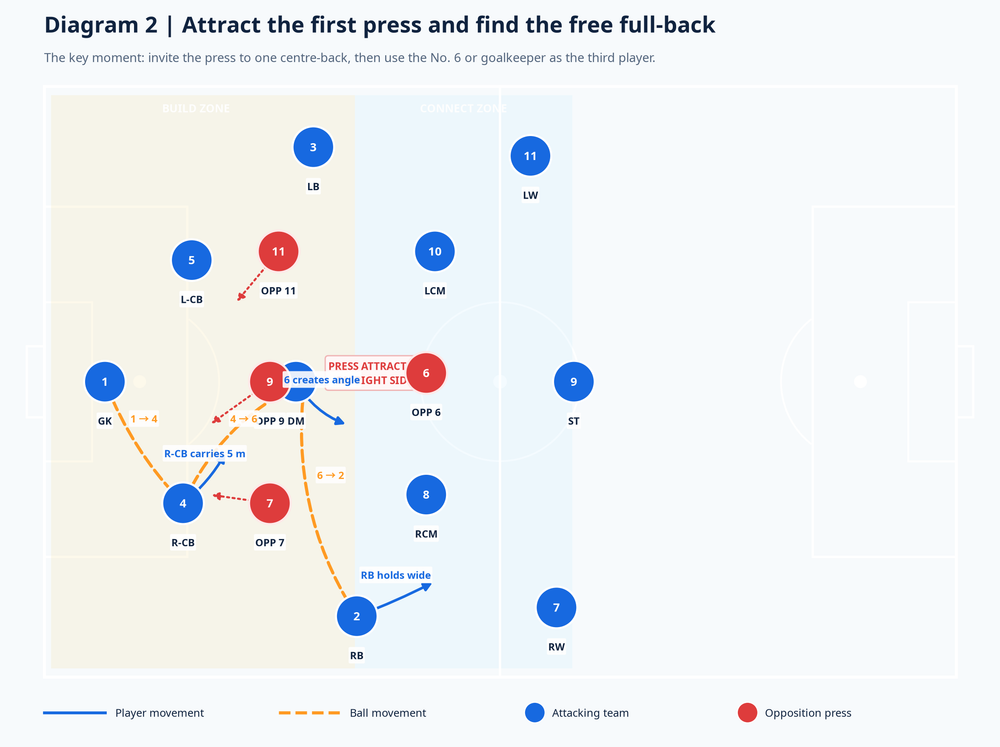
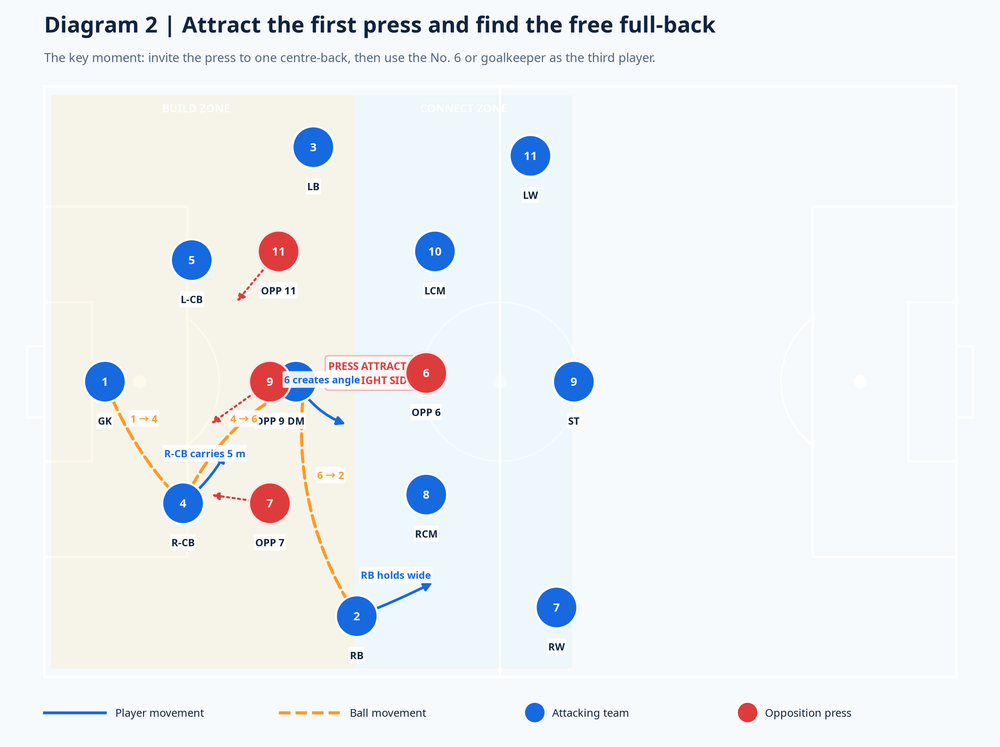
4. The goalkeeper plays a firm, flat pass to the Right Centre-Back (No. 4).
5. The No. 4 receives the ball and deliberately carries it forward for approximately 5 metres. This action is designed to provoke the opposition winger (Opp 7) into pressing the ball.
6. As the press arrives, the No. 6 shifts across to create a diagonal passing angle. The No. 4 plays a sharp pass into the No. 6.
7. Recognising the pressure, the No. 6 plays a quick, one-touch pass out to the Right-Back (No. 2), who has held their wide position and is now free because the opposition winger jumped to press the centre-back.
Phase 3: Breaking the Line and Advancing
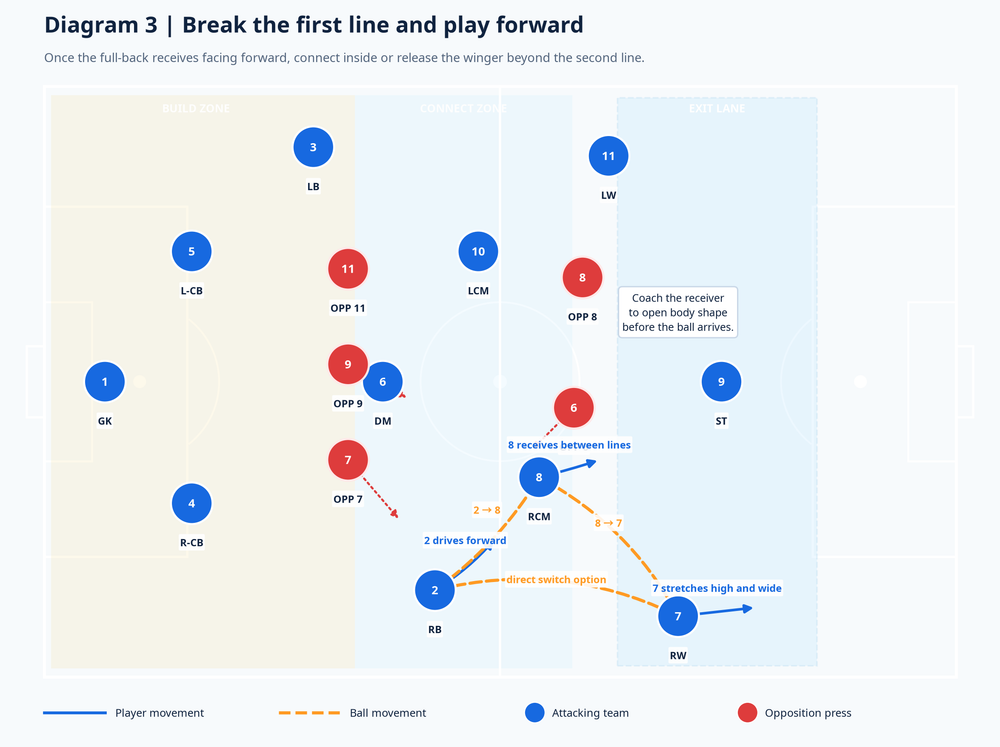
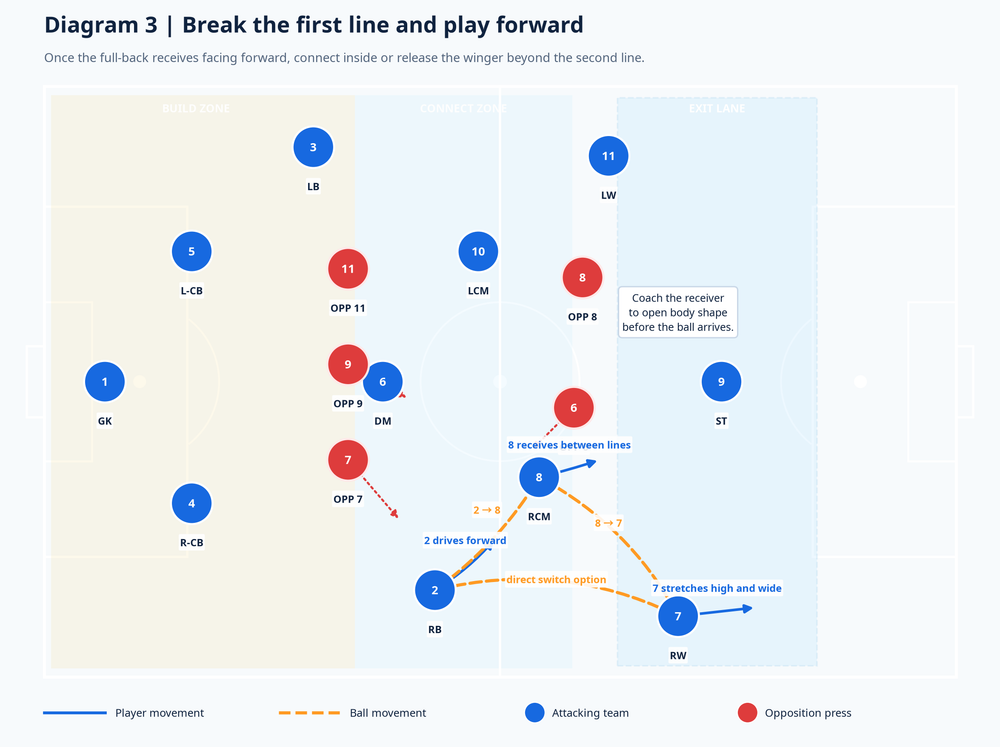
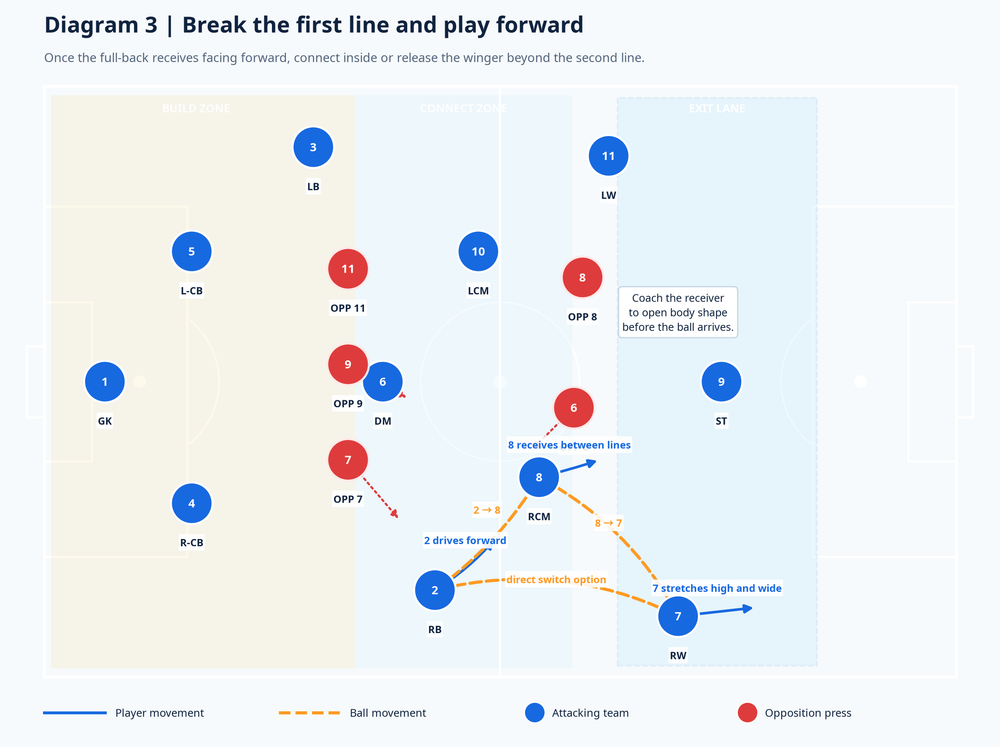
8. The Right-Back receives the ball facing forward and drives into the space ahead.
9. The Right Central Midfielder (No. 8) drops into the half-space between the opposition's midfield and defensive lines, offering a progressive passing option.
10. The Right-Back plays a penetrating pass into the No. 8.
11. The No. 8 receives on the half-turn and immediately looks to release the Right Winger (No. 7), who makes a darting run in behind the opposition full-back, or switches the play if the defence has shifted too far across.
Key Coaching Points
- Ball Speed and Weight: Passes must be struck with purpose. A slow pass allows the opposition to shift their defensive block and close the spaces we are trying to create.
- Body Shape on Reception: Every player, particularly the No. 6 and the full-backs, must receive the ball on their back foot with an open body shape, allowing them to see the next pass before the ball arrives.
- Provoking the Press: The centre-backs must be brave enough to hold the ball or carry it forward to commit an opposition player. If they pass too early, the pressing player can easily recover their defensive shape.
- Third-Man Runs: Emphasise the concept of the third man. The No. 6 is often the bridge to find the free full-back. The passing sequence of Centre-Back → Holding Midfielder → Full-Back must be rehearsed until it is fluid.
Common Mistakes
- Full-backs dropping too deep: If the full-backs drop to receive the ball alongside the centre-backs, they bring the opposition wingers with them, congesting the build-up zone and killing the space.
- No. 6 hiding behind the striker: The holding midfielder must actively seek passing lanes, stepping out of the opposition striker's cover shadow to offer a viable option.
- Panic under pressure: Centre-backs often rush the pass when pressed. They must learn to accept the pressure and trust the structure to provide an out-ball.
Variations & Progressions
- The Goalkeeper as the Pivot: If the opposition aggressively marks the No. 6, the centre-back can bounce the ball back to the goalkeeper, who then switches the play directly to the opposite full-back or centre-back.
- The Midfield Rotation: Have the No. 8 drop deep alongside the No. 6 to create a double pivot, confusing the opposition's marking scheme and opening new passing lanes in the half-spaces.
- Direct to the Winger: If the opposition full-back jumps aggressively to press our receiving full-back, the centre-back or No. 6 can bypass the full-back entirely and play a longer, lofted pass directly into the channel for the winger.
Age Adaptations
- Under 8s to Under 10s: Focus entirely on the technical execution of the passes and the concept of spreading out to make the pitch big. Do not worry about complex third-man combinations.
- Under 12s to Under 14s: Introduce the idea of attracting the press. Teach the centre-backs to wait for the defender to commit before releasing the ball.
- Under 16s and Open: Implement the full pattern, demanding high ball speed, precise body shapes, and rapid decision-making under intense, game-realistic pressure.
