

Football
Right-Sided Crossing & Finishing: Three-Run Final-Third Drill
Build match-ready wide combinations, targeted crossing decisions, and staggered finishing runs with a practical final-third pattern coaches can deliver immediately.
What you need
14 footballs, 24 cones, 12 bibs in two colours, 1 full-size goal, 2 mini-goals or target gates, 1 stopwatch
Overview
This right-sided crossing and finishing drill develops the moment that decides so many attacks: delivering a purposeful ball from the wide channel while the box is attacked with different, well-timed runs. It connects the midfield pass, the winger’s first touch, the quality of the cross, and the forward line’s movement into one repeatable pattern. Use it in the main block of an attacking session when you want to rehearse end-third relationships without the noise of a full-sided game.
The practice is built around a full-pitch reference of 105 m x 68 m, which sits within the 100–110 m by 64–75 m range used for international matches under Law 1.1 The live action takes place in the right-hand final third. A first-time near-post finish earns one point; a first-time finish following a cut-back earns a bonus point. That scoring keeps the tempo high while rewarding the type of movement and delivery you want repeated in match play.
Setup
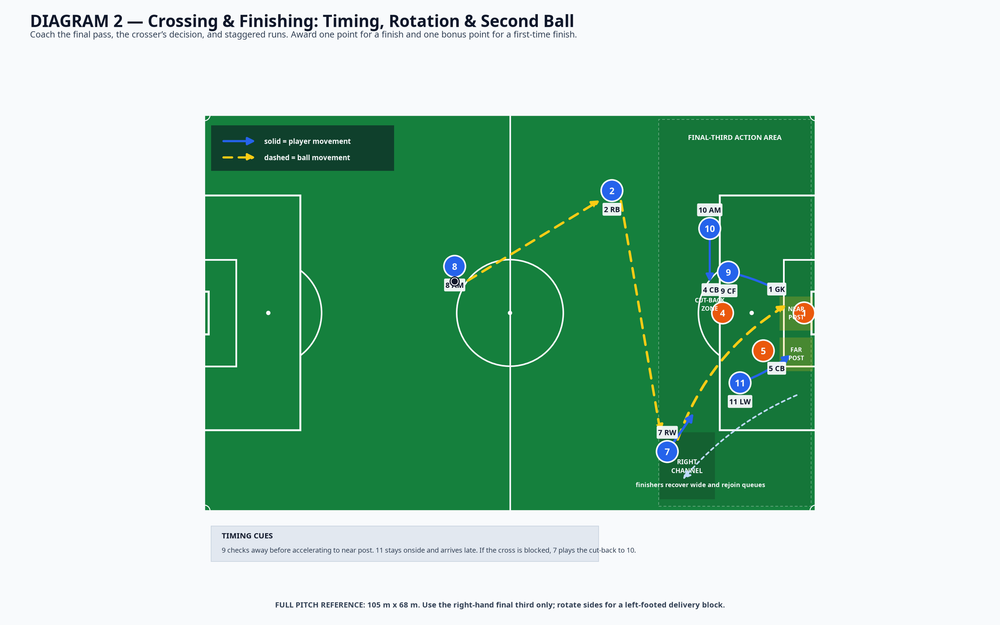
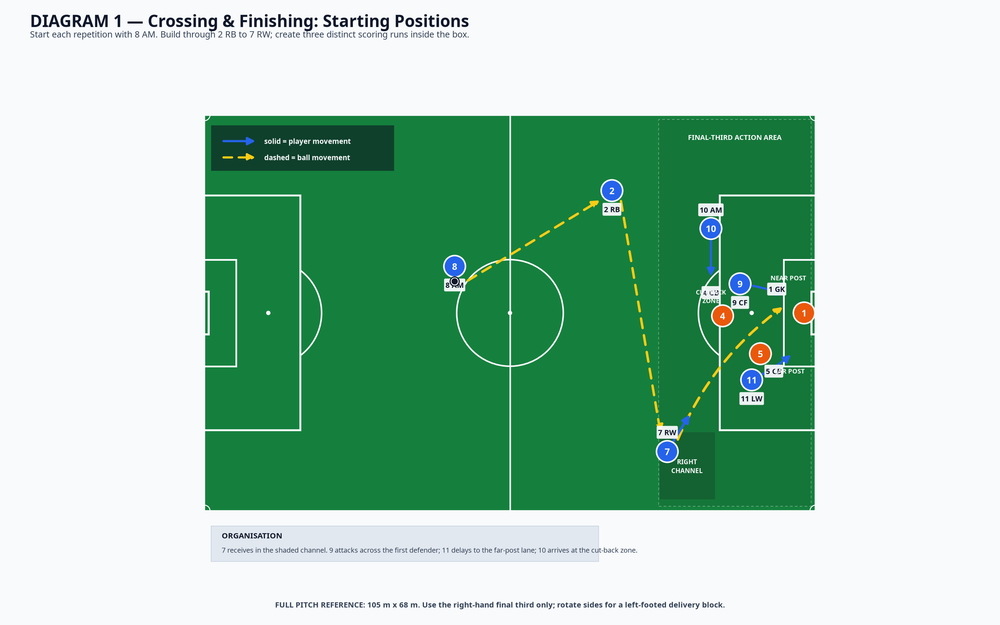
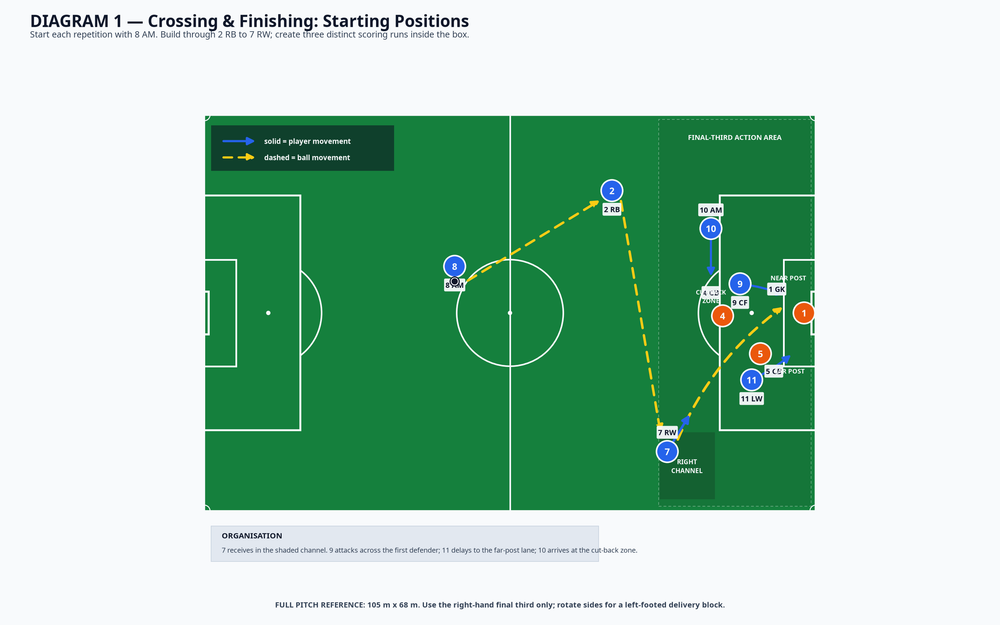
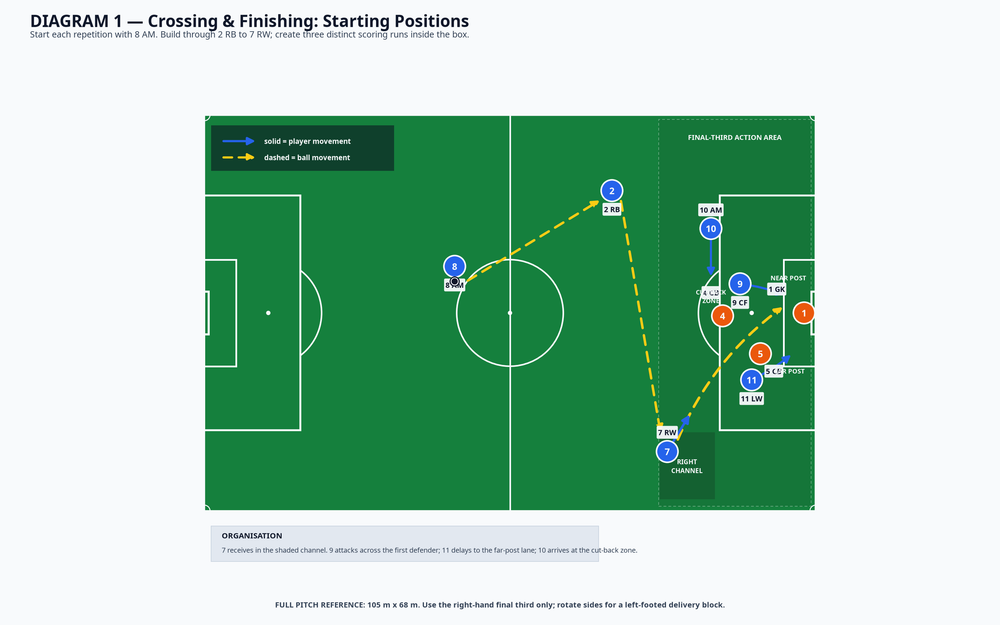
Set up on the right-hand final third of a 105 m x 68 m pitch. Mark a 9.5 m x 11.5 m crossing channel between the touchline and the outer edge of the penalty area. Place a flat service cone at approximately 43 m from goal for 8 (central midfielder) and a receiving cone for 2 (right-back) at 70 m from goal. 7 (right winger) begins just outside the channel, 10–12 m from the byline. Keep a regulation goal and one goalkeeper, 1, in place.
| Element | Organisation |
|---|---|
| Players | 14 is ideal: 1 goalkeeper, 8–10 attackers rotating through 8, 2, 7, 10, 9 and 11, plus 2 active central defenders (4 and 5). |
| Equipment | 14 balls, 24 cones, 12 bibs in two colours, 1 full-size goal, 2 mini-goals or target gates for the return run, and a stopwatch. |
| Work blocks | 3 blocks of 5 minutes, with 90 seconds to coach and reset between blocks. Rotate the active defenders every 2 minutes. |
| Box occupations | 9 attacks near post; 11 attacks far post; 10 supports the edge/cut-back zone. 4 and 5 defend with realistic recovery pressure. |
Position 4 and 5 initially as passive reference defenders for the first two minutes. Once players understand the picture, they defend the cross live but must begin on the coach’s trigger. This gives the attackers a visible decision rather than a rehearsed finish against mannequins.
Step-by-Step Instructions
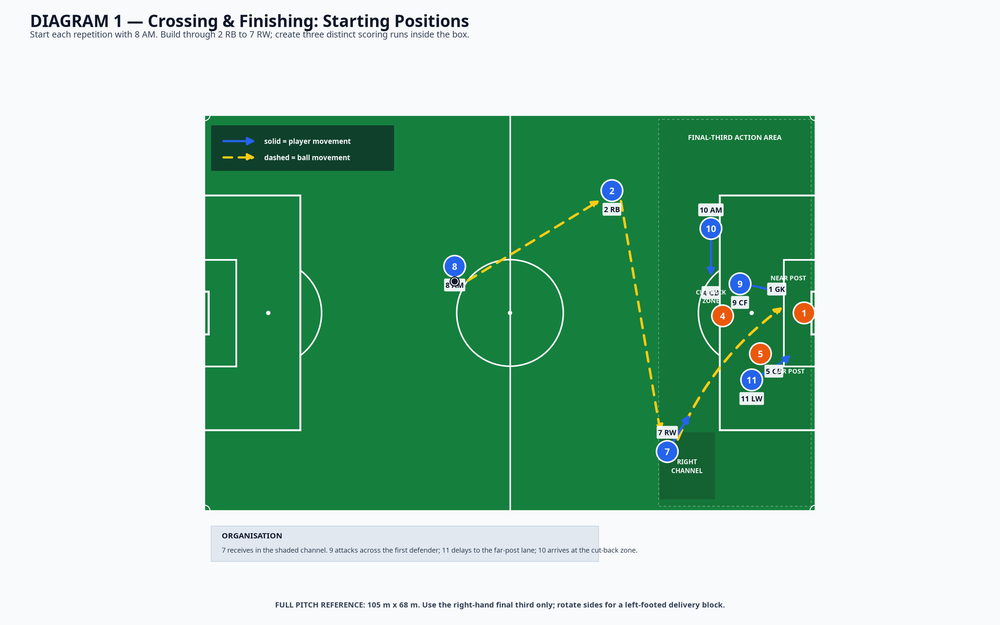
8 starts the pattern. On the coach’s call, 8 plays a firm diagonal pass into 2. The pass must arrive on 2’s front foot so that the next action can be forward. 8 follows the pass only after the ball has travelled.
2 connects to the winger. 2 takes no more than two touches and slides the ball down the line into 7’s path. Insist that 2 passes ahead of 7; a pass into the winger’s feet kills the speed and angles of the cross.
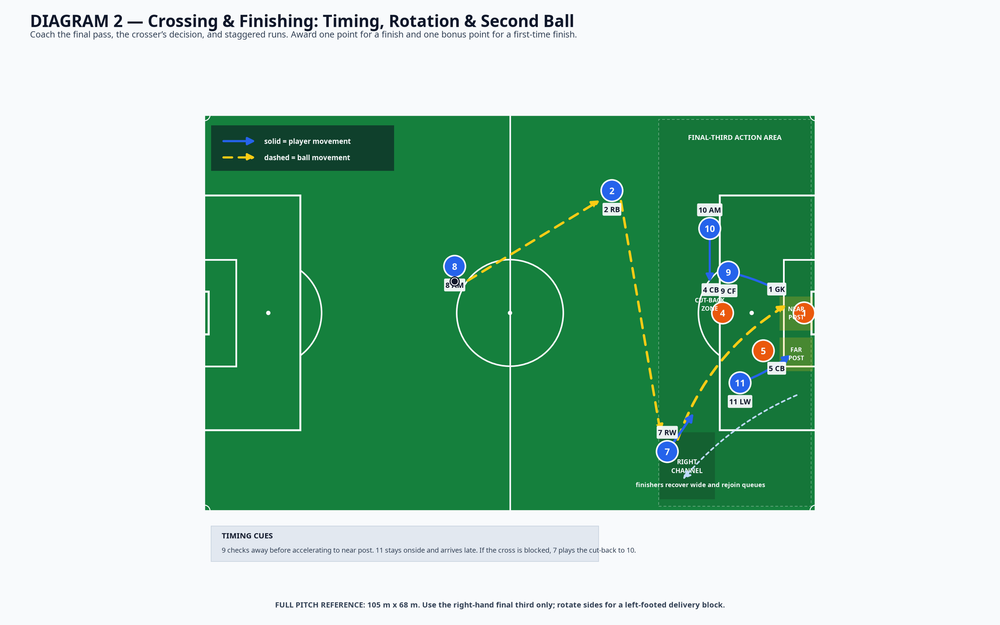
7 creates the delivery. 7 receives on the move, enters the marked channel, and has a maximum of three touches before crossing. The first look is an early, driven ball through the corridor between goalkeeper and recovering defenders. If 4 closes the lane, 7 cuts the ball back toward 10 rather than forcing a hopeful cross.
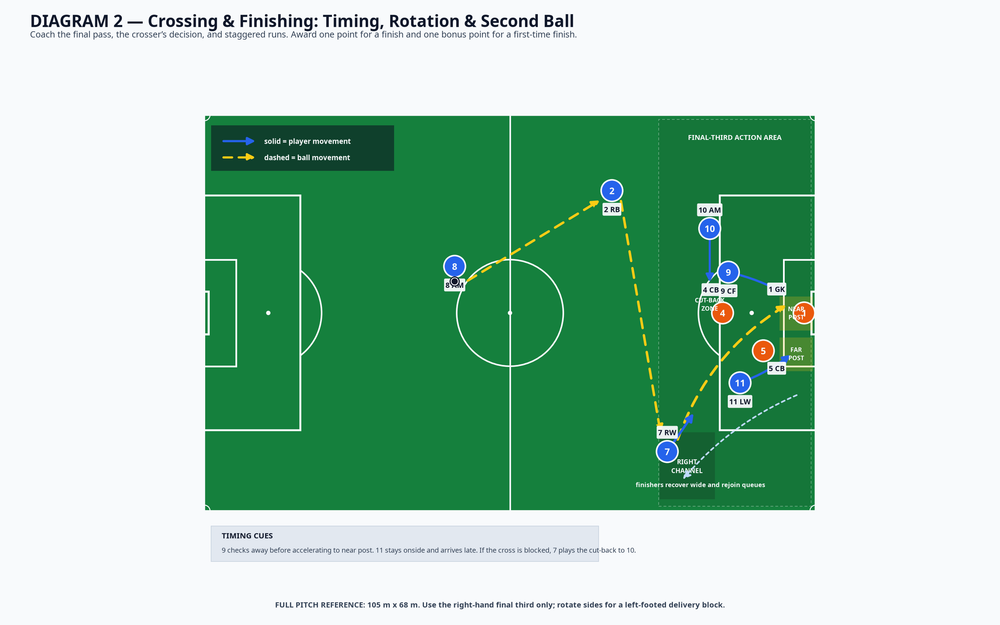
Attack the box with staggered timing. As the pass goes from 2 to 7, 9 checks away from the near-post lane and then accelerates across 4. 11 stays onside, delays two strides, and arrives at the far post. 10 reads 7’s body shape and steps into the cut-back zone at the penalty-spot line. This stagger prevents all three attackers arriving in the same space.
Finish and play the second action. 9 or 11 finishes first time whenever possible. If the goalkeeper saves, the ball remains live for four seconds and the nearest attacker may finish the rebound. Once the action ends, 7 joins the 11 queue; 11 recovers to 8; 8 goes to 2; and 2 becomes the next winger. Defenders rotate after every four attacks.
Key Coaching Points
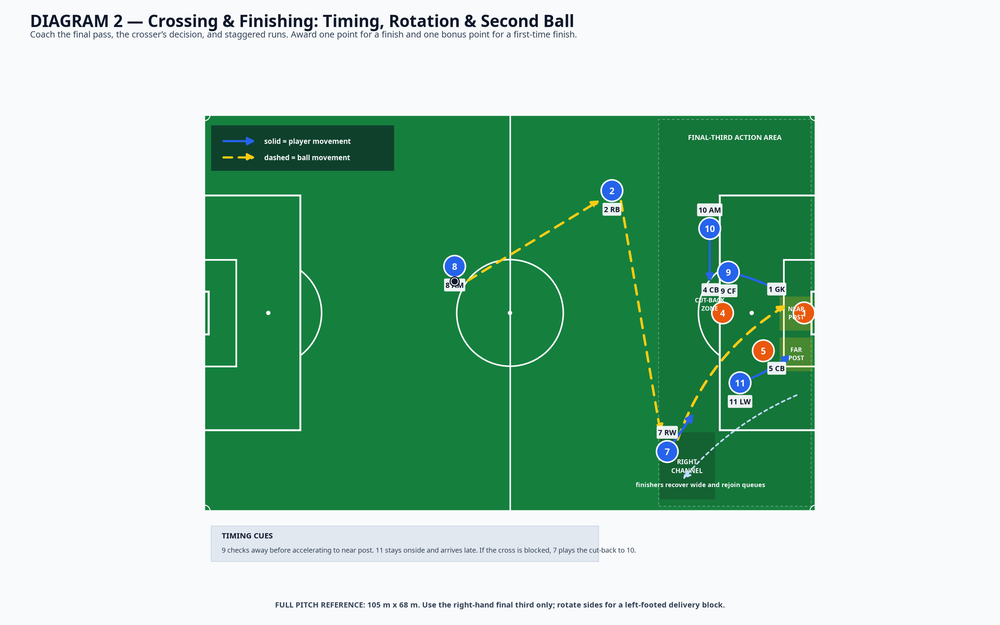
The final pass sets the attack. Coach 2 to pass into 7’s stride, not simply to complete a pass. The receiver should face forward before the ball arrives.
Cross with a target, not a postcode. 7 must scan before the first touch, then choose a delivery: driven near post for 9, clipped far post for 11, or a hard cut-back for 10. Demand a clear cue from the crosser’s hips and head.
Create separation before speed. Tell 9 to move away from the target first. The check creates the yard needed to attack across the defender rather than wrestling from a static starting point.
Arrive late at the far post. 11 should not run underneath the cross. Hold the run, stay onside, then arrive through the far-post line as the ball travels.
Finish through the ball. Instruct finishers to show a stable supporting foot, an open body shape, and a finish directed away from the goalkeeper. First-time contact is the desired habit.
Coach the transition after the shot. Attackers must react for the second ball for four seconds, while 4 and 5 recover with game-real urgency. Do not allow players to admire the first cross.
Common Mistakes
| Mistake | Coach’s correction |
|---|---|
| 7 receives flat-footed and crosses from too deep. | Move the receiving cone 3 m higher and demand a touch forward into the channel before delivery. |
| 9, 10 and 11 run in a straight line toward goal. | Freeze the picture: assign 9 near post, 10 cut-back, and 11 far post; restart only when their starting distances are different. |
| The cross is floated without a target. | Set a rule that every delivery must pass through a named scoring lane. Award extra points for a first-time finish from that lane. |
| 10 arrives too early and blocks the central lane. | Give 10 a verbal trigger: move only when 7’s head drops or the defender blocks the line to the near post. |
| Players jog through the reset. | Use a 15-second restart target and have the next ball ready with 8 before the previous attack has fully cleared. |
Variations & Progressions
Variation 1 — Guided success. Remove live defenders and allow 7 four touches. The coach calls “near”, “far”, or “cut-back” as 7 receives, so younger or less experienced players can match the delivery to a visible target.
Progression 1 — Live 2v3 in the box. Keep 4 and 5 live from the moment 2 plays wide, but restrict them to defending inside the penalty area. 9, 10 and 11 must use the three scoring lanes without needing to beat defenders in the build-up.
Progression 2 — Decision under pressure. Add a recovering full-back who starts 5 m behind 7 on 2’s pass. Give 7 a six-second clock from first touch to delivery. This creates a realistic cue for an early cross, a delayed cross, or a cut-back.
Age Adaptations
For Under-8 and Under-10, reduce the action area to 30 m x 40 m, use a 5-a-side goal and goalkeeper where available, and remove the offside demand. Use one central runner and one far-post runner; give the winger up to four touches and keep defenders passive.
For Under-12 and Under-14, use a 44 m x 50 m end-zone with a full-size or youth-size goal. Retain the three attacking roles, introduce an offside line at the top of the penalty area, and make the two defenders live after the first two-minute learning phase.
For Under-16 and open-age groups, use the full 105 m x 68 m reference, live recovery defenders, and the six-second crossing constraint. Alternate right and left channels each block so both-footed delivery and opposite-sided finishing are challenged. Track first-time finishes, cut-back goals, and second-ball goals separately; this gives you a direct coaching review at the end of the block.
Coach’s Finish
Run the practice at the speed you want in the match. Be demanding about the quality of 8’s and 2’s passes, but spend your stoppages on the relationships in the box: one player attacks the front space, one arrives at the far post, and one protects the cut-back. The drill succeeds when the winger can see three purposeful options rather than crossing into traffic.
