Goal-Kick Build-Up: Create the First Free Player and Play Through the Press
Coach a repeatable 11v11 goal-kick structure that creates a free first receiver, uses the No. 6 as a release player, and switches away from an aggressive press.
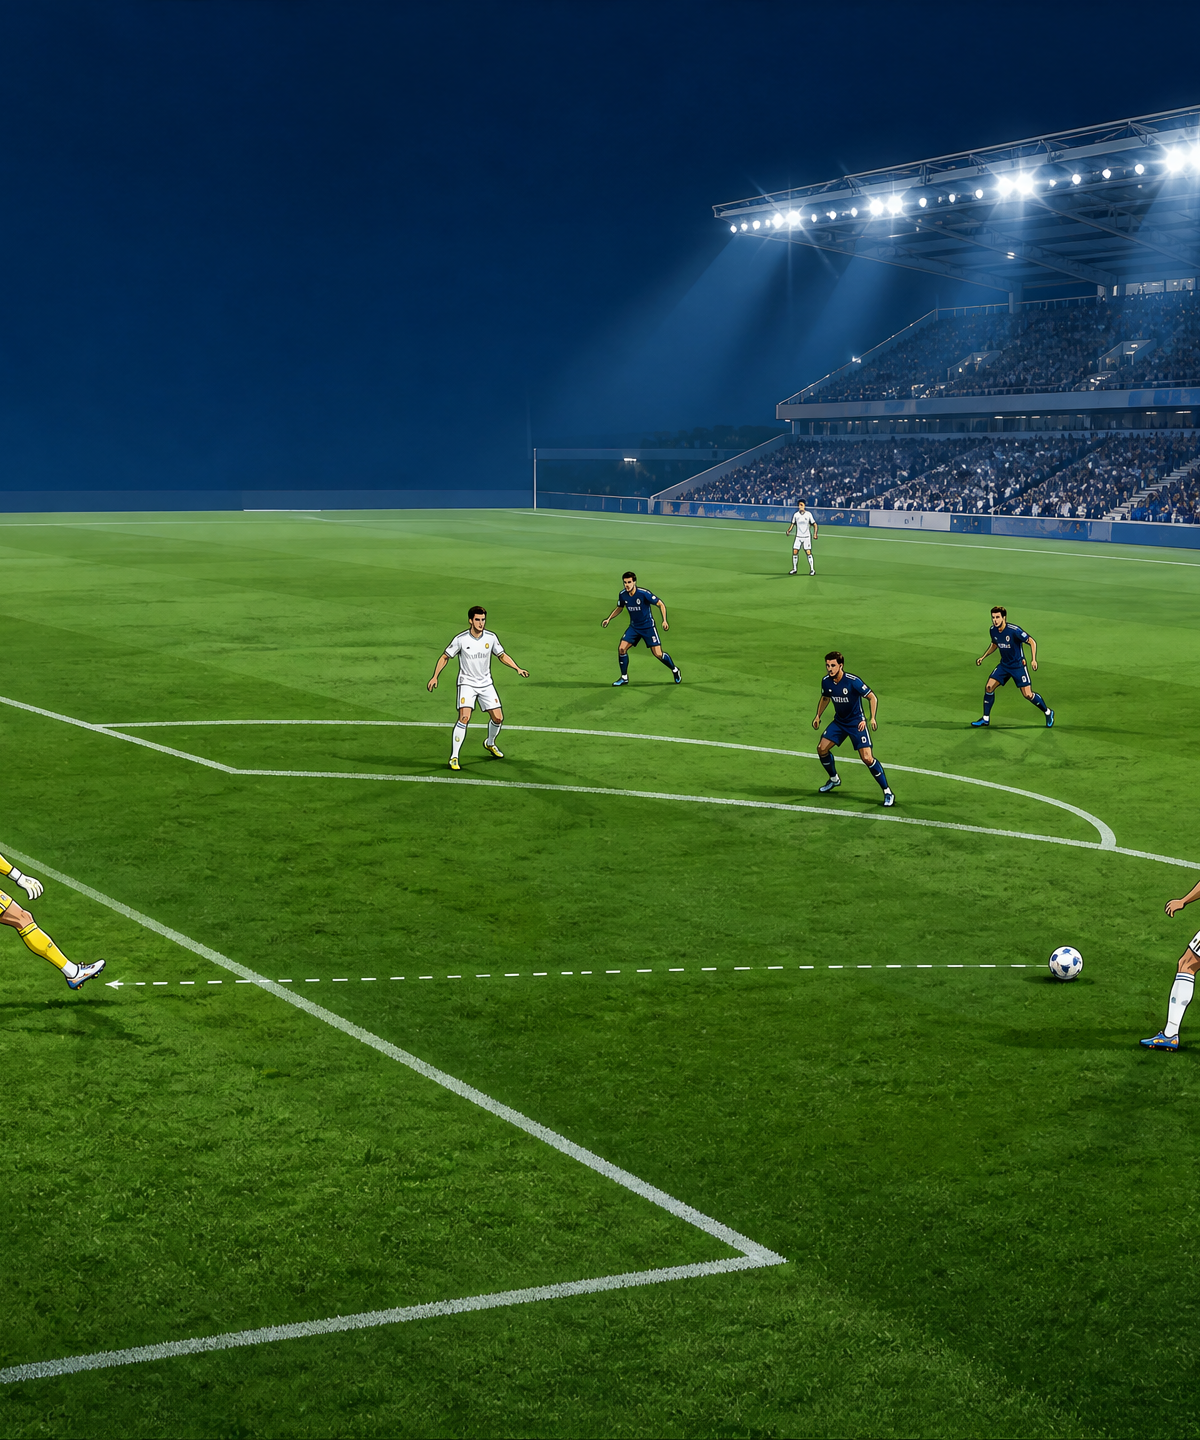
Equipment Needed
Goal-Kick Build-Up: Create the First Free Player and Play Through the Press
Overview
This 11v11 goal-kick build-up pattern helps teams play through the first press with a purpose: create a free player facing forward, secure the next pass, and move beyond pressure. No. 1 starts the move; No. 4 and No. 5 stretch the striker; No. 6 connects; and the full-backs supply exit width.
Use it against one- or two-player high presses, especially 4-3-3 and 4-2-3-1 shapes. If the first pass is screened, bounce through No. 6 and switch to the far-side full-back. The dimensions reference a 100–110m by 64–75m international field; the goal area is 5.5m deep and the penalty area 16.5m deep.[1]
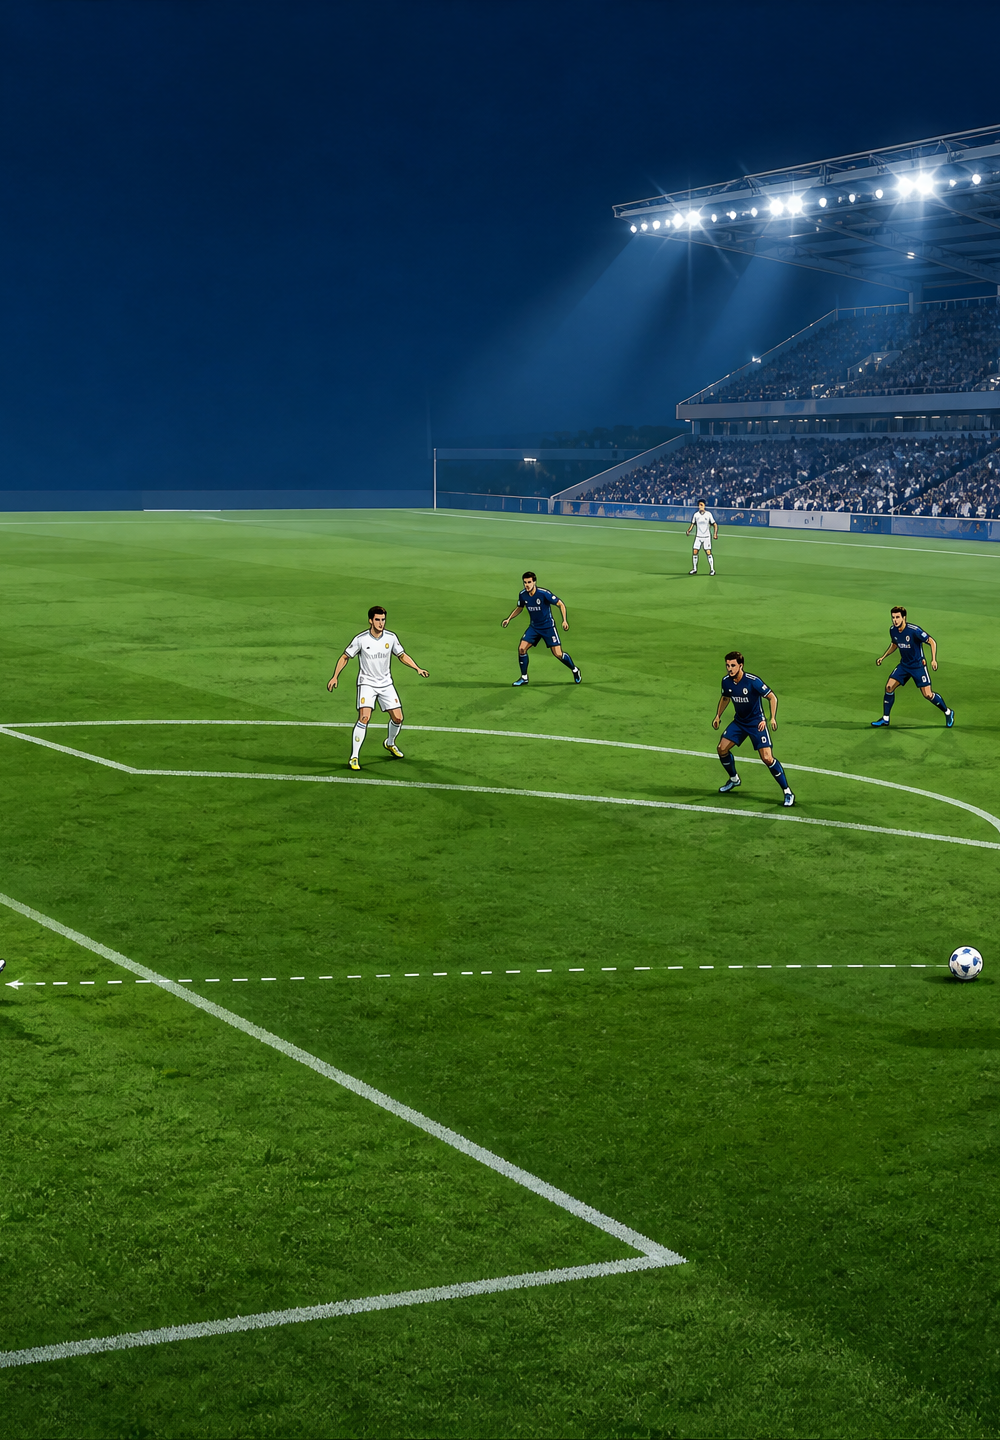
Setup
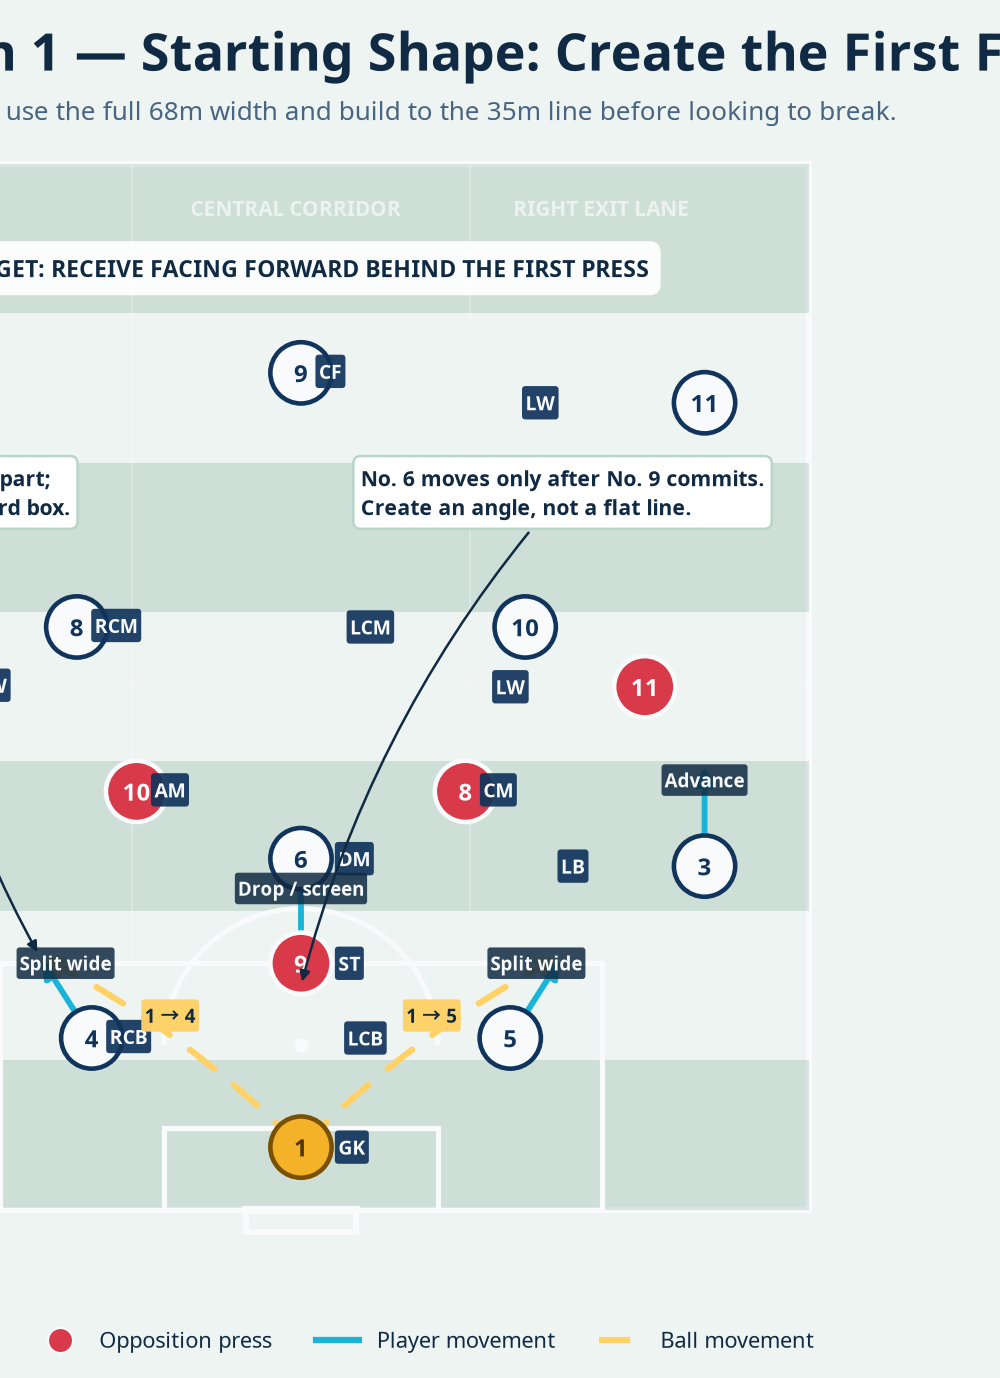
Set up on a 105 x 68m pitch (or the closest available full field). Work from one goal line to a 35m target line, using the full width. Use the marked goal area and penalty area, 12–16 balls, cones for the three exit lanes, bibs, and flat markers.
Use 22 players: an 11-player 4-3-3 build-up team and an 11-player pressing team. For 8v8 plus goalkeepers, remove the far-side winger and one central midfielder from each team. Reference numbers: 1 goalkeeper; 2/3 full-backs; 4/5 centre-backs; 6 defensive midfielder; 8/10 central midfielders; 7/11 wingers; 9 centre-forward.
| Unit | Starting detail | Coach’s purpose |
|---|---|---|
| No. 1, 4 and 5 | No. 1 is central; No. 4 and No. 5 split 14–16m apart and begin 2–4m outside the six-yard box. | Stretch the striker and create two visible passing lanes. |
| No. 2 and 3 | Begin just outside the penalty area, 3–5m inside the touchline; advance only after the first centre-back touch. | Protect the first pass, then offer a wide exit. |
| No. 6 | Start centrally 6–8m outside the penalty area, initially above the striker’s line of sight. | Arrive late as the spare player, rather than standing in the striker’s cover shadow. |
| No. 8, 10, 7, 9 and 11 | Occupy three vertical lanes beyond the target line: one winger wide on each side, No. 9 central, and No. 8/10 in the half-spaces. | Pin the press and give the first receiver forward options. |
Step-by-Step Instructions
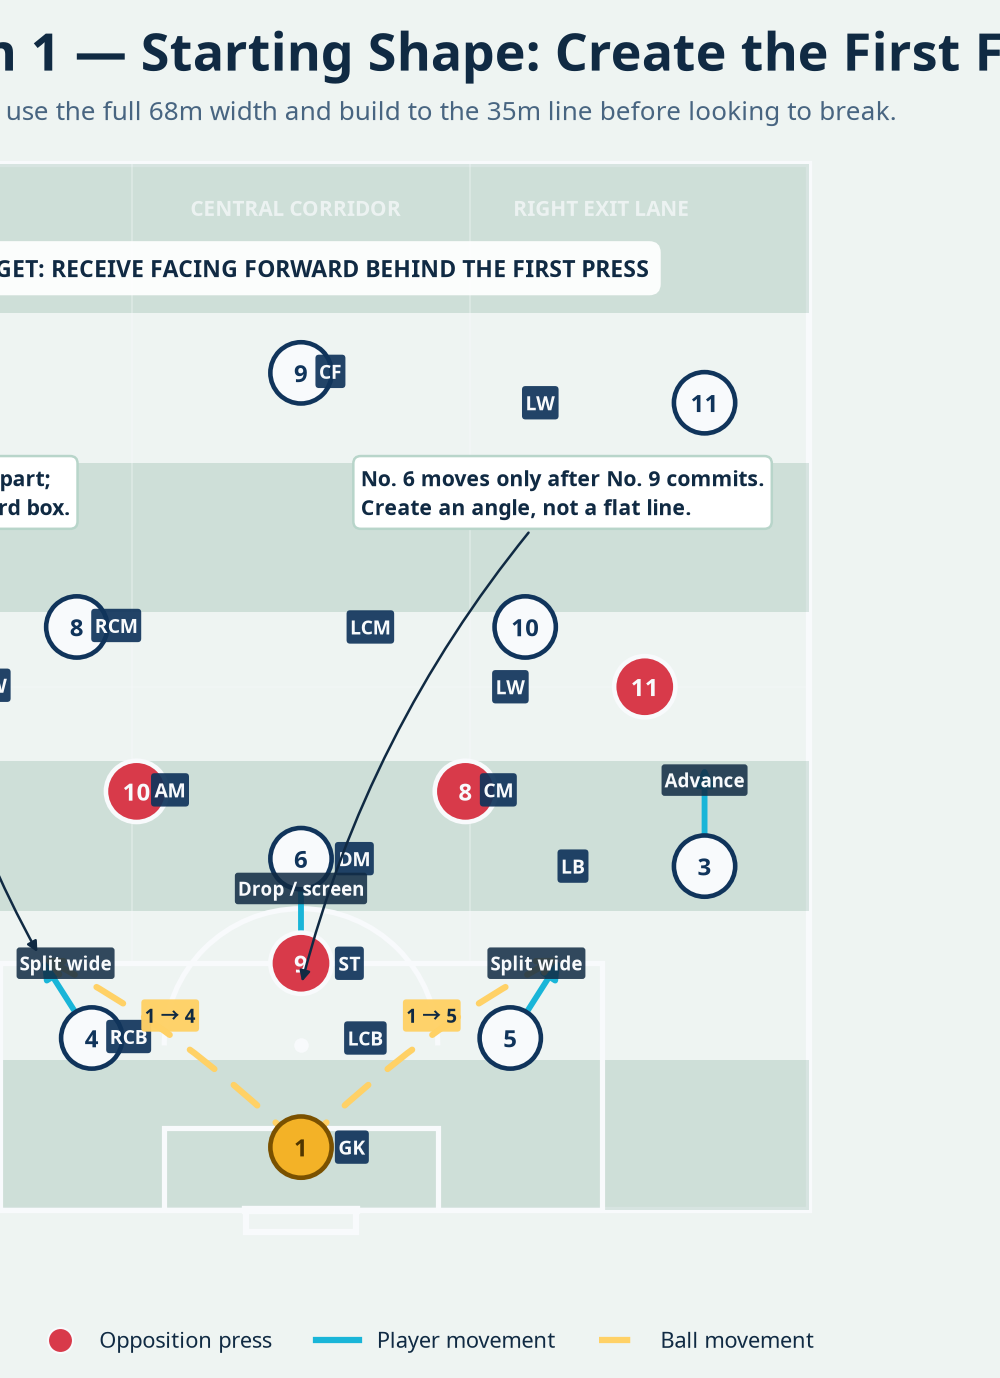
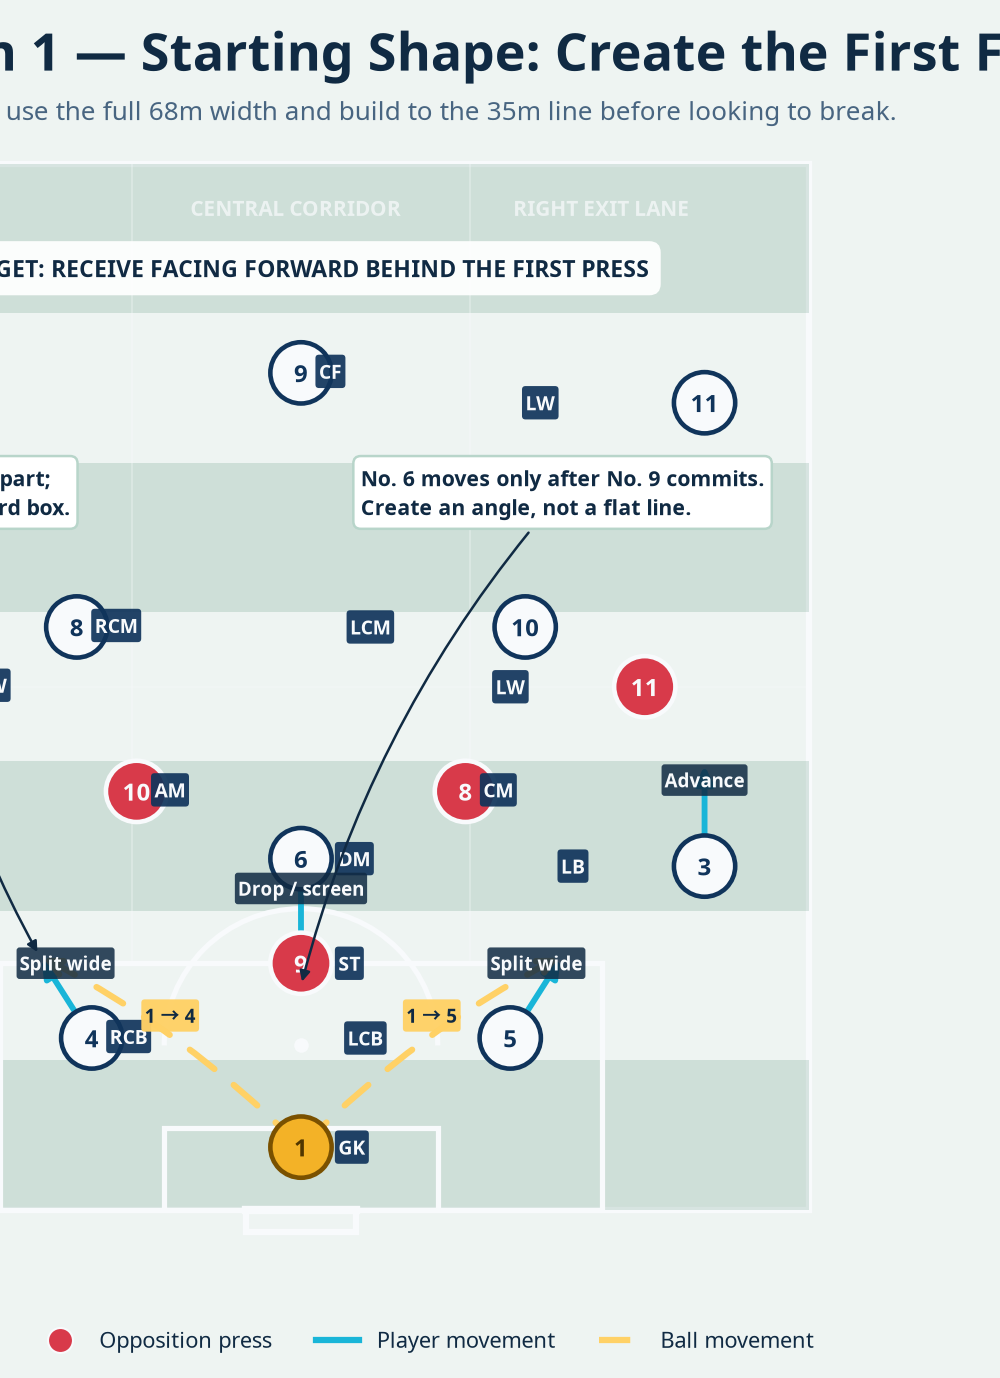
Set the pressing picture. The opposition starts in its match shape. Ask their No. 9 to screen one centre-back and press the goalkeeper’s first pass on a curved line. The midfield three protect the central corridor but must be free to jump when the ball enters No. 6. Start with passive pressure for two rehearsals, then make the press live.
Establish the first free player. No. 1 scans both centre-backs before placing the ball. No. 4 and No. 5 split with open body shape: far shoulder toward the touchline, near shoulder toward the ball. The goalkeeper plays the pass to the centre-back not screened by the striker. The ball should travel firmly on the ground and arrive on the receiver’s back foot.
Trigger the late movement of No. 6. No. 6 waits until the striker commits. When No. 9 curves to close No. 4 or No. 5, No. 6 moves diagonally into the pressing midfielder’s free shoulder. He scans, receives half-turned, and plays in one or two touches. Too early is easy to mark; too late cannot connect.
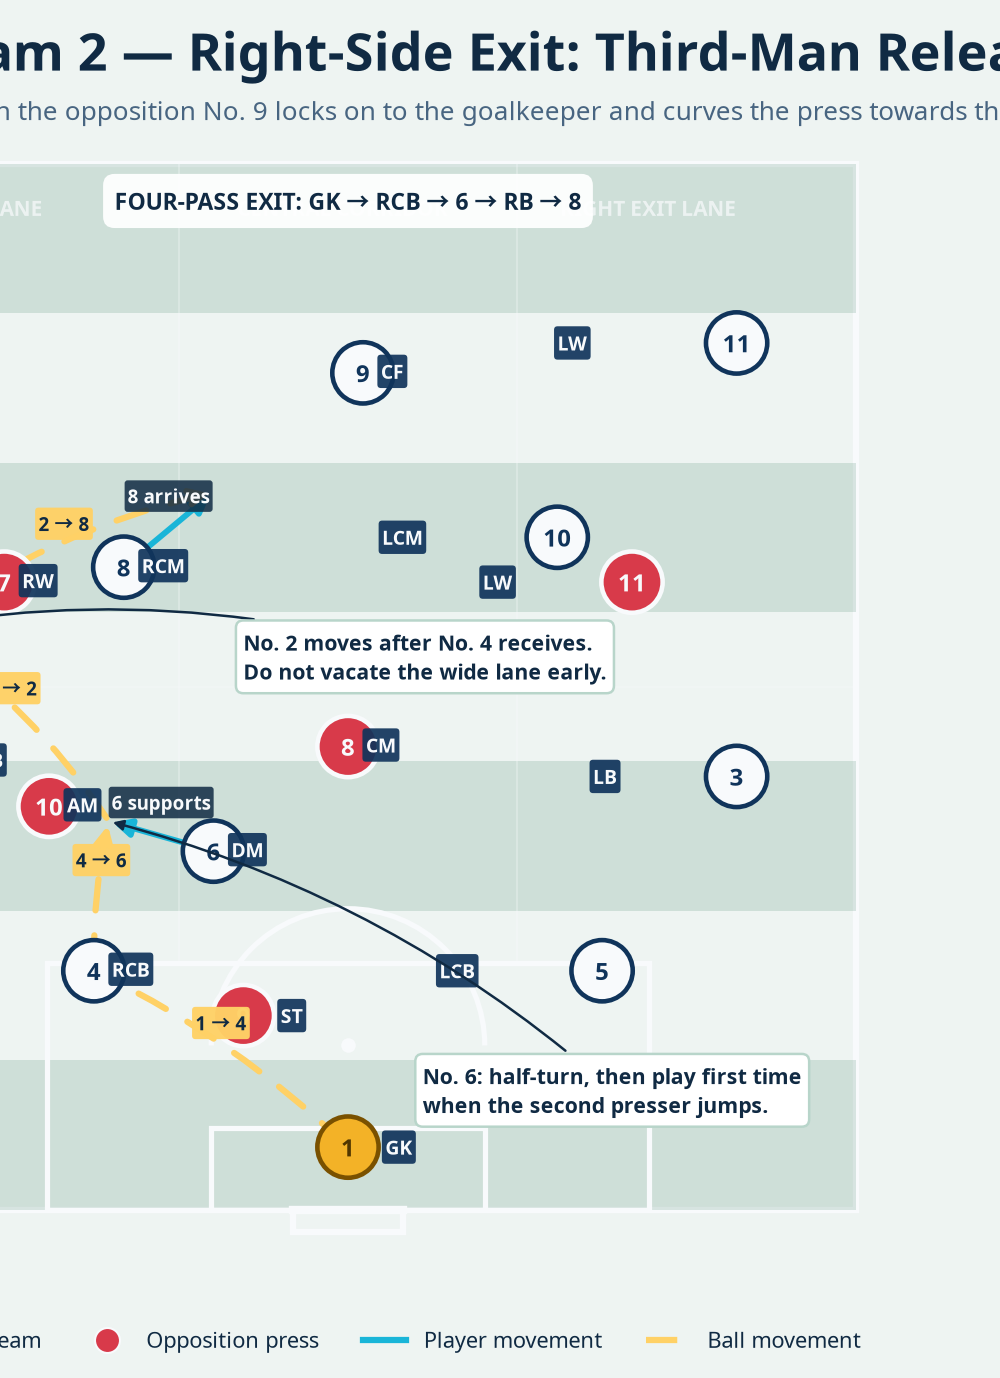
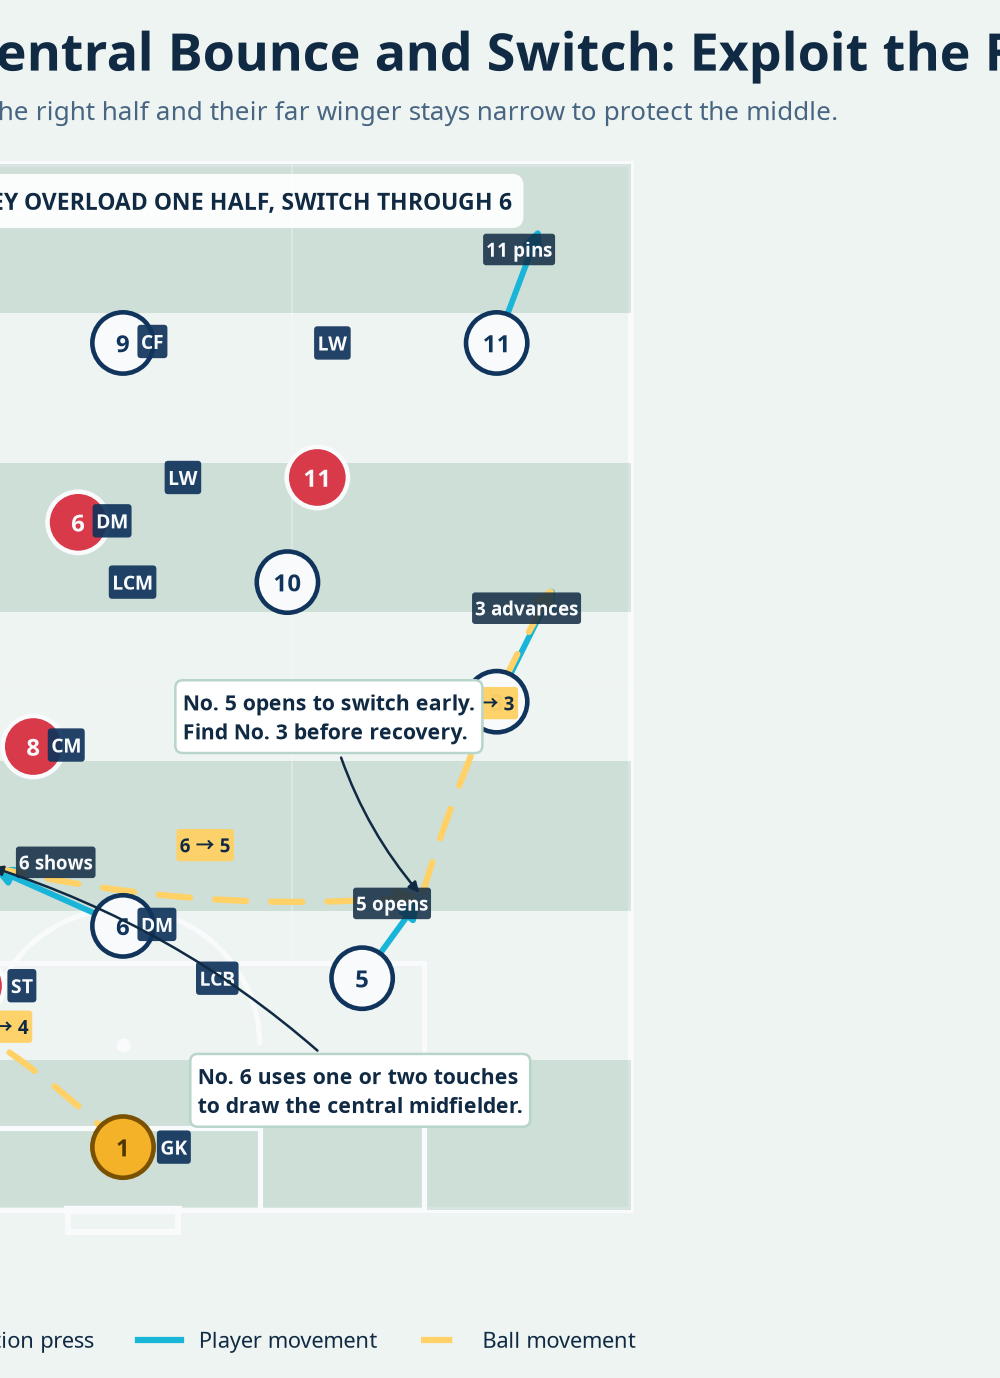
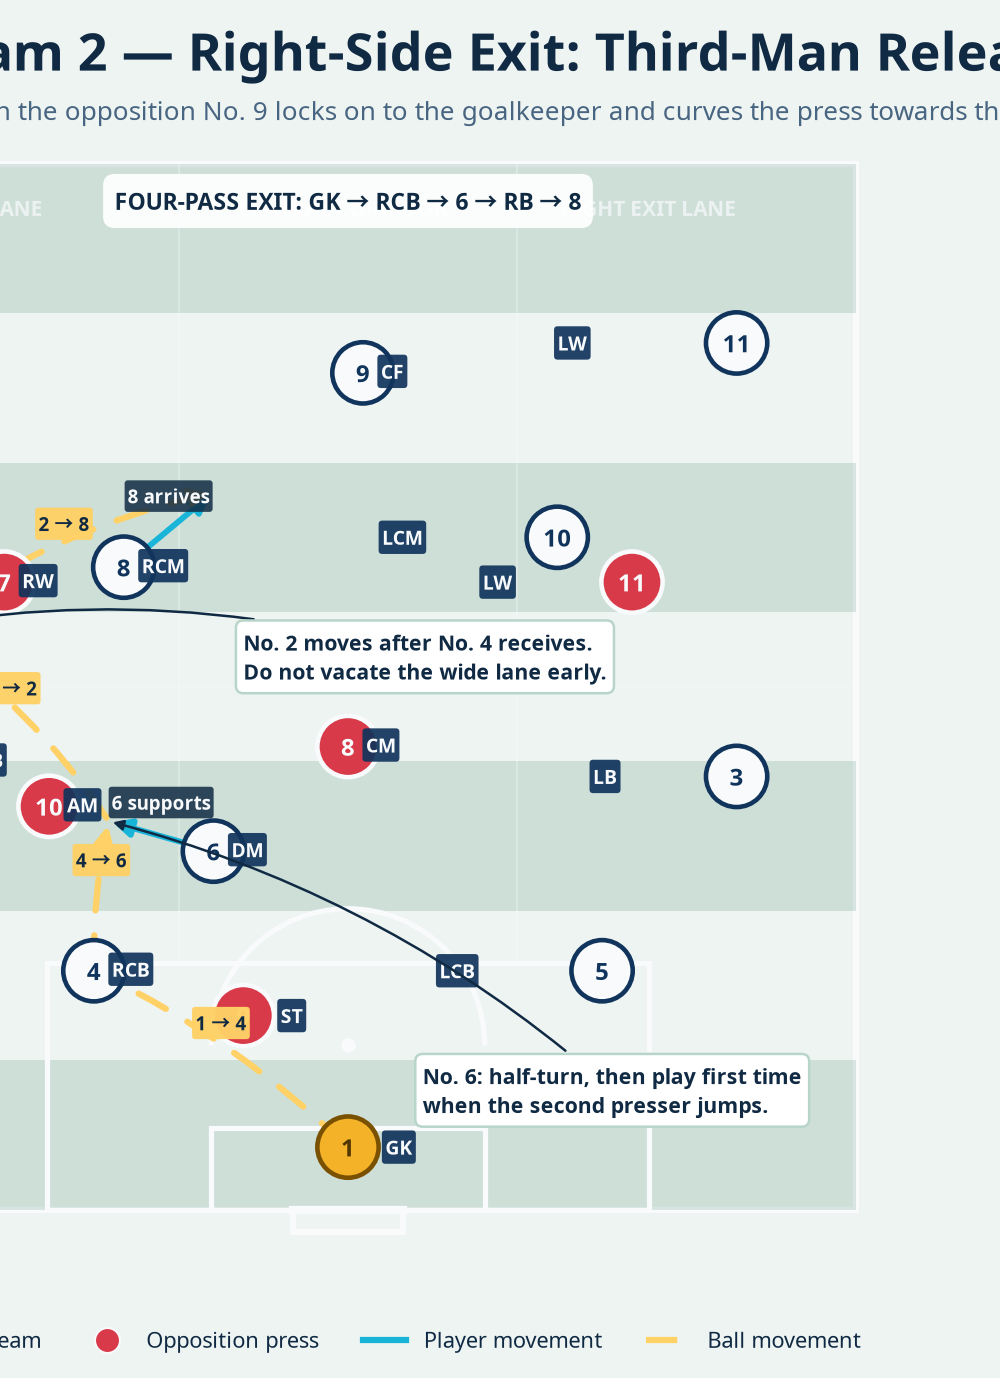
Exit through the near-side full-back. If the opposition winger jumps inside to close No. 6, No. 2 or No. 3 advances into the wide lane. Play directly to the full-back or use No. 1 → No. 4 → No. 6 → No. 2. The full-back’s first touch is forward; No. 8 arrives next in the half-space.
Secure the third-man release. In the right-side example, No. 2 moves only after No. 4 receives. No. 6 supports at an angle. With back pressure, he plays first time into No. 2; facing forward, he can carry two to three metres to draw a midfielder. No. 8 arrives beyond the next press as No. 2 receives.
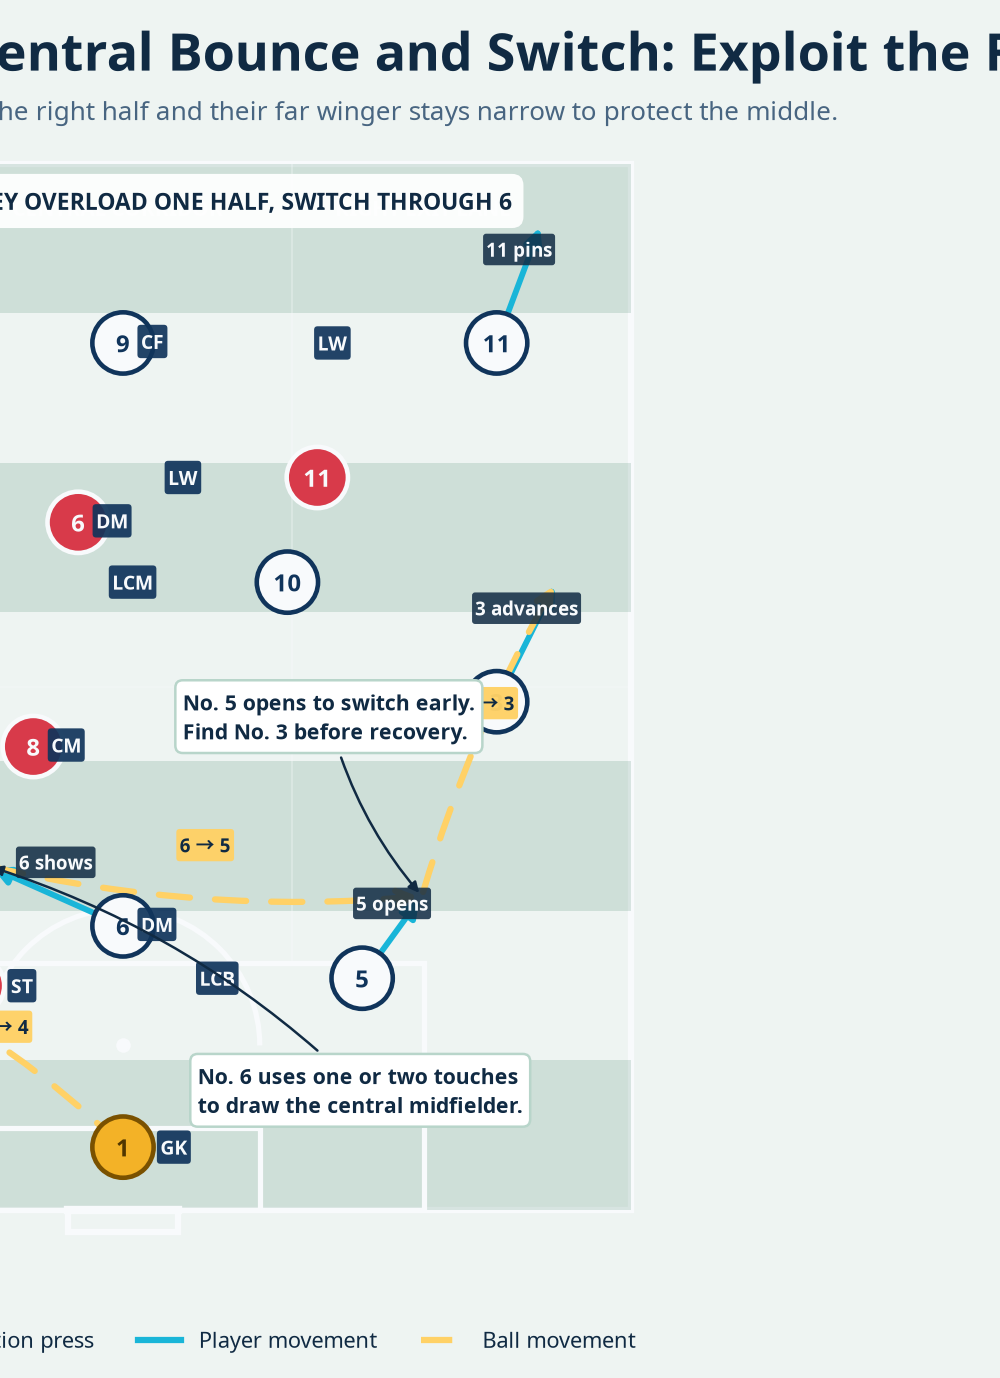
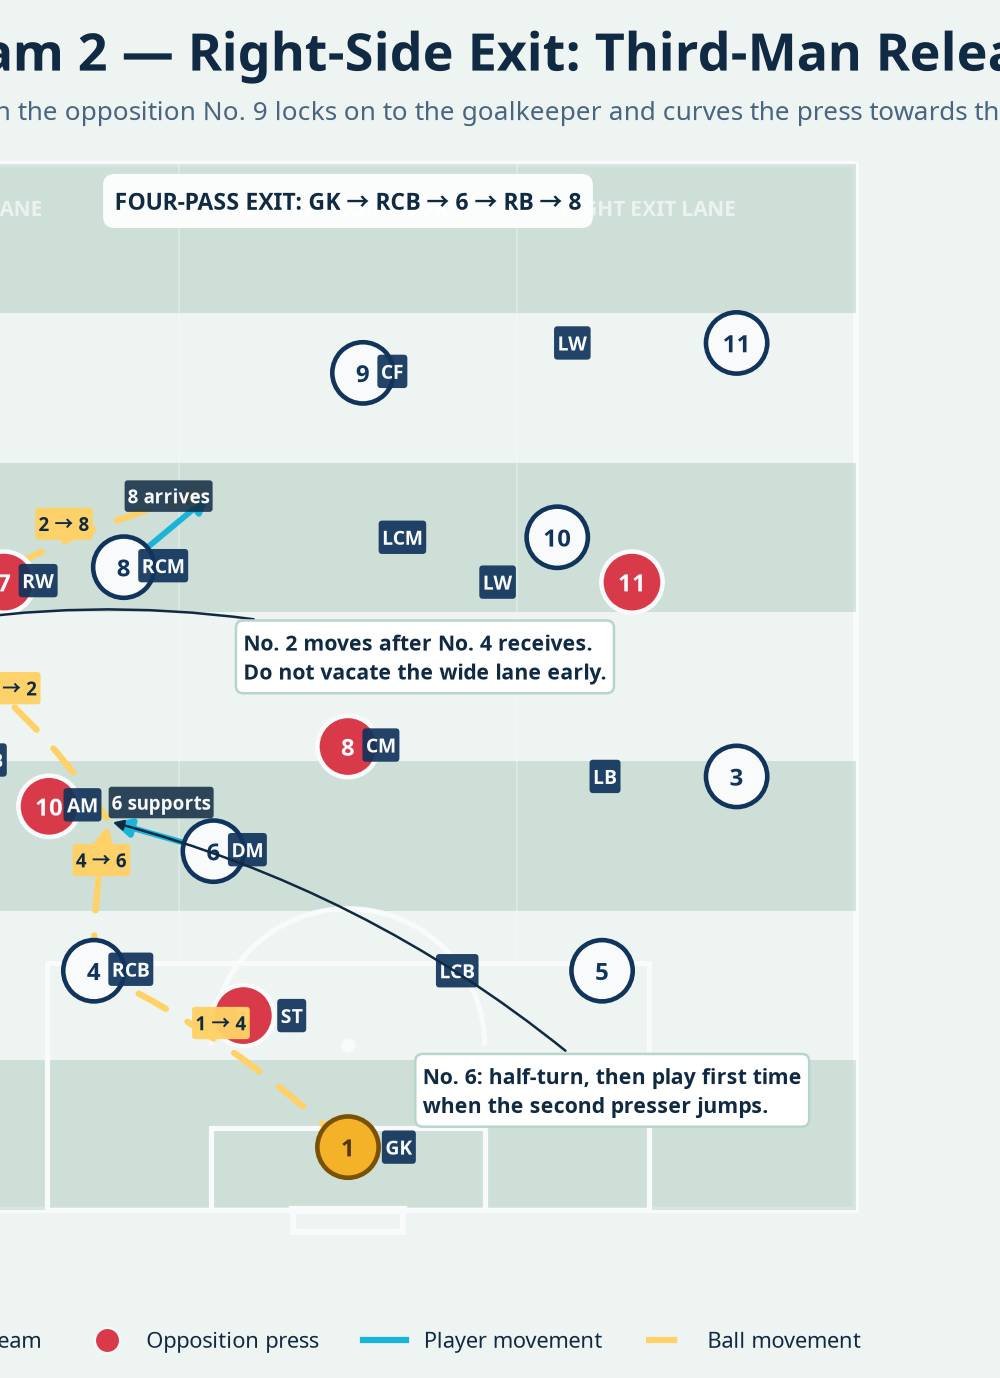
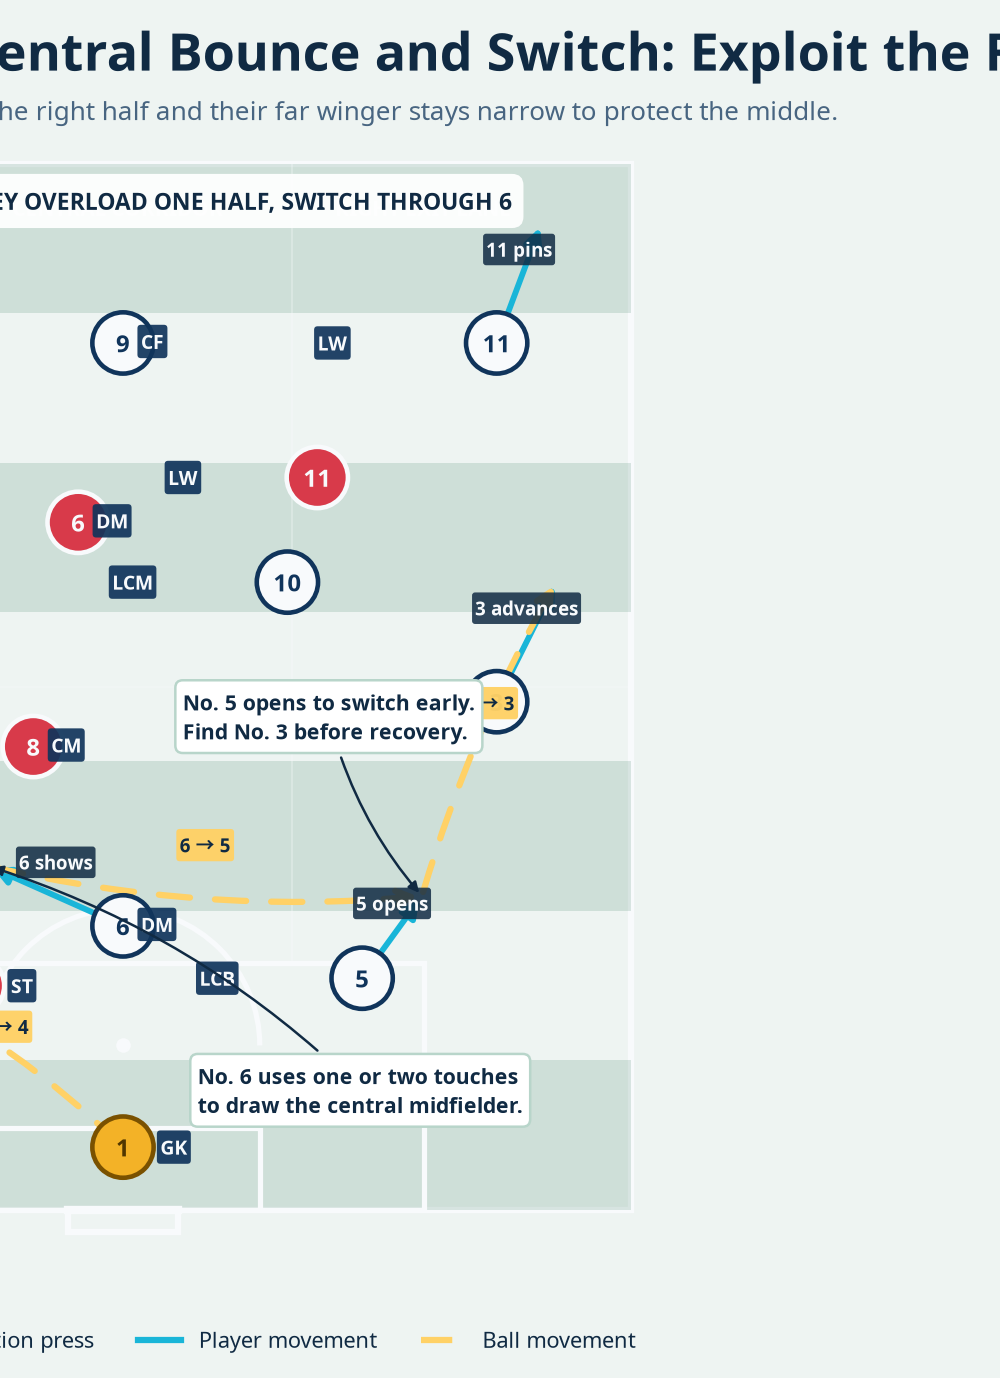
Switch when the press overloads. If the press closes the right half, use No. 6 as a bounce player: No. 1 → No. 4 → No. 6 → No. 5, then find No. 3. No. 5 opens before the bounce to switch in one or two touches. No. 11 stays high and wide to pin the far winger.
- Finish the action with purpose. Award one point for crossing the 35m line under control, two if the receiver can turn, and one extra for a far-side switch. On a pressing regain, allow six seconds to score. Reset from a goal kick quickly.
Key Coaching Points
| Coaching point | Detail to demand |
|---|---|
| Create width before the kick | Centre-backs split early; full-backs wait to advance until the first receiver is secure. |
| Play on the back foot | The first touch should open the next passing lane, not trap the player facing his own goal. |
| Time No. 6’s movement | He moves after the striker commits and arrives on an angle outside the cover shadow. |
| Use communication with information | Goalkeeper calls the side; centre-back calls “turn”, “set” or “man on”; No. 6 names the next action before receiving. |
| Attack the free lane, not the crowded lane | The opponent’s shift is your cue to release the far-side full-back or winger. |
| Keep rest defence in place | The non-ball-side centre-back and No. 6 protect the central counterattack lane until the exit is secure. |
Common Mistakes
| Error to watch for | Immediate correction |
|---|---|
| Centre-backs stand too close to the goalkeeper. | Stop the picture, move them wider, and show how the striker can screen both in one run. |
| No. 6 stands flat in front of the ball. | Rehearse a curved, delayed movement from behind the striker’s line of sight. |
| Full-back races high before the first pass. | Freeze the start. The full-back is an exit after the centre-back’s first touch, not the first risk. |
| First receiver takes a closed first touch. | Reposition the body: scan, open the hips, and receive on the far foot. |
| Team keeps playing into the pressed side. | Ask, “Where did their winger go?” Then require the next action to attack the space the winger has vacated. |
Variations & Progressions
Start with a guided pattern in which the press shadows. Progress to a conditioned live practice with four passes to cross the 35m line. Finally, make it fully opposed: the pressing coach varies between one and two strikers and the build-up side identifies the free player.
Make it harder by reducing depth to 30m or setting a six-second clock from No. 1’s first touch. Make it easier by removing an opposition midfielder, giving No. 6 a neutral role, or allowing two unopposed passes.
Age Adaptations
| Age group | Adaptation |
|---|---|
| Under 8–10 | Use 5v5 or 7v7, a 35 x 25m area, two mini goals, and only goalkeeper–defender–wide-player relationships. Coach spacing and a safe first touch rather than a full pressing scheme. |
| Under 12 | Use 7v7 or 9v9, a 55 x 40m area, and introduce the delayed No. 6 movement. Give the build-up side a free first pass before making pressure live. |
| Under 14 | Use 9v9 or 11v11 on 70 x 55m. Add the 35m target line, transition scoring, and the switch to the far-side full-back. |
| Under 16 and open age | Use full 11v11 dimensions and allow the pressing team to vary its trigger. Demand that players solve the press from their scans and cues rather than follow a pre-called pattern. |
Coach’s final reminder
Do not praise the short pass alone. Praise the decision that creates a forward-facing free player. When No. 1, No. 4/5, No. 6 and the full-back understand the timing of the press, the goal kick becomes the first attack, not merely the first clearance.
References
[1] The Football Association, Law 1: The Field of Play. Goal-kick procedure should also follow IFAB Law 16.

