

Football
Three-Lane Crossing & Finishing: Wide Release to Goal
A progressive 6v4+GK session that coaches a wide release, decisive delivery, and coordinated near-post, cut-back, and far-post finishing runs.

What you need
1 full-size goal with net, 2 mini-goals, 12-14 footballs, 18-22 flat markers, 8 cones, Two colours of training bibs, Stopwatch
Overview
This is a crossing and finishing drill for coaches who want wide possession to produce repeatable chances rather than hopeful deliveries. The core picture is clear: No. 7 is released in the wide channel, No. 9 attacks the near post, No. 10 arrives late in the cut-back pocket, and No. 11 attacks the far post. The teaching point is timing. Your attackers must fill three different lanes as the cross is delivered, not simply run into a crowded box.
Use it when your side reaches the final third but lacks bodies, spacing, or conviction around goal. It suits a 4-3-3 or 4-2-3-1, although the role numbers can be adapted to your model. Run it after a short technical activation and before an opposed attacking phase. The outcomes are a sharper first touch from the wide player, better delivery selection, more first-time finishing, and stronger protection against the counter-attack.
Coach’s intention: One runner threatens the near post, one arrives for the cut-back, one attacks the far post, and two players protect the transition behind the ball.
Setup
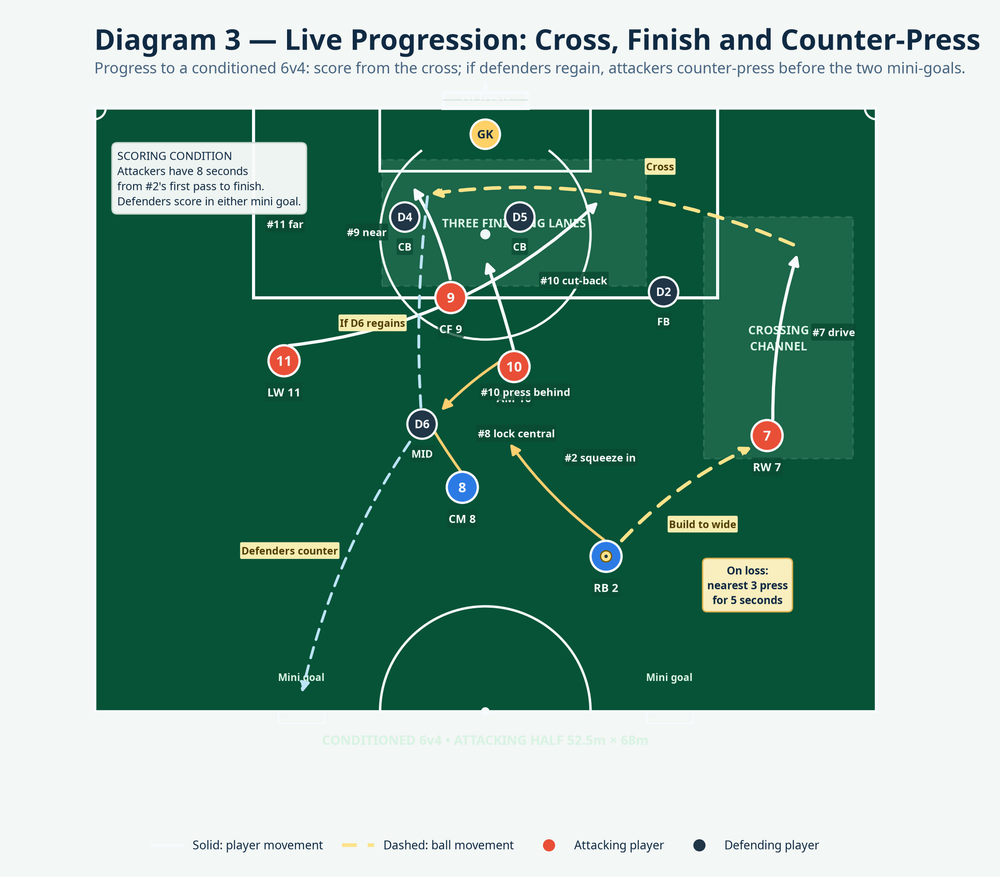
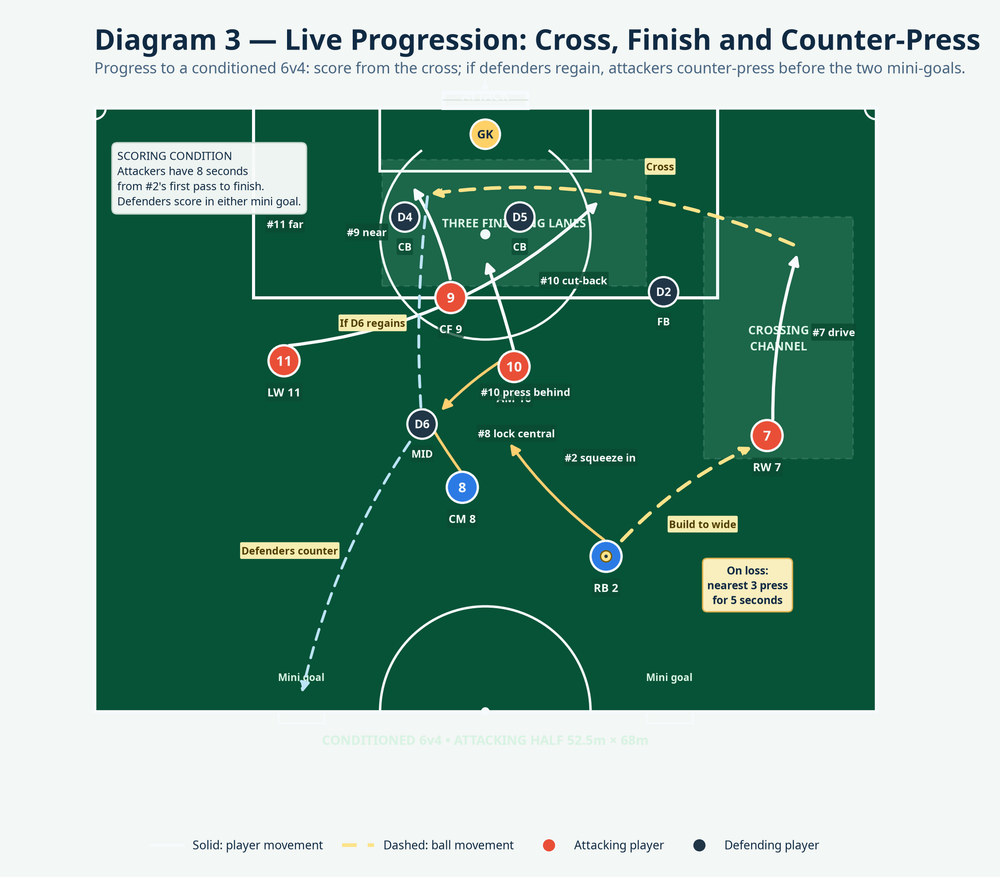
Use one attacking half of a 105m × 68m full-size pitch: the working area is 52.5m long by 68m wide, with a full-size goal and goalkeeper. On the right flank, mark a 12m-wide crossing channel from 24m out to the byline. Place a delivery line 2–3m from the byline. Mark three target lanes inside the box: a 6m near-post lane, a central cut-back zone around the penalty spot, and a 7m far-post lane. For the final progression, place two mini-goals 8m apart on the halfway line.
| Item | Detail |
|---|---|
| Players | 11: GK; attackers No. 2, 7, 8, 9, 10, 11; defenders No. 3, 4, 5, 6 |
| Equipment | 12–14 balls, 18–22 flat markers, 8 cones, two bib colours, full-size goal, two mini-goals, stopwatch |
| Duration | 30–35 minutes: 6-minute rehearsal, 10-minute opposed practice, 10-minute live progression, 4–6-minute reset |
| Rotation | No. 2 → No. 7 → No. 9 → No. 10 → No. 11; keep No. 8 as first rest-defence player before rotating |
Start No. 2 with a ball 8m inside halfway and 10m from the right touchline. No. 7 starts wide, No. 9 outside the penalty area, No. 10 eight metres behind No. 9, No. 11 wide on the left, and No. 8 in the central support lane. In opposed practice, No. 4 and No. 5 are centre-backs, No. 3 protects the far side, and No. 6 screens the cut-back area.
Step-by-Step Instructions
Phase 1 — Rehearse the Pattern, 6v0

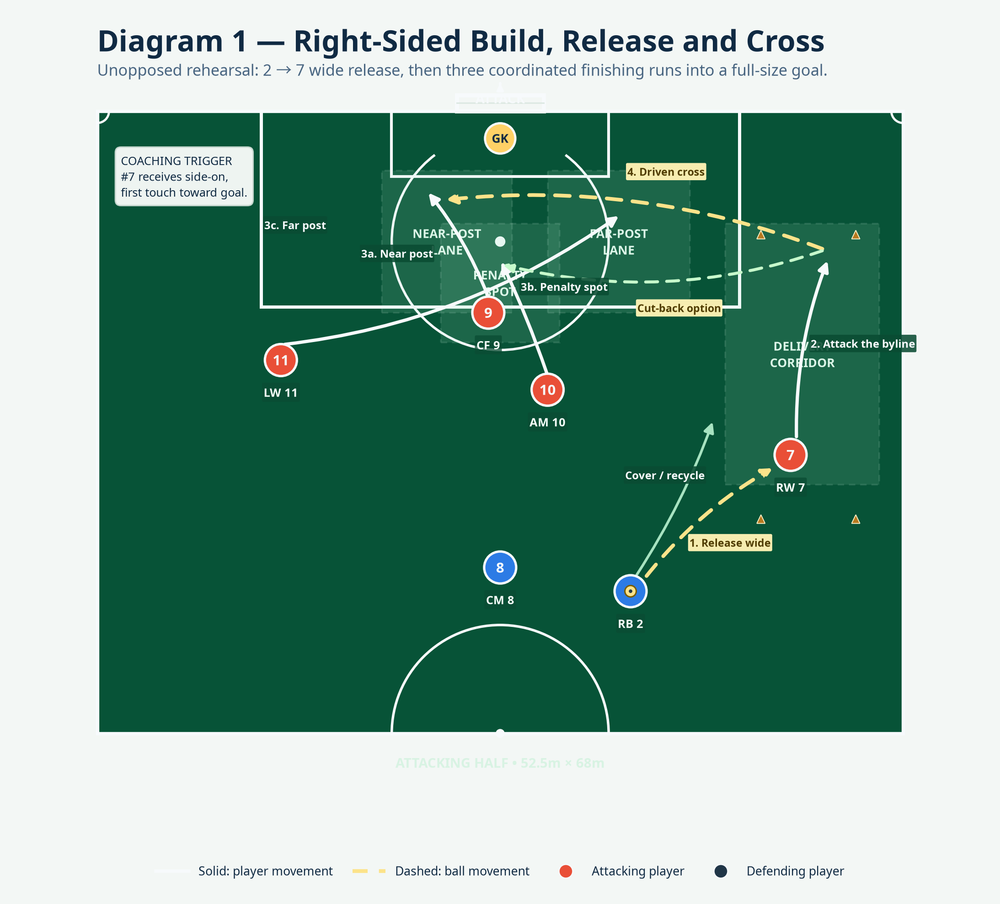
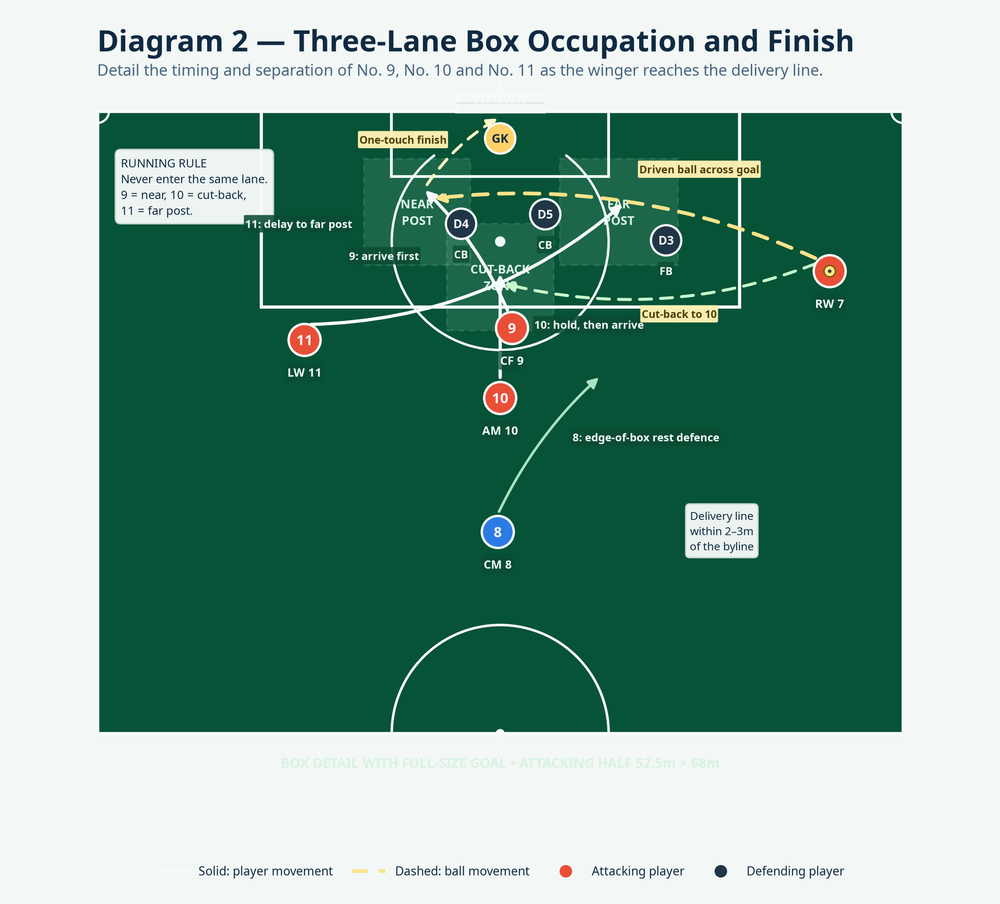
Set the starting picture. No. 2 stands over the ball. No. 7 opens their body to receive facing goal. No. 9, No. 10, and No. 11 stay outside the final lanes until the release is played; this makes the timing cue obvious.
Release wide. No. 2 plays a firm ground pass into No. 7’s front foot. The pass must allow No. 7 to attack forward on the next action, not receive with their back to goal.
Attack the delivery line. No. 7 takes the first touch down the line and accelerates through the 12m channel. Allow a maximum of three touches before the delivery line. No. 2 advances to support but remains behind the ball.
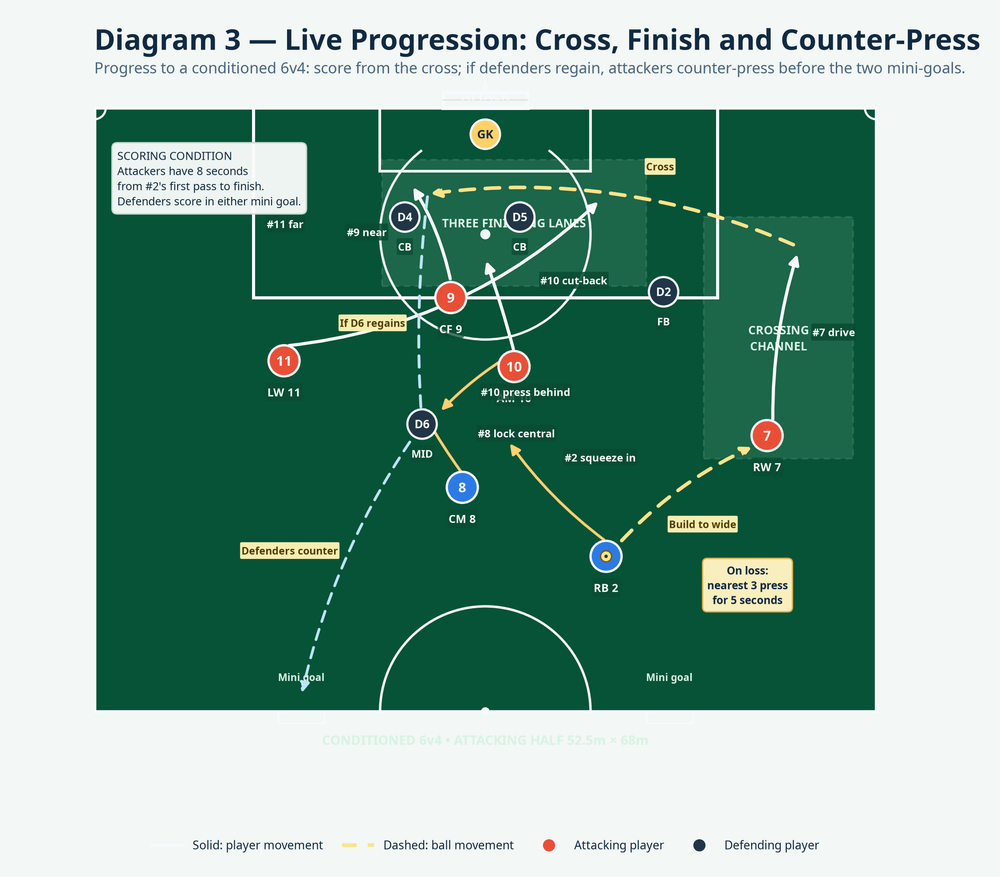
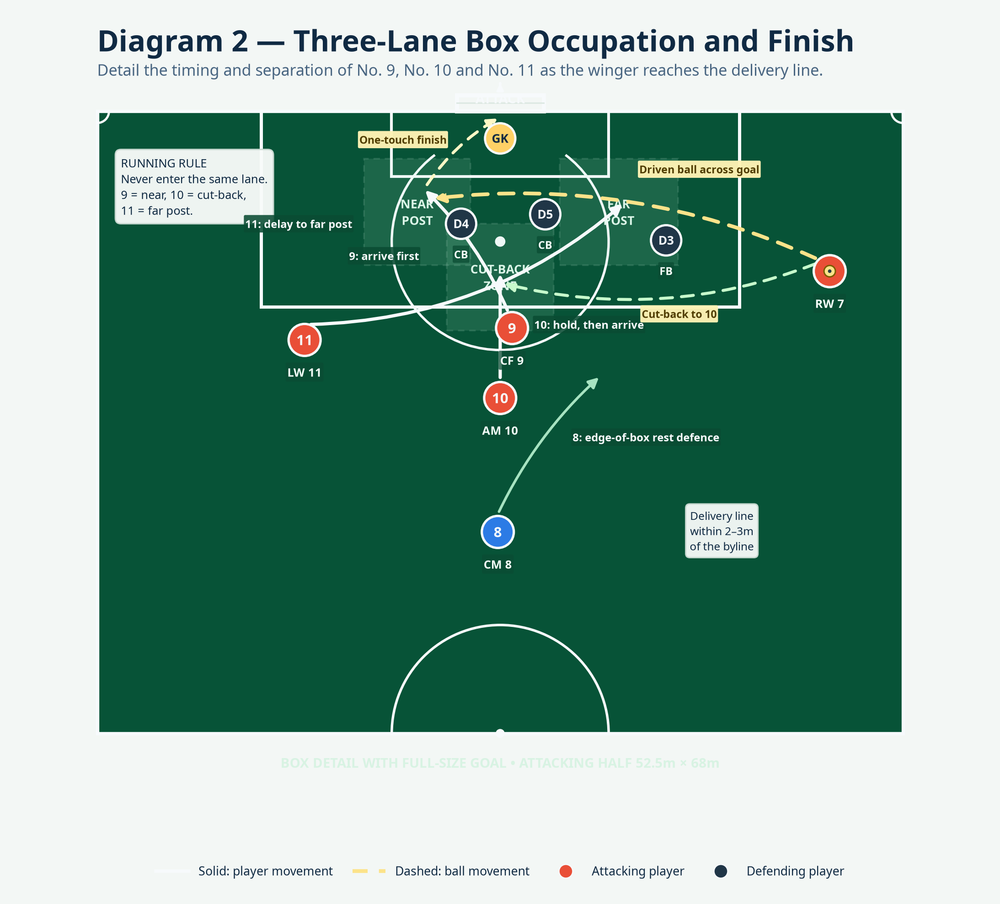
Trigger the runs. As No. 7 takes their final preparation touch and drops their head to strike, No. 9 darts across the nearest centre-back into the near-post lane. No. 10 holds for half a beat, then arrives around the penalty spot. No. 11 curves behind the far-side defender into the far-post lane.
Finish and recover. No. 7 plays a driven ball across the six-yard area or a ground cut-back. The first receiver finishes in one touch; if the ball bypasses a lane, the next lane attacks it. No. 8 holds 18–20m from goal to win clearances, while No. 2 slides inside as cover. Complete six repetitions, then mirror the drill on the left.
Phase 2 — Add a Defensive Reference, 6v3+GK
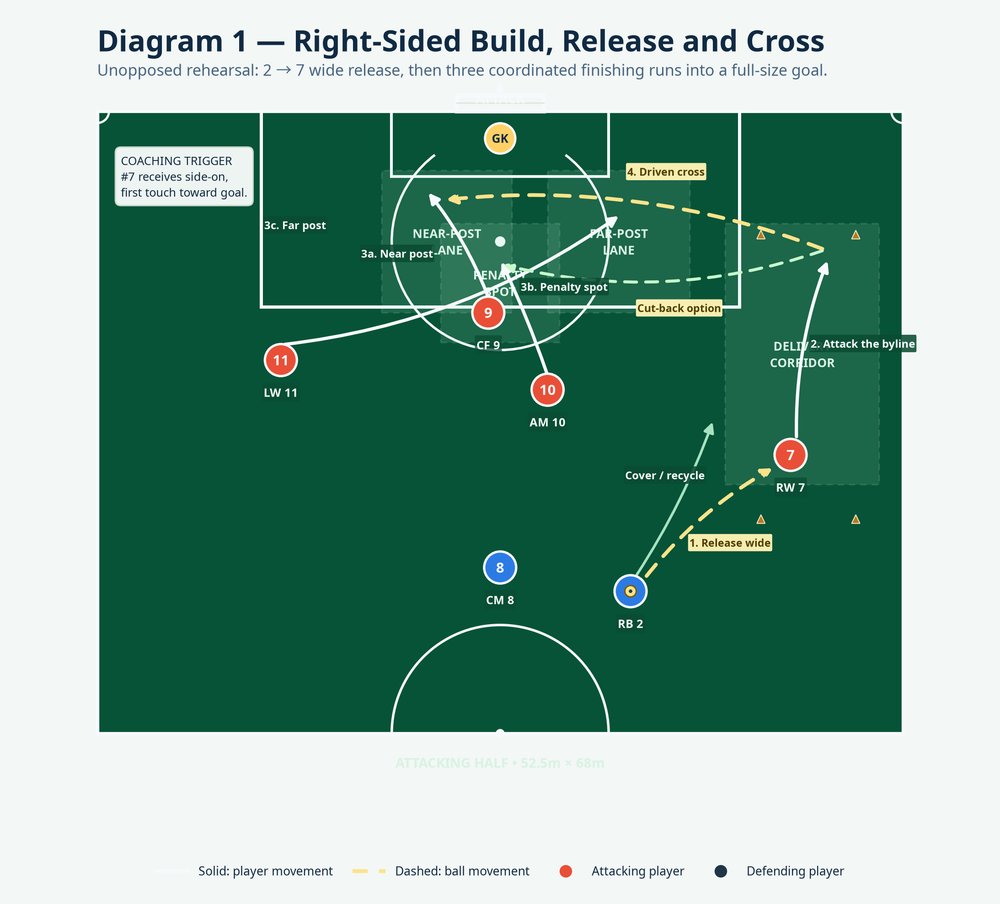
Make the box live. Introduce No. 4, No. 5, and No. 3. They are live from No. 7’s first touch and try to defend the cross and clear wide. This creates a realistic reference without overloading the learning stage.
Coach the delivery choice. If defenders drop toward their goal, No. 7 cuts the ball back behind No. 9 for No. 10. If the near-side centre-back is beaten or the goalkeeper stays central, No. 7 drives the ball across goal. If No. 11 has separated at the back post, a clipped far-post delivery is available. Give the attack 10 seconds from No. 2’s first pass to finish.
Phase 3 — Live 6v4+GK with Transition
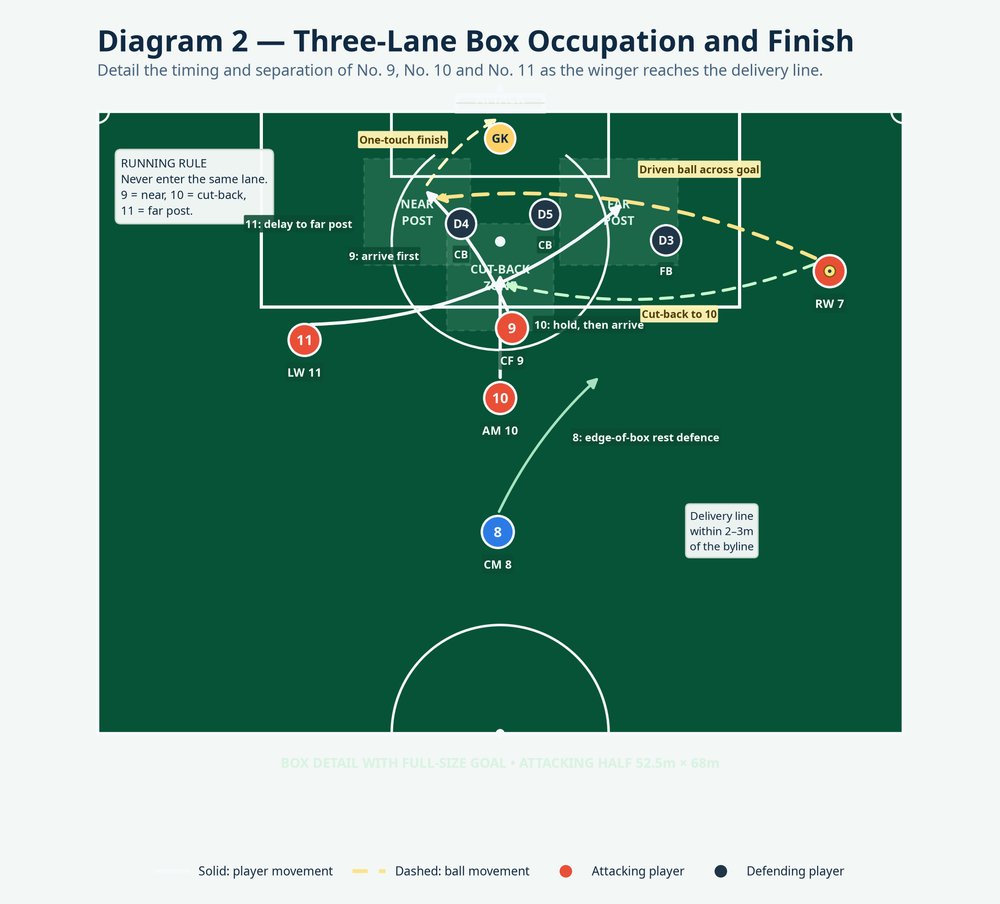
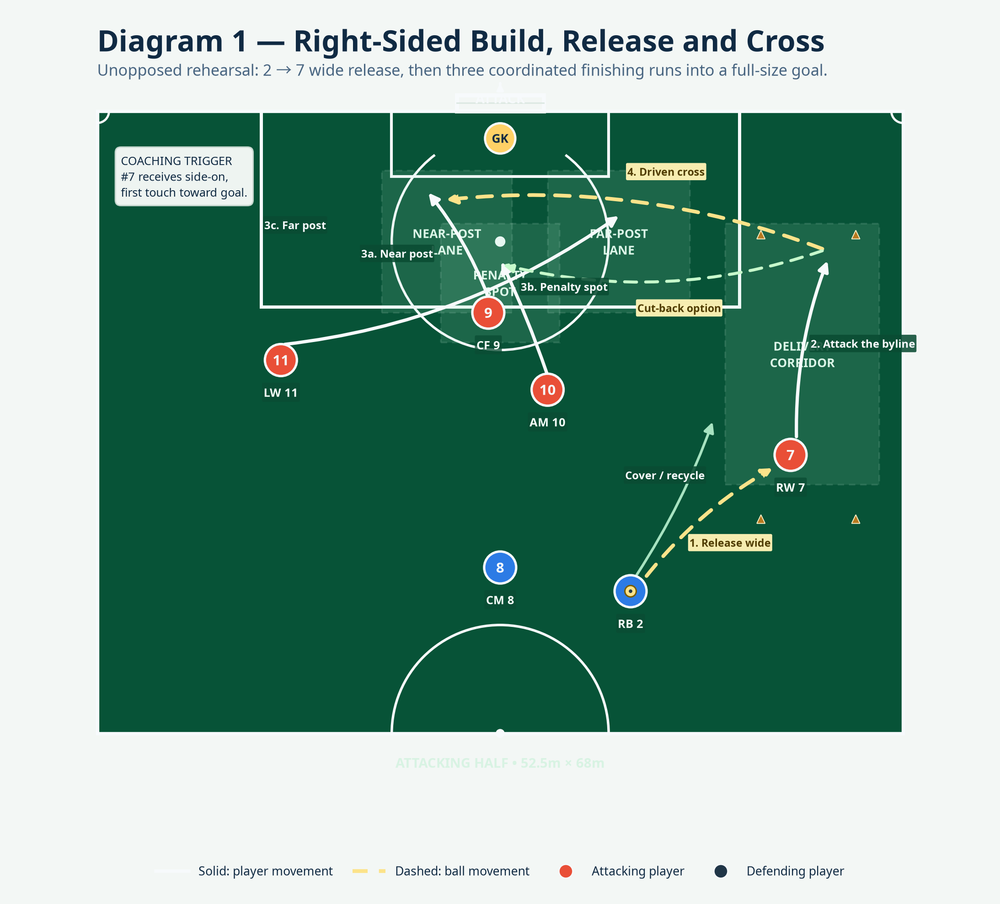
Add No. 6 and compete. The attackers have eight seconds from No. 2’s first pass to score. Award two points for a first-time finish from a cross or cut-back and one point for another finish. Defenders gain one point by scoring in either mini-goal after a regain.
Counter-press immediately. On a turnover, the nearest three attackers have five seconds to lock the first forward pass and regain possession. No. 8 protects the centre, No. 2 squeezes inside, and No. 10 presses from behind the ball. A regain restarts the eight-second attack; an escaped counter ends the repetition. Play two four-minute blocks with a 90-second coaching break.
Key Coaching Points
| Coaching point | What to coach |
|---|---|
| Receive to go | “Arrive side-on; your first touch must take you beyond the full-back.” A static touch lets the defensive line recover. |
| Use the real trigger | “Sprint when the crosser sets the ball, not when the pass travels.” This prevents early, static runs. |
| Keep lane discipline | No. 9 owns near post, No. 10 the cut-back pocket, and No. 11 the far post. Stop the practice if two players enter one lane. |
| Deliver with purpose | Drive the ball between goalkeeper and defenders, or cut it back behind the first line. Avoid floated crosses from deep. |
| Protect the transition | No. 8 and No. 2 must be set before the cross. Their first job is to stop the counter, then win the second ball. |
Common Mistakes
| Error | Correction |
|---|---|
| Runners arrive too early and become static targets. | Freeze the picture, move them back outside the box, and rehearse the final-touch trigger. |
| No. 9 and No. 10 both attack the near post. | Use flat markers to make the three lanes visible; restart only when each lane has an owner. |
| No. 7 clips a high ball from too deep. | Move the delivery line forward and require the final touch to travel into it. |
| No. 8 watches a clearance escape. | Mark a 5m recovery box at the edge of the area and reward a second-ball regain there. |
Variations & Progressions
Easier: Use a 35m × 44m area, remove defenders, allow four touches for No. 7, and use a target zone instead of a goalkeeper. This gives players time to learn the cross and the three runs.
Harder: Start No. 7 inside the half-space and make No. 2 overlap to cross. No. 7 now becomes the late arriving player, adding a decision to combine, release, or cross early.
Harder again: Play through No. 8, switch diagonally to the opposite winger, and limit the attack to 12 seconds. Require the far-side winger to attack the back post with their weaker foot.
Age Adaptations
For Under-8, use a 25m × 30m area, one small goal, no defenders, and only two lanes: near post and far post. Keep the cue simple: “run to different spaces.” For Under-10 and Under-12, use 35m × 44m, passive defenders, a 7–8m-wide channel, and coloured cones for the three lanes. Allow three touches for the winger and reward correct movement even when the finish misses.
For Under-14 and Under-16, retain the 52.5m × 68m attacking half, introduce live defenders, and enforce the 10-second finish condition. For open-age and senior squads, use the complete 6v4+GK progression, the eight-second attack, and five-second counter-press. Track how many of 10 attacks produce a shot on target from one of the three named lanes, then use that evidence to set the next session’s focus.
Coach’s Close
Do not coach your team to “cross more.” Coach them to cross when the box is filled correctly. When the spacing, timing, delivery, and rest defence are right, players create more first-time finishes while staying protected against the counter-attack.
