Netball
Master the Dodge and Lead: A Netball Attacking-Third Drill
A progressive, court-accurate session drill that teaches WA, C and GA players to lose a defender, receive on the move and link the next attacking pass.
What you need
1 netball per station, 6 flat cones or marker spots, 4 position bibs (C, WA, GA, GD), Stopwatch or session timer
Overview
This is a high-repetition attacking drill that teaches players to create a clean passing lane rather than simply run away from a defender. The worker sells a short fake, changes line sharply and leads at pace; the feeder waits and passes ahead of the runner. Use it when WA, C or GA is trapped in a congested channel or receiving flat-footed.
Run it in the main skill block after a dynamic warm-up, before moving into a full-court possession game. The base version is unopposed and gives coaches time to coach footwork and timing. The final version adds a live GD, so the same movement must work under genuine pressure. The activity is set on a regulation court measuring 30.5m × 15.25m, divided into three equal thirds, with 4.9m-radius goal circles.1
Session outcome: By the end of the block, each worker should be able to create separation with a sharp dodge, receive a pass at speed, land under control and release a purposeful next pass within three seconds.
Setup
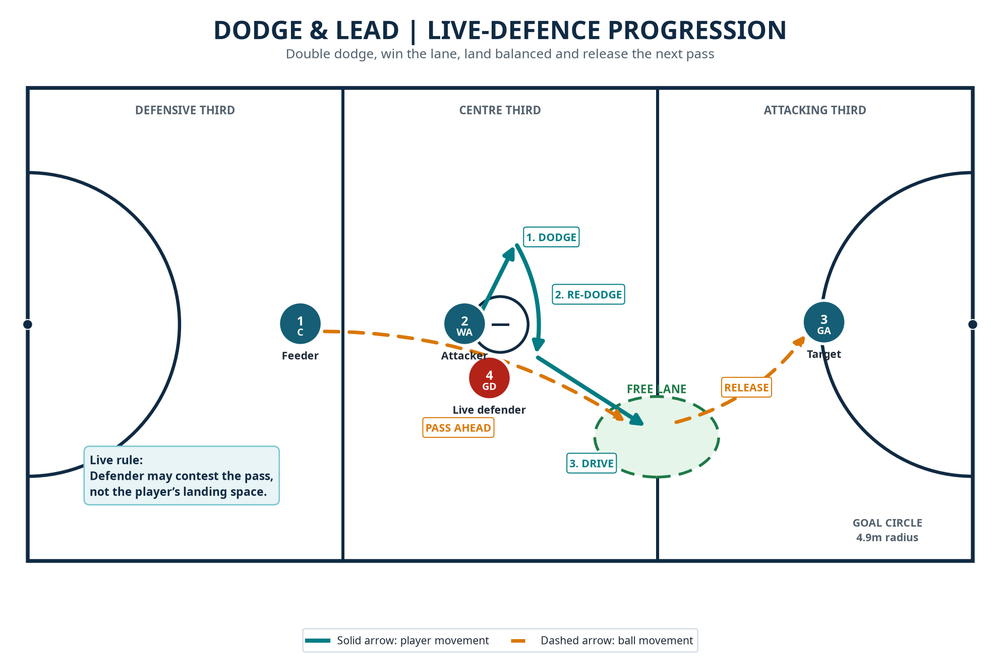
Use the centre third and attacking third in your team’s direction of play. Each station has Player 1: C (feeder); Player 2: WA (worker); Player 3: GA (link target); Player 4: GD (progression defender). With larger groups, queue three metres behind each starting cone and rotate after every action.
| Setup item | Exact coaching instruction |
|---|---|
| Court space | Mark the centre transverse line, then use the next 10.17m as the attacking third. Keep the GA target outside the goal circle until the drill progresses. |
| Feeder cone | Place Player 1 one metre inside the centre third, roughly two metres in from the sideline. |
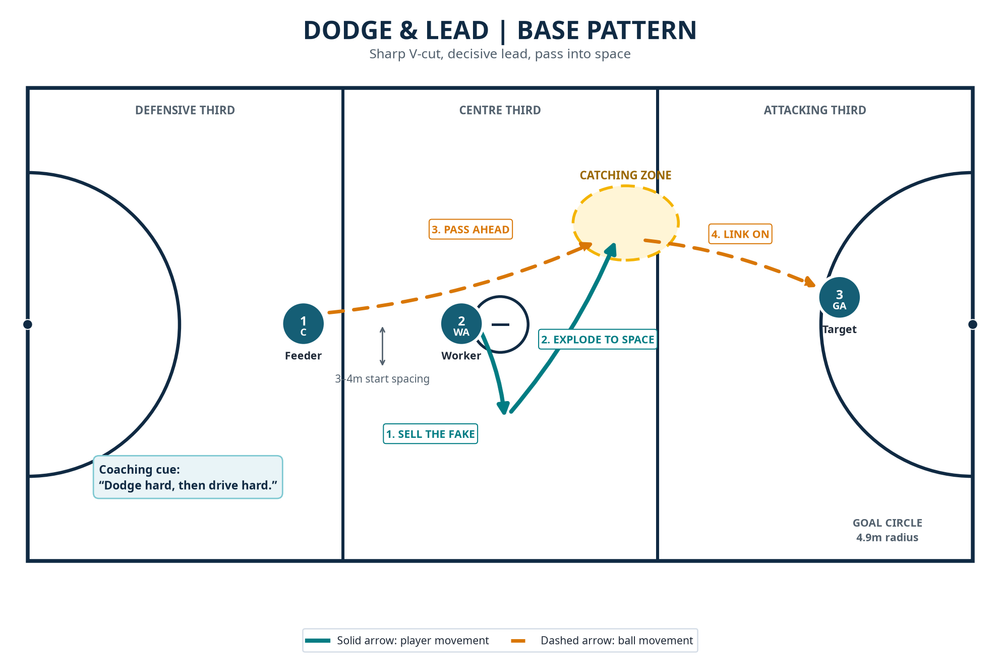
| Worker cone | Place Player 2 3–4m laterally from the feeder, facing them, with knees flexed and feet active. |
| Dodge marker | Put a cone 1.5m toward the worker’s first fake. It is a visual target for the short, convincing dodge—not the final destination. |
| Catching zone | Mark a 3m × 2m zone 4–5m diagonally forward from the worker’s start. It should sit in open court and outside the 4.9m goal circle. |
| Link target | Place Player 3 on the goal-side edge of the catching zone, initially 2–3m clear of the circle edge, ready to receive the second pass. |
You need one netball per station, six flat cones or spots, four position bibs and a stopwatch. Allocate 18 minutes: two minutes to demonstrate, three rounds of three-minute work with 45 seconds of coaching/reset between rounds, and two minutes to finish with a pressure challenge. The restricted position areas still apply: use a C, WA and GA as the attacking roles, with the GD defending in the opposition’s attacking third.
Step-by-Step Instructions
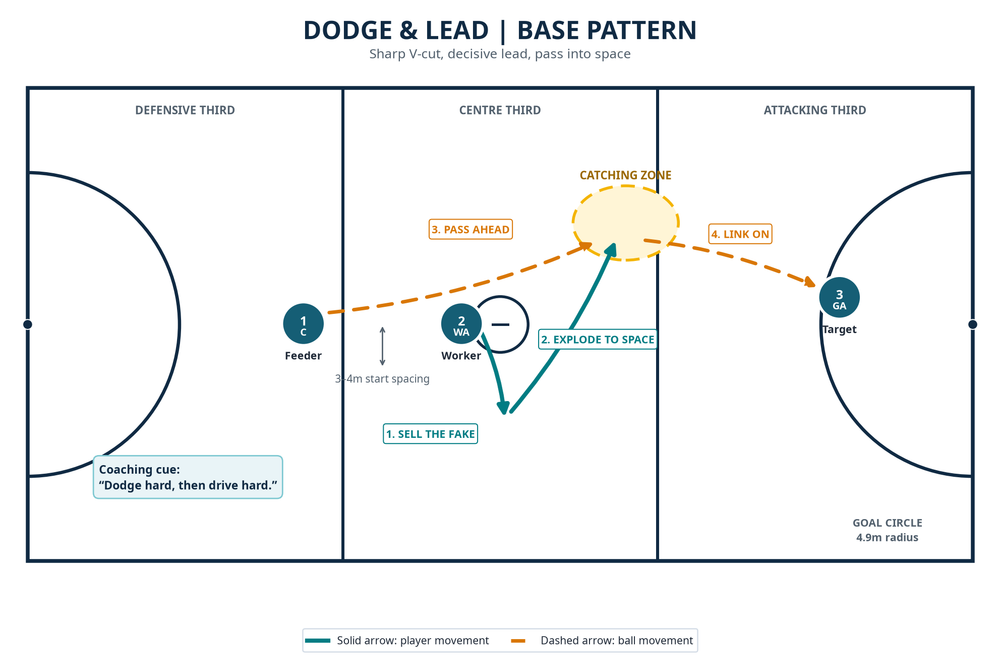
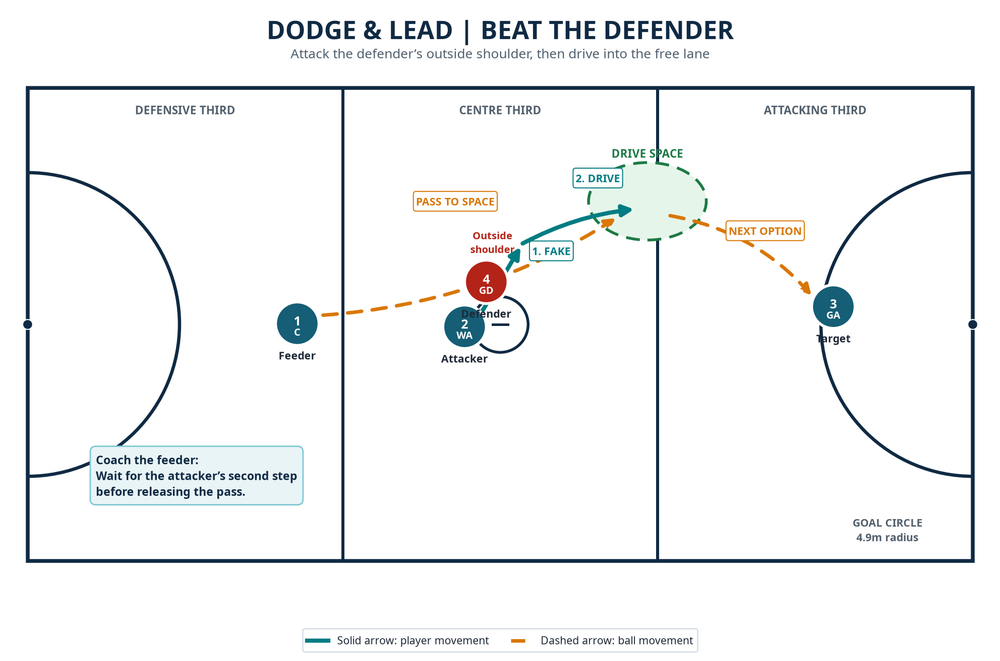
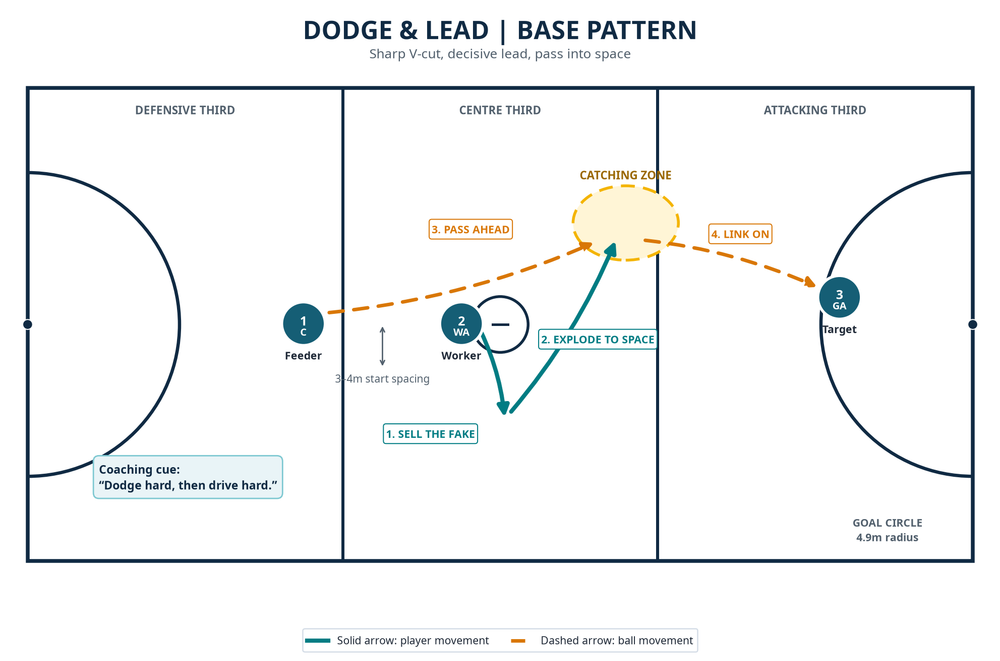
Demonstrate the picture first. Show a curved run versus a sharp V-cut. The fake is only one or two steps; its purpose is to shift the defender’s feet.
Set the feeder. Player 1 (C) starts balanced, chest facing Player 2 and eyes up. They hold the ball ready to pass but do not release it on the first movement. The feeder’s job is to read the lead, not to force a predetermined pass.
Sell the dodge. Player 2 (WA) takes one powerful step toward the dodge marker, lowering the hips and dropping the near shoulder. Insist on genuine weight transfer; a token side-step will not shift a defender.
Drive into the catching zone. Load the outside foot and drive 4–5m into the marked zone. The first three steps are fast and direct, creating a V rather than a semicircle.
Pass to where the worker will be. Once Player 2 commits to the new line, Player 1 delivers a firm chest pass to the front shoulder, early enough for the WA to run onto it.
Catch, land and scan. Player 2 receives at extension, lands balanced and establishes a legal pivot. They turn hips and shoulders down-court, find Player 3 and show the ball early.
Link the next pass. Player 2 passes to Player 3 (GA), who holds a clear angle. Player 2 then clears the space.
Rotate with urgency. Player 1 becomes Player 2; Player 2 becomes Player 3; Player 3 returns to the feeder line; Player 4 joins as a shadow defender once live. Target eight clean catch-and-link sequences per role.
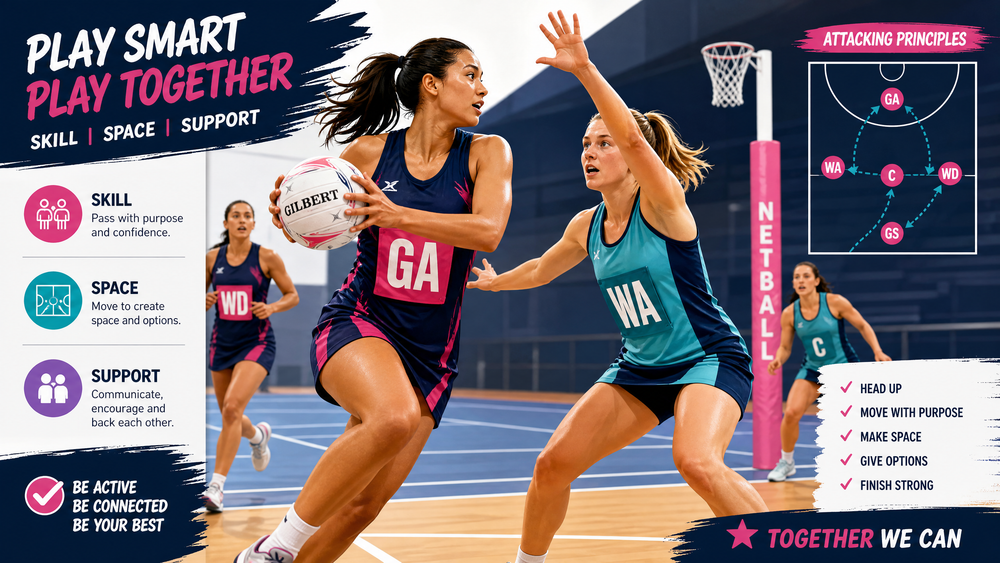
Key Coaching Points
| Coaching focus | What to look and listen for |
|---|---|
| Convincing deception | The player’s shoulder, hips and eyes sell the first direction. Coach the cue: lower, show, go. |
| Explosive change of line | The outside foot loads and pushes the attacker into the new lane. The first three drive steps are hard, short and purposeful. |
| Timing between feeder and worker | The feeder waits for the attacker to win the line; the worker does not leave before the feeder is balanced. |
| Pass into space | The pass travels to the front shoulder and arrives early enough to preserve the runner’s stride. |
| Strong landing picture | The receiver lands with knees soft, body tall and eyes already scanning for the GA. Do not allow a catch followed by a panic turn. |
| Clear the next option | The GA presents an angle, while the WA clears after passing. Good attacking work creates two options, not one crowded lane. |
Common Mistakes
| Error to correct | Why it breaks down | Coach intervention |
| --- | --- |
| The worker curves the lead | The defender can stay goal-side and the pass lane closes. | Place a second cone on the drive line and require the lead to pass between the two markers. |
| The dodge is too long or soft | The attacker loses speed and the defender does not shift. | Call one-and-out: one fake step only, then a full acceleration. |
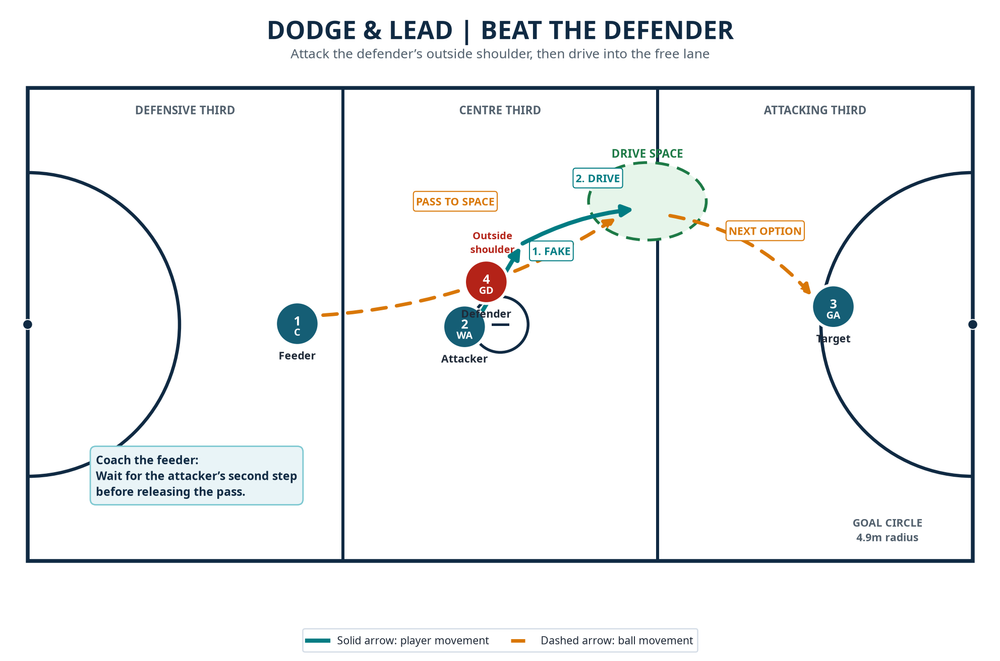
| The feeder releases too early | The ball travels to the fake, not to the new line. | Make the feeder say wait internally until they see the worker’s second drive step. |
| The pass lands behind the runner | The receiver must brake, reach backwards or turn into traffic. | Freeze the feeder and ask where the runner’s front shoulder will be in one second. |
| The GA crowds the catching zone | The WA cannot land or see the next pass. | Mark a separate target cone and require the GA to hold an angle until the WA has possession. |
Variations & Progressions
1. Gate-lead variation for early learning. Keep the defender out. Turn the catching zone into a two-cone gate, 2m wide, and award a point only if the WA catches while moving through it. This gives younger or less experienced players a clear spatial target and lets you shorten the lead to 2–3m.
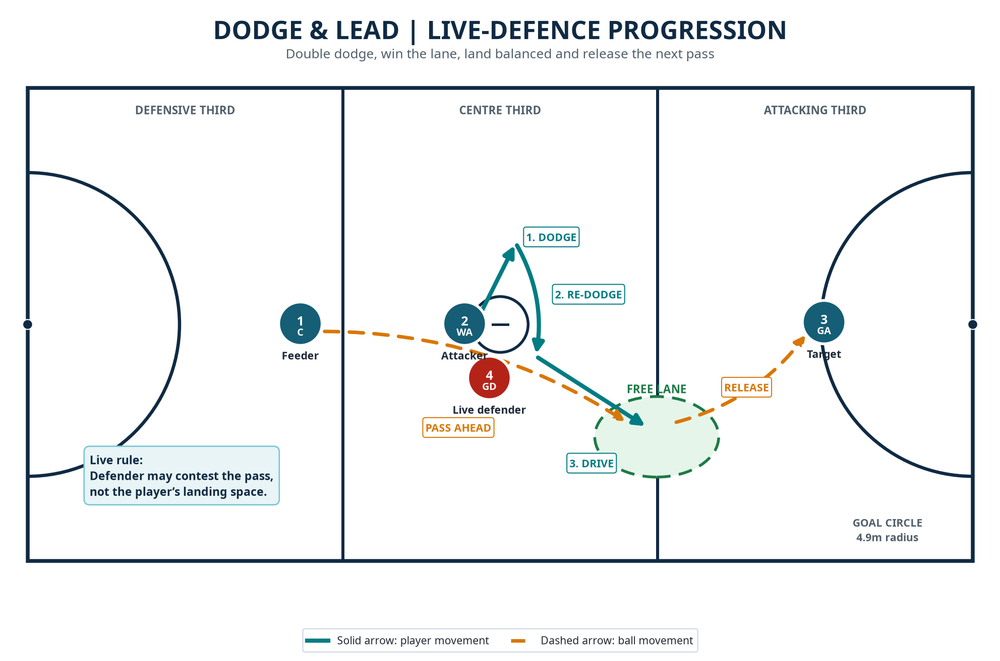
2. Guided GD progression. Add Player 4 as a GD positioned half a metre goal-side and slightly inside Player 2. The defender shadows first, then is allowed to mirror the initial dodge but not intercept. The attacker must attack the defender’s outside shoulder before driving into the open lane. Pause after every third rep and ask the attacker to identify which side of the defender was available.
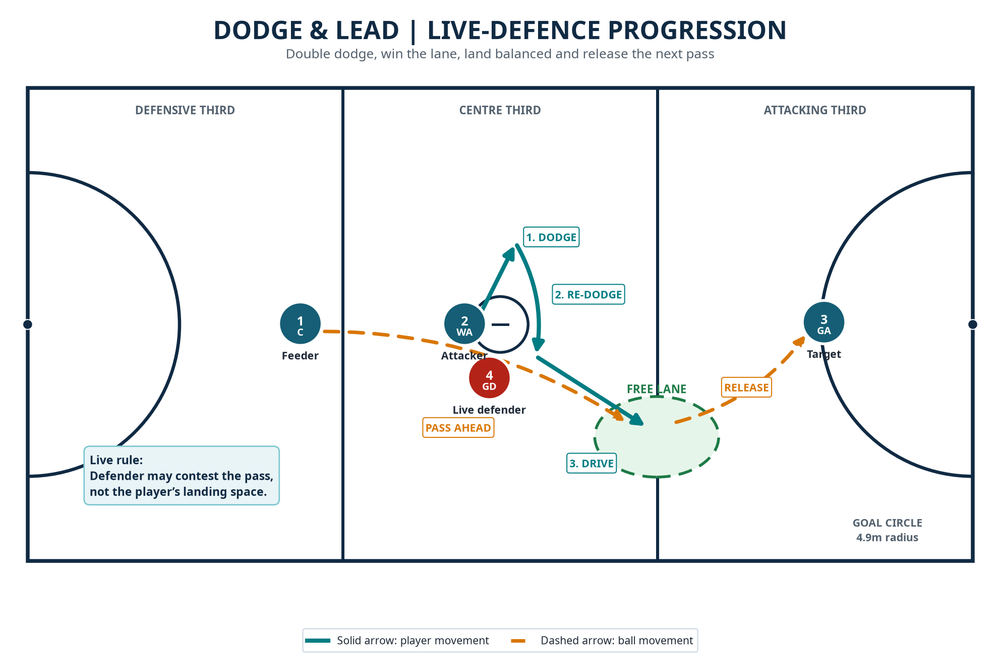
3. Live-defence challenge. Make the GD fully live. The attacking group earns one point for a clean C-to-WA-to-GA connection completed in six seconds; the defender earns one point for a legal deflection or intercept. On the second and third rep, require a double dodge if the defender wins the first line. This progression raises the decision-making demand without losing the original technical focus.
Age Adaptations
| Age group | Adaptation | Coach emphasis |
|---|---|---|
| Under 8 | Use a 6m × 6m grid, a 2m lead and no defender. Let pairs roll into a gentle jog before adding a pass. | Celebrate changing direction and catching with two hands; keep work blocks to 45–60 seconds. |
| Under 10–12 | Use a 8m × 8m grid, a 3m lead and a passive shadow defender. Begin with named positions only after players understand the movement. | Teach ready stance, eyes up and pass-to-space language. |
| Under 14–16 | Use the full centre-to-attacking-third layout, a 4–5m lead and a guided then live GD. | Demand a sharp V-cut, legal landing control and a quick link to GA. |
| Open | Run the live version at match speed, add a second intercepting defender or require the feeder to choose between two leading options. | Focus on reading body position, disguising the first move and delivering under pressure. |
Finish by asking: What made the defender move first? The answer reveals whether the player understands the attacking principle.
References