Netball
Fast Break Centre Pass: 4-Pass Circle Entry
Coach a repeatable, high-tempo centre-pass pattern that moves the ball from the centre circle to a front-cutting shooter in four purposeful passes.
What you need
1 regulation netball, 14 position bibs or coloured training bibs, 6 flat cones, 1 whistle, full Netball court and goalposts, stopwatch or visible timer
Overview
This Fast Break Centre Pass is a four-pass attacking pattern that converts a controlled restart into an early circle entry. The pattern is designed for teams that want to take the first available attacking space rather than settle into a static possession. The Centre (C) releases the ball to Wing Attack (WA), who links immediately to Goal Attack (GA); WA then arrives at the circle edge to feed Goal Shooter (GS) on a front cut. The target is a shot attempt in five to six seconds, before the defensive unit can establish a tight circle screen.
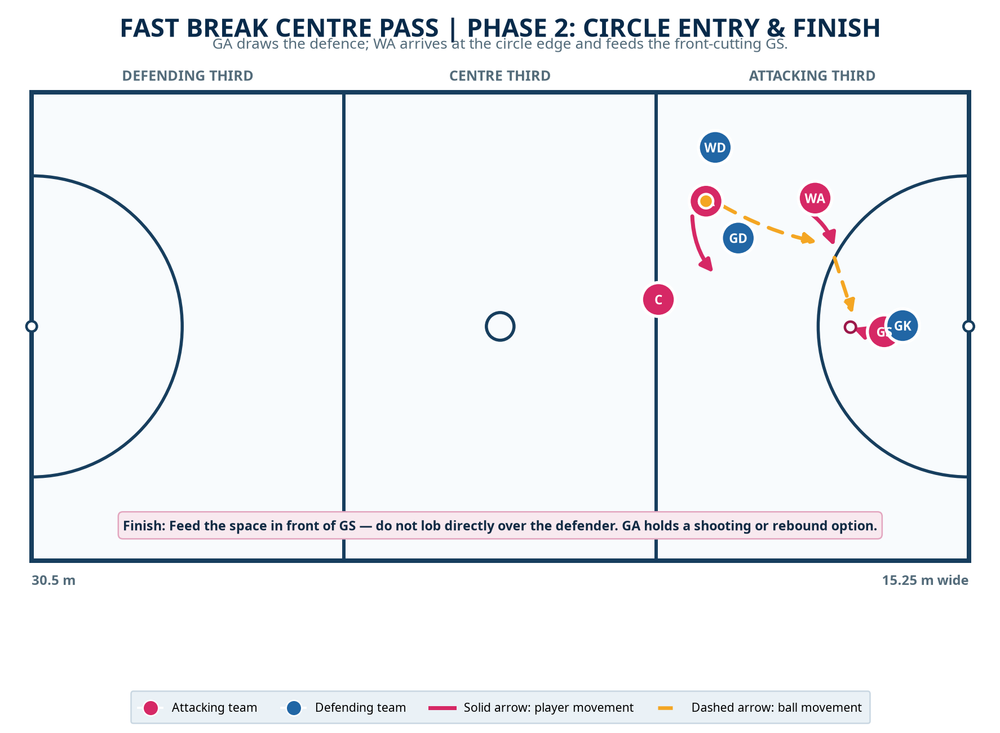
Use it after a goal when your team has the centre pass, or as a planned restart when the defence is sitting off the centre circle. It is especially effective when the opposing Wing Defence (WD) marks ball-side and leaves room for WA to lead across their front. The court is 30.5 m long by 15.25 m wide, divided into three equal thirds; each goal circle is a 4.9 m-radius semicircle, so the route shown keeps WA outside the circle and gives GA and GS the legal scoring options.1
Play key
| Attacking sequence | Position | Primary job |
|---|---|---|
| 1 | C — Centre | Release quickly and trail as the safety link. |
| 2 | WA — Wing Attack | Win the first lead, then arrive balanced at the circle edge. |
| 3 | GA — Goal Attack | Drive into the attacking third and draw Goal Defence. |
| 4 | GS — Goal Shooter | Hold the circle, then front cut into the feed. |
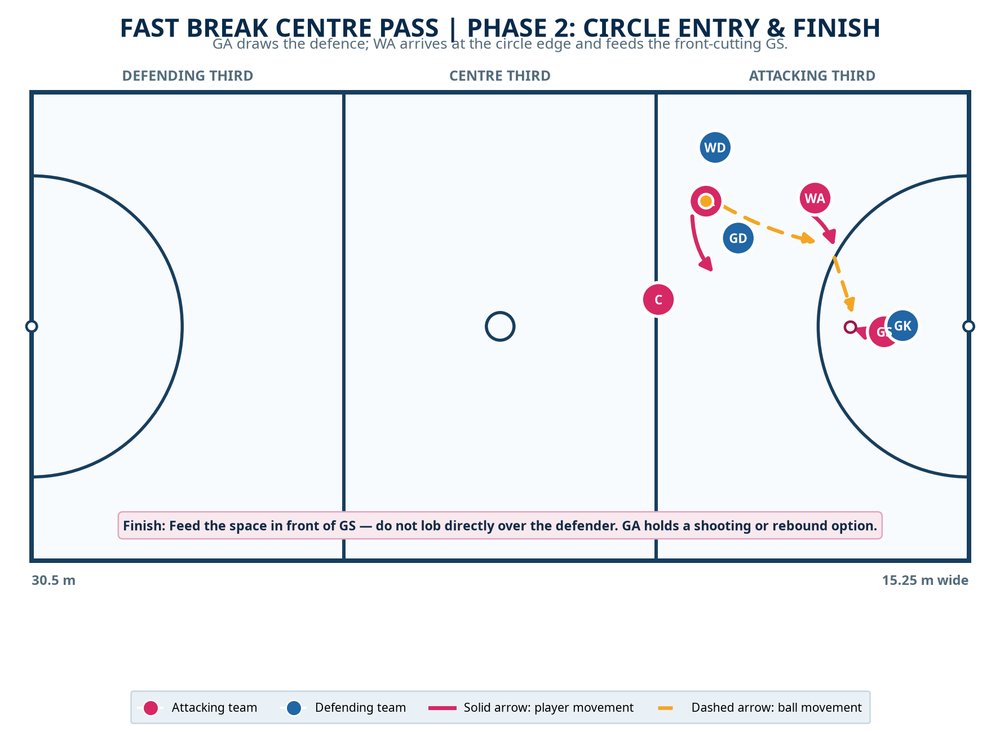
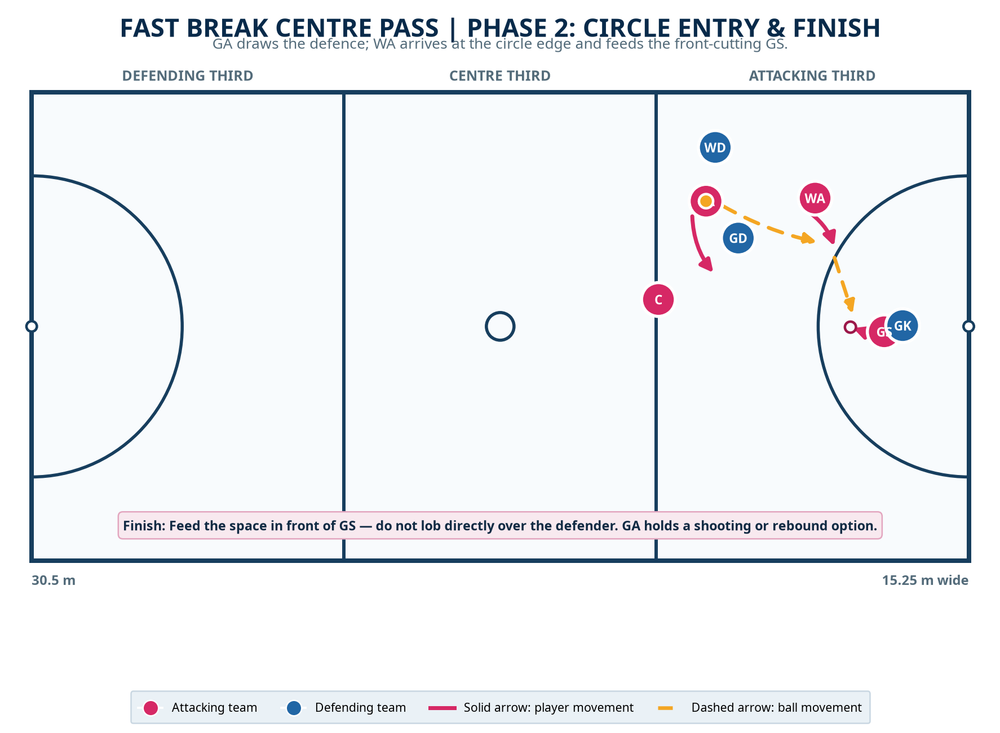
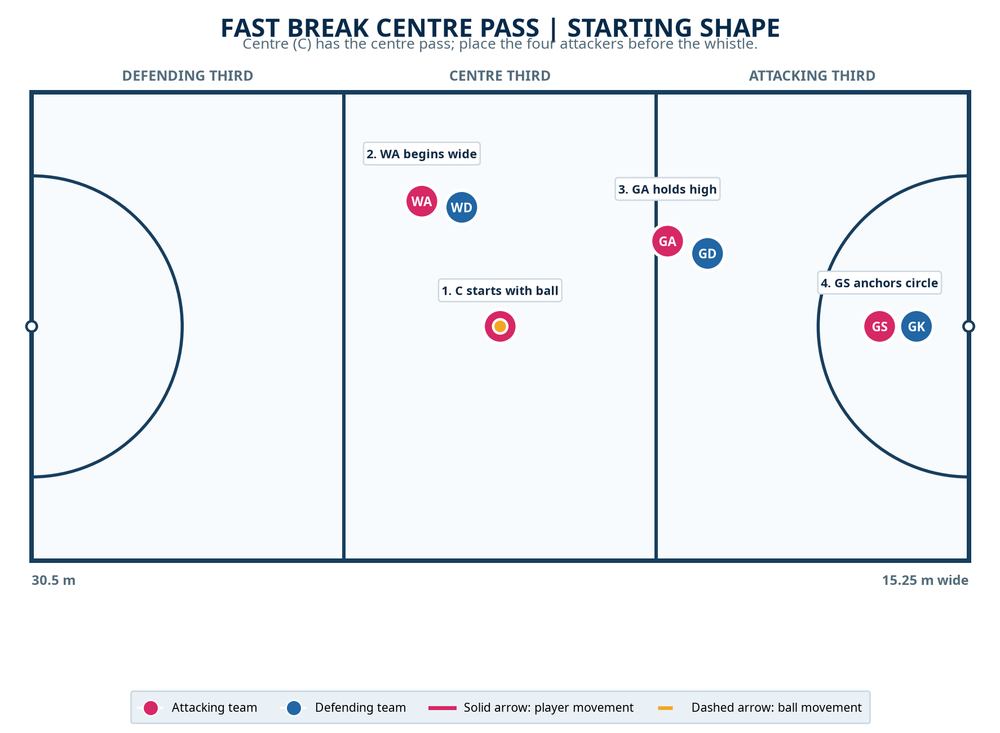
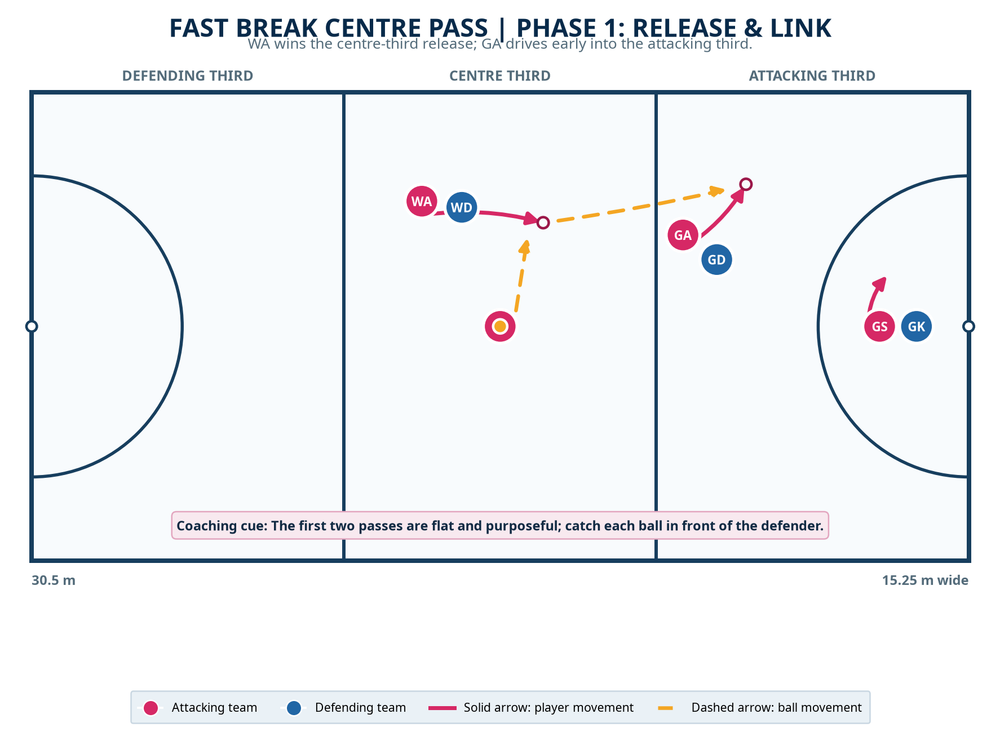
The diagrams use pink for the attacking team, blue for defenders, solid arrows for player movement and orange dashed arrows for ball movement.
Setup
Set up on a full 30.5 m × 15.25 m court. You need one ball, bibs for two units, six flat cones and a whistle. Place two flat cones 1 m either side of the intended WA reception point in the centre third, then place two further cones 1 m outside the goal-circle line to mark WA's delivery lane. The final two cones mark the preferred GS front-cut channel, approximately 1.5 m from the post and 1 m inside the circle line. A full rehearsal uses 14 players (seven attackers and seven defenders); begin with C, WA, GA and GS active against WD, GD and GK if numbers are limited.
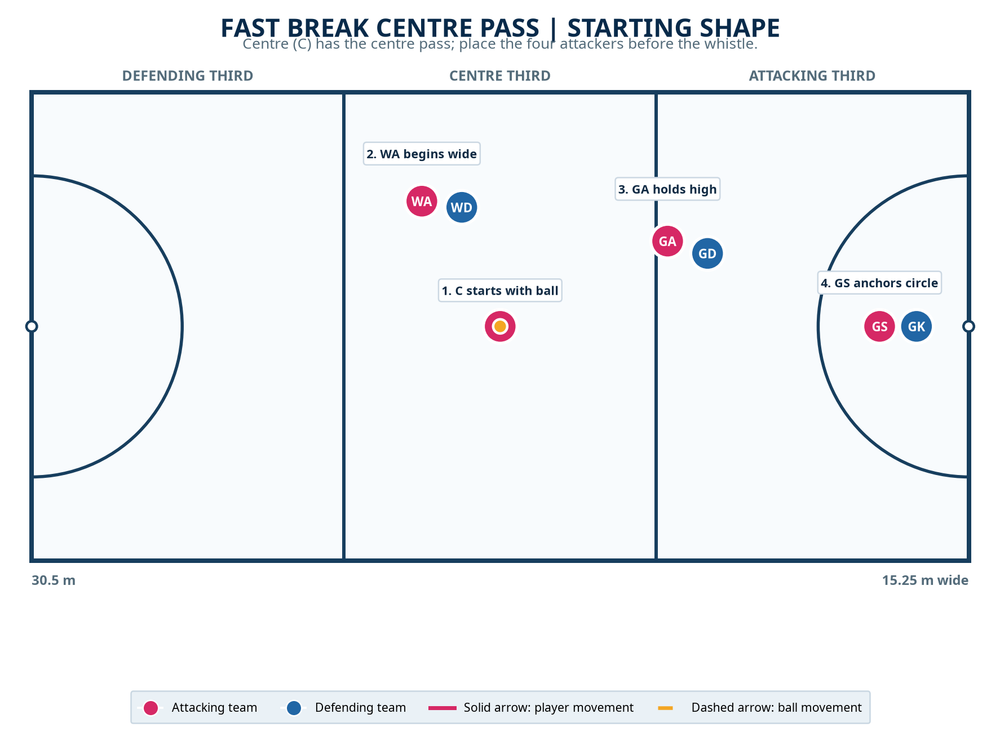
Start C in the centre circle with WA 2–3 m wide and 3–4 m ahead in the centre third. GA begins high in the attacking third, 4–5 m from the transverse line, while GS stands just inside the top of the circle and slightly ball-side of GK. Keep the remaining players in their legal areas as passive or live defenders. This starting shape preserves width, gives C a visible first option and prevents GA and GS from occupying the same driving lane.
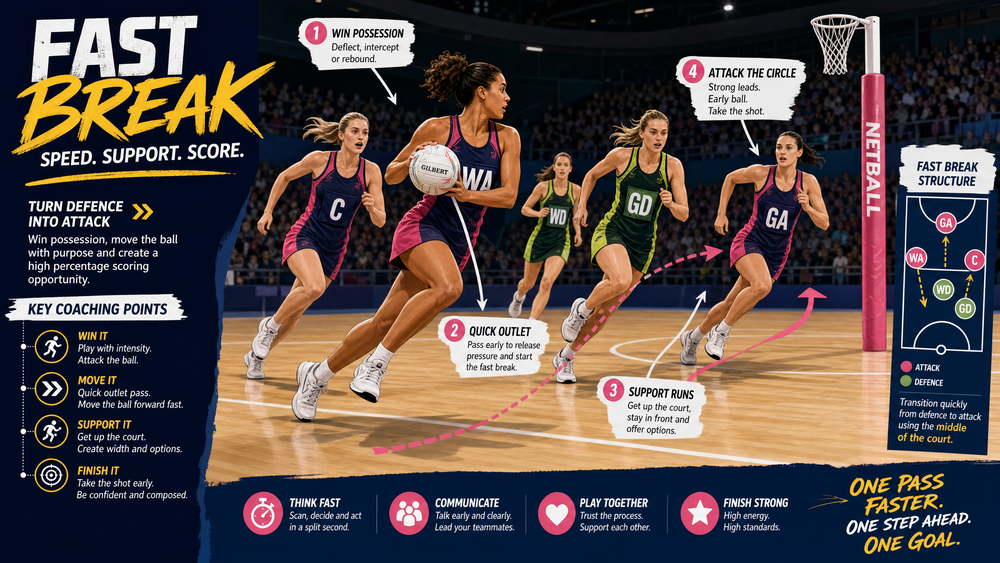
Coach's picture: C sees WA first, but GA is already preparing the next space. GS stays patient until the ball reaches the attacking third.
Step-by-Step Instructions
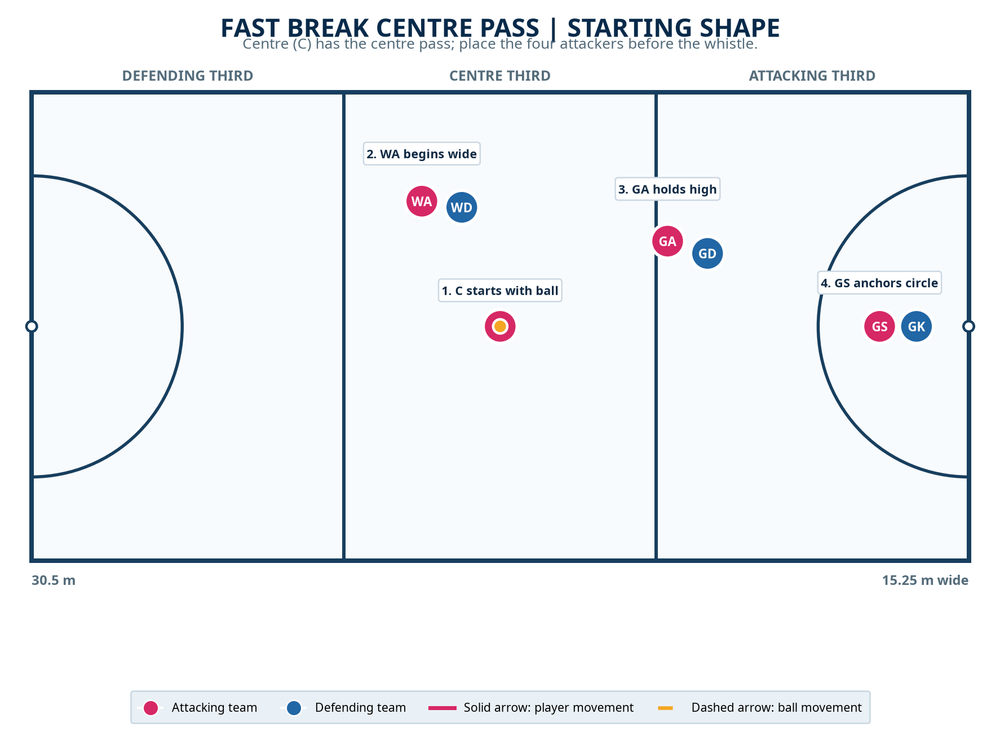
Set the trigger. On the whistle, C (1) stands in the centre circle with eyes up and shoulders square to WA. C's first scan lasts no longer than half a second: look to WA, check GA's diagonal drive, then commit. WA (2) initially holds wide to pull WD away from the central lane.
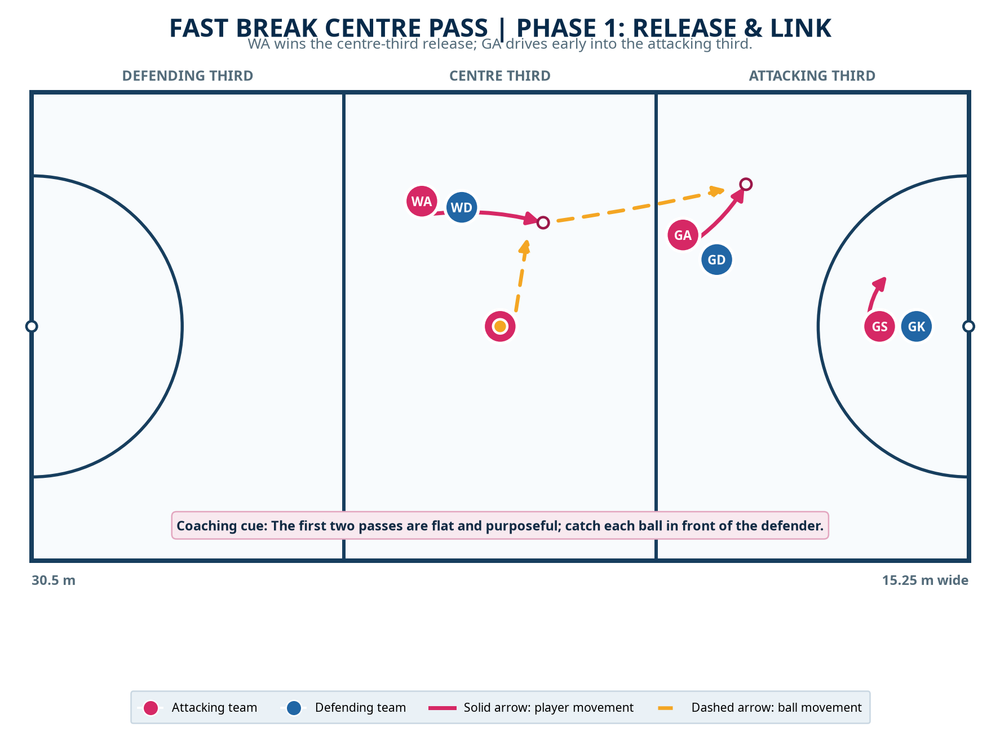
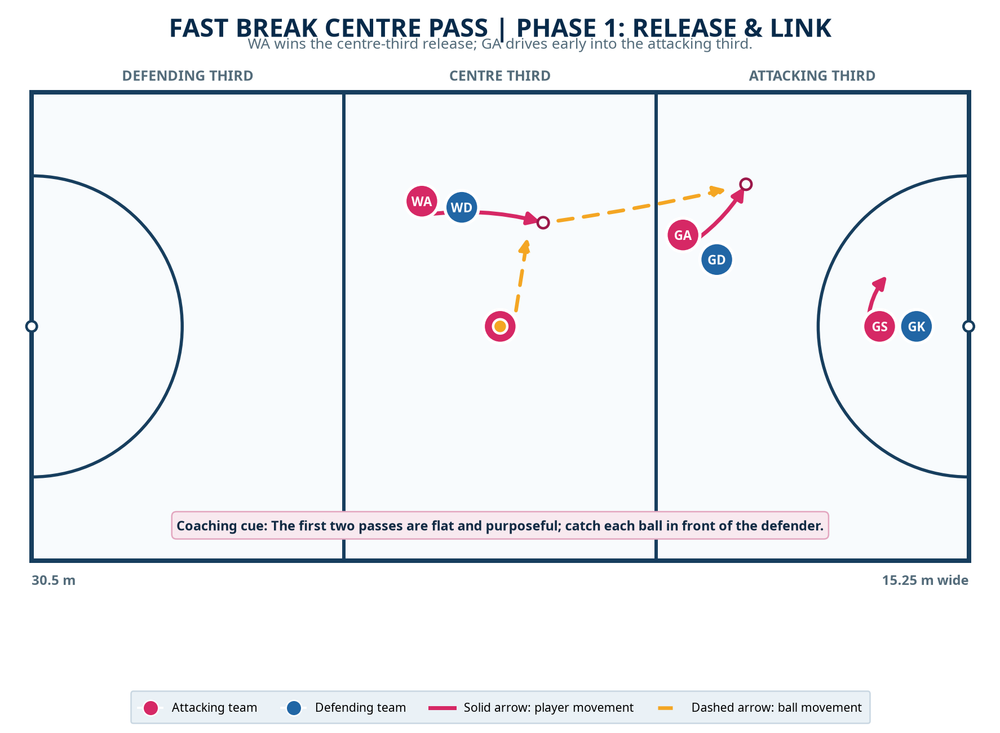
Win the first lead. At roughly 0.5 seconds, WA plants the outside foot and drives a hard 5 m lead across WD's front toward the centre-third cone gate. The lead must be away from the ball first, then back toward it; this creates separation instead of running directly into the defender. C delivers a flat chest or shoulder pass to WA's outside hand at about 1.0 second.
Drive GA as WA catches. GA (3) moves the instant WA is airborne or receiving, not after the catch. GA accelerates on a 6–8 m diagonal into the attacking third, aiming to receive 2–3 m inside the transverse line and clear of GD's direct line. C follows the pass by trailing 4–5 m behind WA as the emergency reset.
Link forward, not sideways. WA lands on balance, opens the body toward GA and releases within about 0.7 seconds. WA's pass travels forward and slightly ahead of GA's run, so GA can catch moving toward goal rather than stopping. This second pass should arrive at 1.8–2.2 seconds. If GA is denied, WA returns to C immediately and restarts the same attacking shape; do not force a floated ball through GD.
Create the circle-edge feed. As GA catches, WA continues the run to a point 1–2 m outside the circle line, arriving at an angle rather than square to the sideline. GA carries GD for one or two steps toward the post side, then feeds WA into space. The third pass should arrive around 3.0–3.5 seconds.
Time the GS front cut. GS (4) does not move early. When GA receives the second pass, GS shows a brief hold behind GK, then plants the outside foot and cuts across GK's front into the ball-side channel. The desired catch point is 1–2 m in front of the post, with GS facing the ring and GK behind or alongside. GA remains mobile inside the circle as the second shooting and rebound option.
Deliver the fourth pass. WA sees GS's front shoulder, not the defender's hands. WA feeds a firm, low-to-mid-height pass into the space of the cut at approximately 4.0–4.5 seconds. The pass must be driven in front of GS; a high lob gives GK time to recover.
Finish and reset the standard. GS secures the ball, turns with a legal landing, and takes the shot by 5–6 seconds. Whether the shot scores or misses, C and GA set immediate rebound and retention positions. Restart the drill from the centre circle and hold the same pass count: C → WA → GA → WA → GS.
Key Coaching Points
| Coaching focus | What to teach |
|---|---|
| Lead quality | Demand an explosive change of pace; a jog does not create a passing window. |
| Pass timing | Release to the next runner's space, not to the spot they occupied. |
| Width and depth | WA gives width; GA provides depth. If either flattens, the defence can hunt two receivers at once. |
| Ball speed | Use flat, catchable passes. The ball should move more quickly than any player. |
| Circle patience | GS holds until the second pass is secure, then cuts once with conviction. |
| Safety link | C trails the play and is always available for a reset rather than watching the attack. |
Common Mistakes
| Error to spot | Immediate correction |
|---|---|
| WA starts the lead too close to C. | Move WA 2–3 m wider before the whistle; insist on an away-then-back lead. |
| GA waits for WA to catch before running. | Use the cue, “move on the flight”; GA leaves as C's pass is travelling. |
| WA stops at the circle edge. | Coach WA to arrive on an angle with hips open to GS and GA. |
| The final feed is floated. | Rehearse a firm feed to GS's front shoulder; use GK as a live visual constraint. |
| Players drift toward the ball after a miss. | Freeze the picture and re-establish C as the reset, GA as the rebound, and WA as the outlet. |
Variations & Progressions
Start with the unopposed walk-through. Run the pattern at 60% pace and use the cone gates to teach exact lead and catch locations. The next progression is guided defence: WD, GD and GK track their opponents but may only intercept the fourth pass. This gives attackers a realistic defensive picture without breaking down the first two links.
For a full-pressure progression, play live 4 v 3 inside the centre and attacking thirds. Award one point for a shot within six seconds, an extra point for a score, and a turnover to the defenders for any forced or floated pass. To make the pattern harder, instruct WD to deny the WA lead; C must then hit GA as the first option, with WA becoming the second link at the circle edge.
Age Adaptations
| Group | Adaptation | Coaching priority |
|---|---|---|
| Under 8–10 | Use half court, four attackers and passive defenders. Allow a five-pass finish. | Catching on balance and identifying the next option. |
| Under 11–12 | Use the full movement pattern but remove the six-second outcome. Begin with cone channels before adding WD, GD and GK. | Strong leads, landing control and forward vision. |
| Under 13–14 | Run 4 v 3 live and time the shot window at 6 seconds. Rotate C and WA frequently. | Speed of decision, pass selection and circle timing. |
| Under 15–open | Add scout constraints, live intercepts and a counter-pressure rule after the shot. | Reading defensive shape and using the reset without losing tempo. |
Session delivery note
Coach this play in three blocks: five minutes of unopposed patterning, seven minutes against guided pressure, and eight minutes of competitive live reps. Stop only for a clear technical correction, then replay the same moment immediately. The standard is not merely a completed pattern; it is a composed, forward-moving attack that gets GS or GA a clean early look.
References