Netball
Zone Defence Set-Up Play: Funnel, Trap & Intercept
Build a connected seven-player zone that shows the first pass wide, closes the return lane, and creates a repeatable intercept opportunity without sacrificing circle protection.
What you need
1 regulation netball, 14 position bibs (7 red, 7 blue), 8 flat cones, 1 whistle, Full 30.5 m x 15.25 m netball court
Overview
This Zone Defence Set-Up Play gives a seven-player defensive unit a repeatable answer to an opposition centre pass and the first two passes into the defensive half. It protects the middle first, closes the ball-side wide gate, then funnels the attack into a long pass that GD can intercept or GK can contest. Use it against sides with a fast Wing Attack, a predictable C-to-WA release, or a tendency to pull defenders away from the circle.
The court is 30.5 m long by 15.25 m wide, split into three equal 10.17 m thirds. The centre circle is 0.9 m in diameter and each goal circle has a 4.9 m radius.1 Treat these lines as coaching landmarks: the zone must connect across them rather than become seven separate one-on-one contests. This is an intermediate set play, but the starting shape can be introduced from Under 12 onward.
For training calls, use 1 GK, 2 GD, 3 WD, 4 C, 5 WA, 6 GA, 7 GS. These numbers are team shorthand only; use standard position initials in a match. Red circles in the diagrams are the zone-defence unit and blue circles are the opposition.
Setup
Use a full court, 14 players, one ball, seven red and seven blue bibs, eight flat cones, and a whistle. Place two cones 1.5 m inside each transverse line and two cones 2 m in from each sideline in the defensive half. These landmarks create a visible central lane and ball-side wide gate. Mark a 2 m by 2 m intercept pocket just inside the defensive goal third, about 3 m outside the top of the goal circle on the ball side.
Set blue C in the centre circle, blue WA high and wide in the centre third, and blue GA/GS in the defensive goal third. Start red 4 C just goal-side of the opposition C, 3 WD inside the ball-side WA, 2 GD above the intercept pocket, and 1 GK at the top of the goal circle. Red 5 WA, 6 GA, and 7 GS connect behind the ball as first turnover outlets. Players must remain in their legal court areas; an undesignated entry is offside even without touching the ball.2
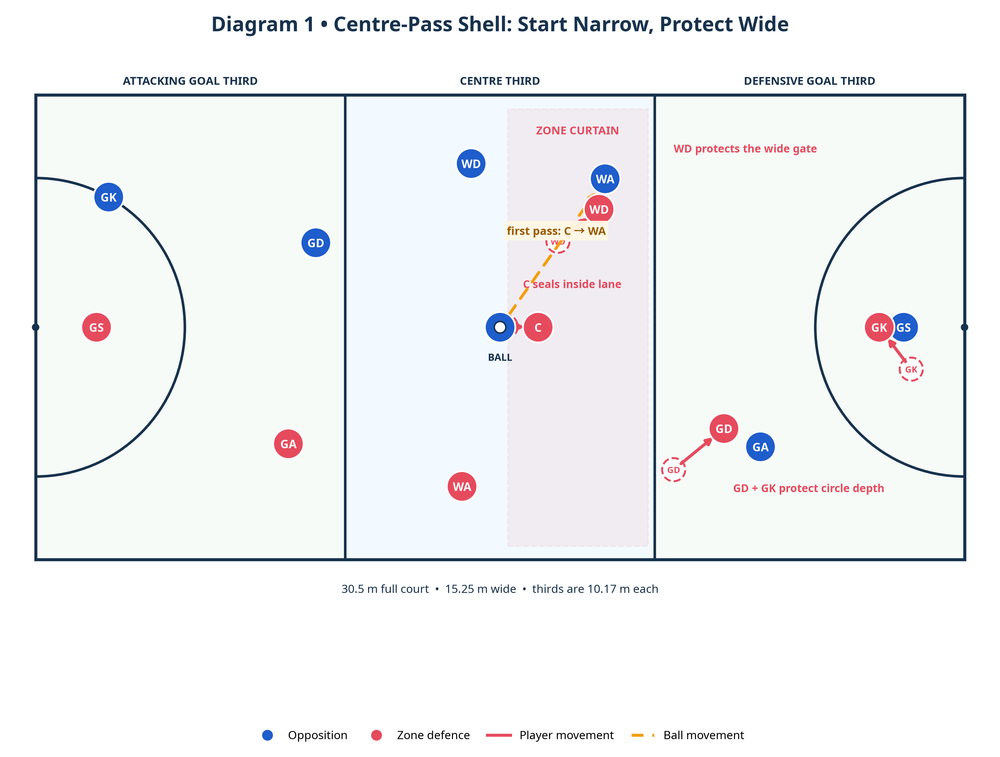
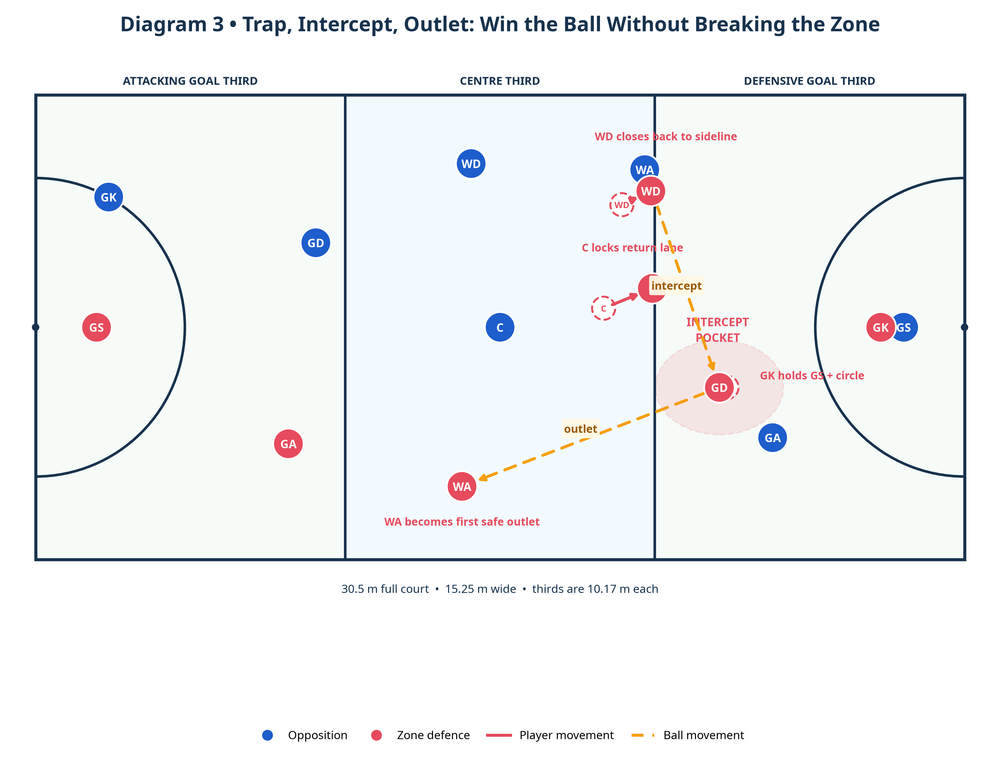
Diagram 1: Centre-pass shell
The starting message is: C owns the inside lane, WD owns the wide gate, GD owns the long pass, and GK owns circle depth. Keep the C-to-WD gap at 2.5–3 m and the WD-to-GD diagonal at 3–4 m: close enough to close a seam, far enough to see ball, player, and space.
Step-by-Step Instructions
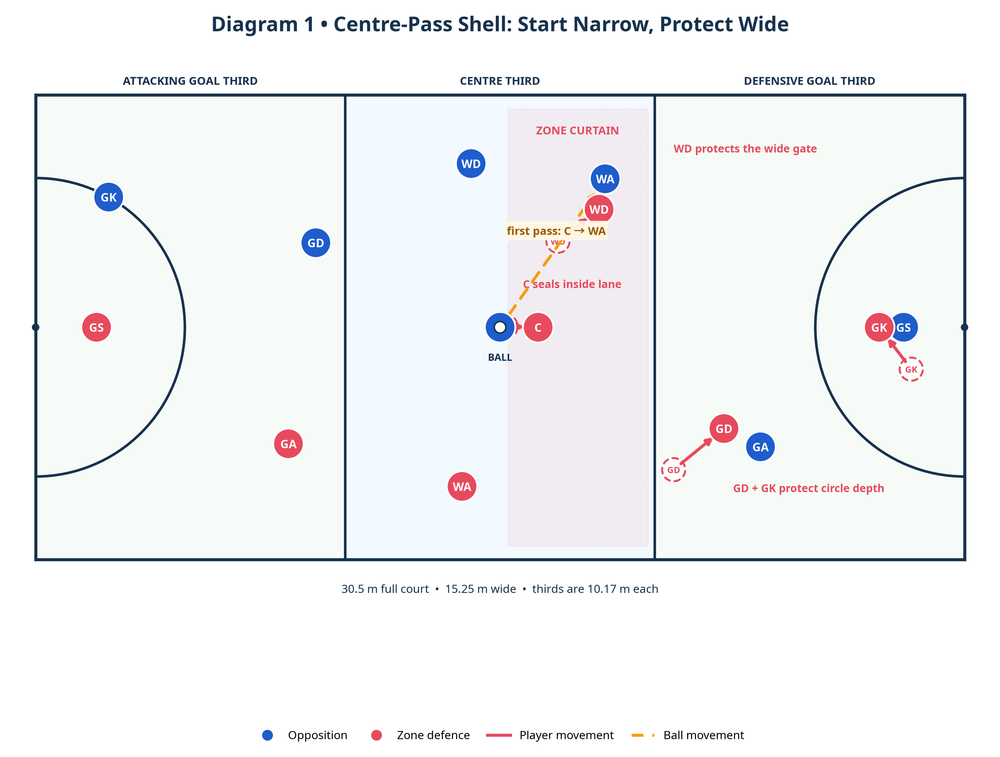
Set the shell before the whistle. On “shell,” red C, WD, GD, and GK take their landmarks. C points inside; WD points to the ball-side sideline; GD points to the intercept pocket; GK points to the circle. Establish this communication before a pass is thrown.
Let the first pass reveal the side. Once blue C releases, red C moves one to two strides goal-side and inside of the next option. WD curves from WA’s inside shoulder, showing the receiver the sideline rather than the centre. The aim is to make WA catch facing the boundary, not the goal circle.
Apply legal pressure and hold the return. WD arrives balanced, hands active, and no closer than 0.9 m from WA’s landing foot when contesting the ball.2 C slides across to protect the WA-to-C return and calls “inside shut.” A lunging defender opens the exact lane the set play is designed to remove.
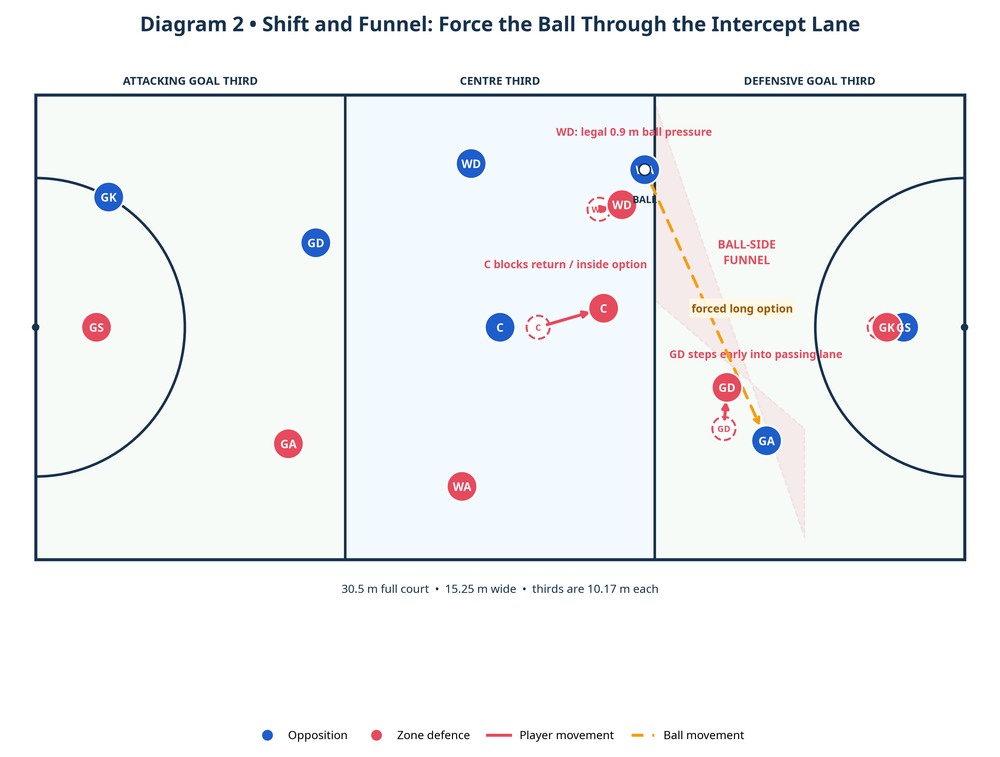
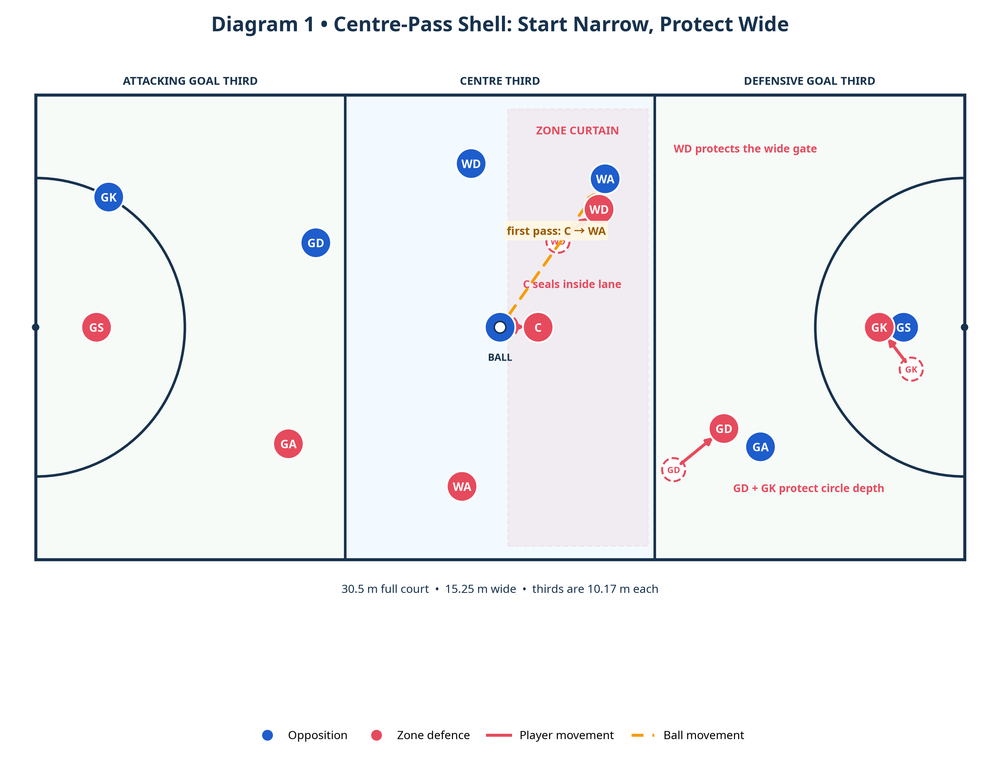
Diagram 2: Shift and funnel
Shift as one unit when the ball is wide. On the call “wide,” WD closes the receiver, C locks the return lane, GD steps early into the diagonal corridor, and GK takes one short step to keep depth behind GD. The shift happens in the first second after the catch, not after the attacker has turned and selected a pass.
Create the long-pass decision. The pressure should leave WA with the longer, lower-percentage pass toward GA. GD reads the passer’s eyes and shoulder line, then attacks the space in front of GA rather than GA’s body. GK stays square to GS and the post. Because the ball holder is limited to three seconds, disciplined pressure makes the rushed release more likely.2
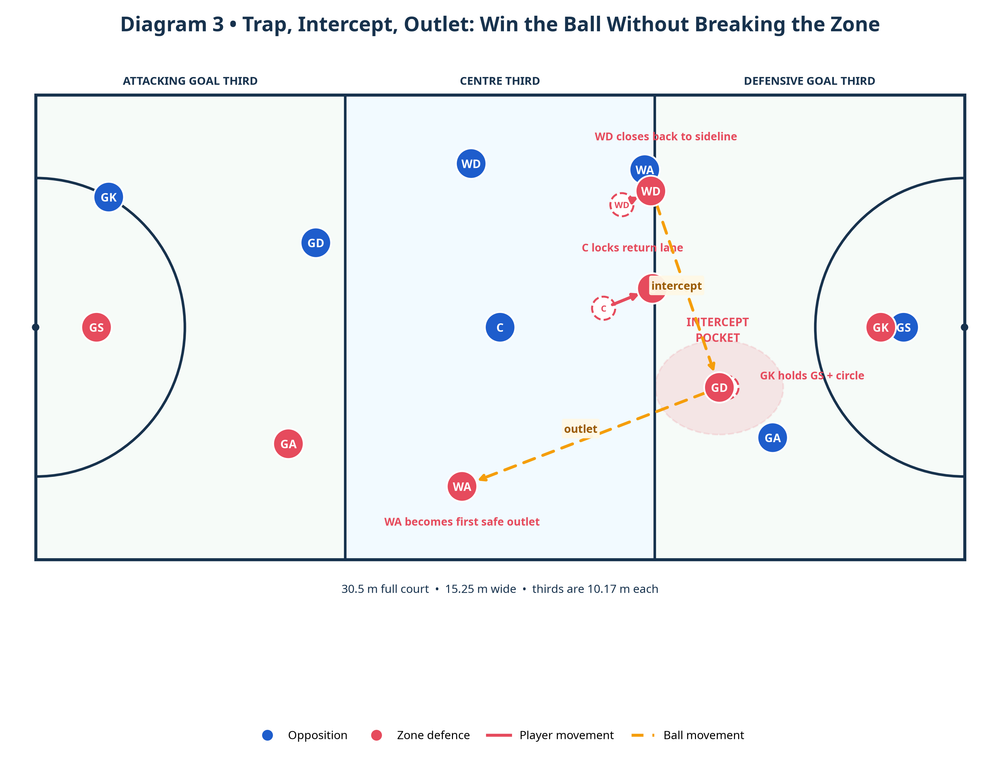
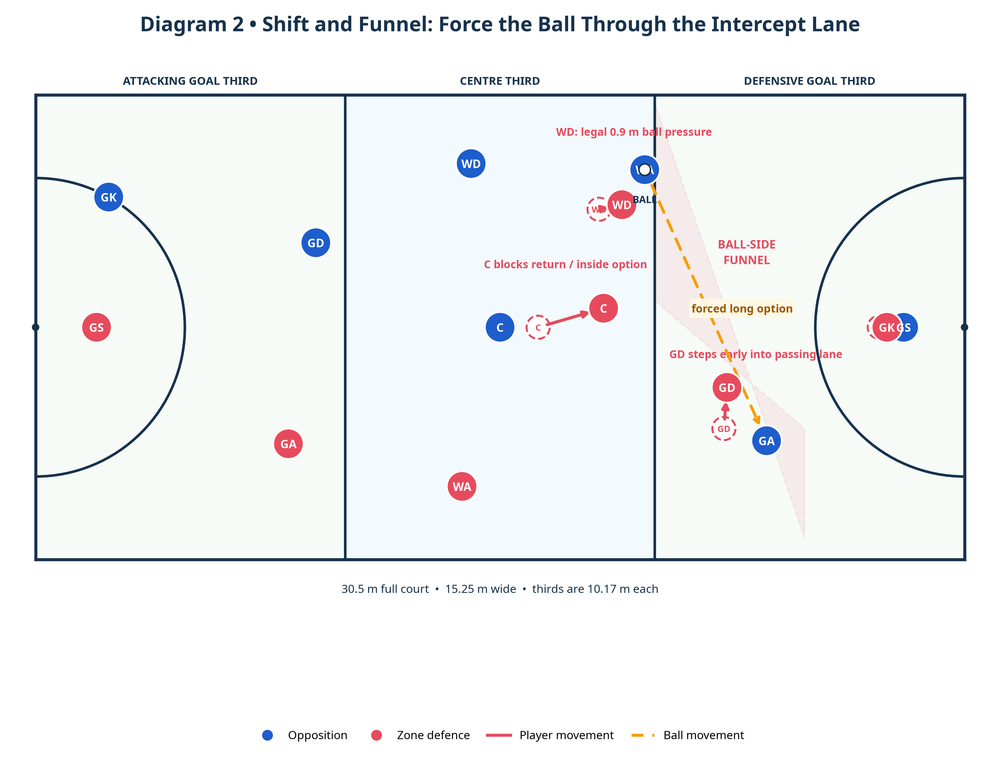
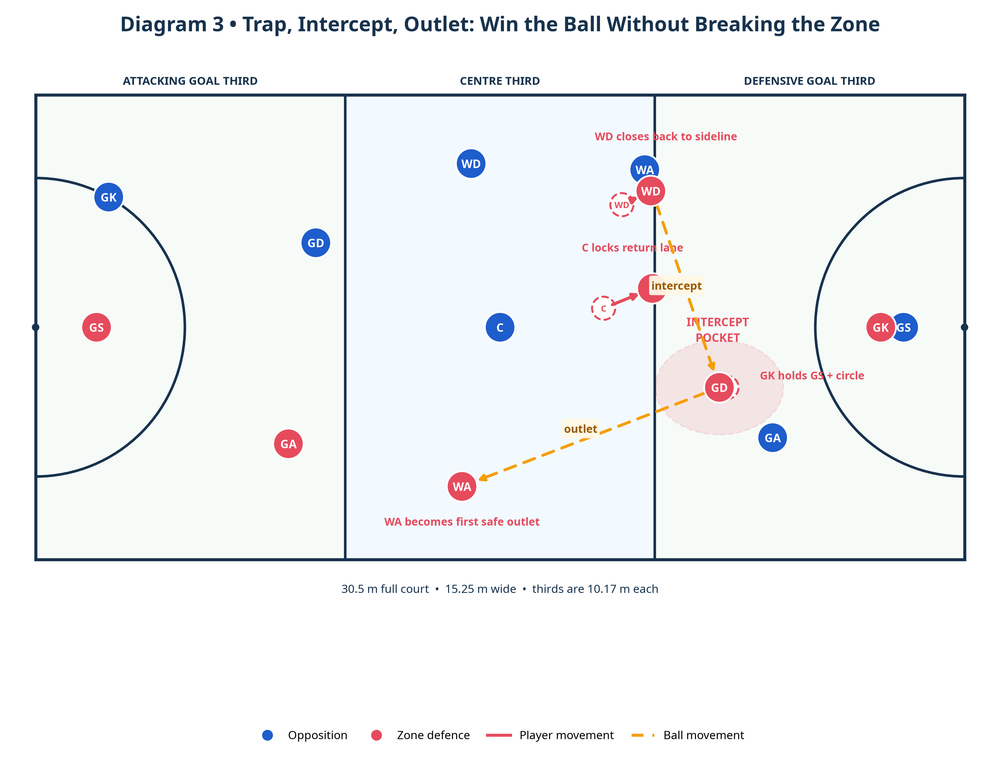
Spring the trap and secure possession. When the pass enters the intercept pocket, GD calls “mine,” drives through the ball line, and takes it with two hands. C and WD still protect the immediate return. The first outlet is red WA into the centre-third lane; if covered, use red C as the safety.
Diagram 3: Trap, intercept, outlet
- Finish with a controlled exit. After the turnover, the player with the ball pivots away from pressure, checks the 0.9 m space, and passes to the first safe red outlet. Convert in two passes: intercept to WA/C, then forward to GA/GS. Reset to the shell immediately if possession is lost.
Key Coaching Points
| Coaching priority | What to coach and listen for |
|---|---|
| Connection before chase | The C–WD–GD chain moves as a curve. If one player is more than about 4 m from the next defender, the passing lane is too large. |
| Show, do not shove | WD uses footwork and body angle to show WA to the sideline. There is no contact, reach across, or desperate lunge. |
| Ball-side urgency | Everyone shifts on the catch. Demand a sharp first two steps and the call “wide” from the nearest defender. |
| Eyes and shoulder read | GD starts from the passer’s head and shoulder cue, then attacks the space ahead of the receiver. |
| Circle discipline | GK holds depth and does not get dragged to the sideline. One defender hunts the ball; one protects the ring. |
| Turnover composure | An intercept only counts if the first pass is safe: “catch, land, scan, outlet.” |
Common Mistakes
| Error to catch | Correction on court |
|---|---|
| WD chases WA from behind and opens the middle. | Rehearse a curved approach from the inside shoulder; freeze and show the correct angle. |
| C watches the ball and leaves the return lane. | Give C a cone gate to protect; any blue return through it is an attacking point. |
| GD waits for the ball to leave before moving. | Start with slow passes and require GD to call the shoulder direction before the throw. |
| GK follows GD and exposes GS or the ring. | Use a “post” cue: GK must see both GS and the post before moving. |
| The unit stops after an intercept. | Award the defence only if it completes a safe outlet within three seconds. |
Variations & Progressions
Begin with a 4 v 3 walkthrough in the centre and defensive third: red C, WD, GD, and GK defend blue C, WA, and GA at 60% speed. Progress to 7 v 7 with scripted first passes, then remove the script so the attack may choose either side. In a competitive round, award two points for an intercept in the pocket, one for forcing a sideline throw-in, and one to the attack for a clean central pass.
For a harder version, allow blue GA a second drive or add a blue WD as another short option. This forces red C and WD to communicate a handover without breaking the zone. For a transition version, time the exit: after the intercept, red must reach its shooting circle in four passes or fewer.
Age Adaptations
| Group | Adaptation |
|---|---|
| Under 10 | Use half court and only C, WD, GD, GK versus C, WA, GA. Teach colours and landmarks before the intercept; focus on safe landings. |
| Under 12 | Use 5 v 5, script the C-to-WA pass, and praise the correct zone shift even without a turnover. |
| Under 14 | Use full 7 v 7 and live choices after the first pass. Demand the 0.9 m distance and a three-second outlet. |
| Under 16/Open | Remove the script, add attacking overloads, and film two repetitions to review gaps, trigger timing, and GK depth. |
Coach’s Close
Run three blocks of six repetitions: walk it, race it, then compete it. Between blocks, ask one question: “Where did we make the attacker see the sideline?” If defenders can answer with their positioning—not just their words—you have built a zone that creates pressure without sacrificing the circle.
References