

Rugby
Four-Man Lift-to-Launch Lineout Set-Piece Drill
Build a dependable four-man lineout that wins a clean No. 4 take, connects immediately with No. 9, and launches the first attacking wave before the defence can set.

What you need
6 Rugby balls, 20 flat cones, 4 hit shields, 2 coloured call cards, whistle, stopwatch, training bibs
Overview
This is a lift-to-launch lineout drill for coaches who want more than a clean catch. It trains the full sequence: a clear call, a legal and explosive lift, a secure take by No. 4, a controlled landing, and an immediate transfer to No. 9 and the first attacking wave. Use it early in a set-piece unit, before moving into live lineout attack, or as a 12-minute technical block in the captain's run. The standard is not simply possession; the standard is possession delivered to No. 10 with the defensive guard still reacting.
On a full 100 m × 70 m Rugby pitch, set the drill at least 10 m from either try line so the players can work into open space. The live lineout channel sits between the 5 m and 15 m lines; in a match, each line forms parallel to, and half a metre from, the mark of touch within that channel.1 Keep the exercise in that lawful geometry so the pictures transfer directly to game day.
| Drill outcome | Session dose | Recommended group | Difficulty |
|---|---|---|---|
| Clean aerial take and fast first-phase launch | 30 minutes: 10 technical, 12 contested, 8 live | 10 attackers, 6 defenders, 1 coach/referee | Intermediate |
Setup
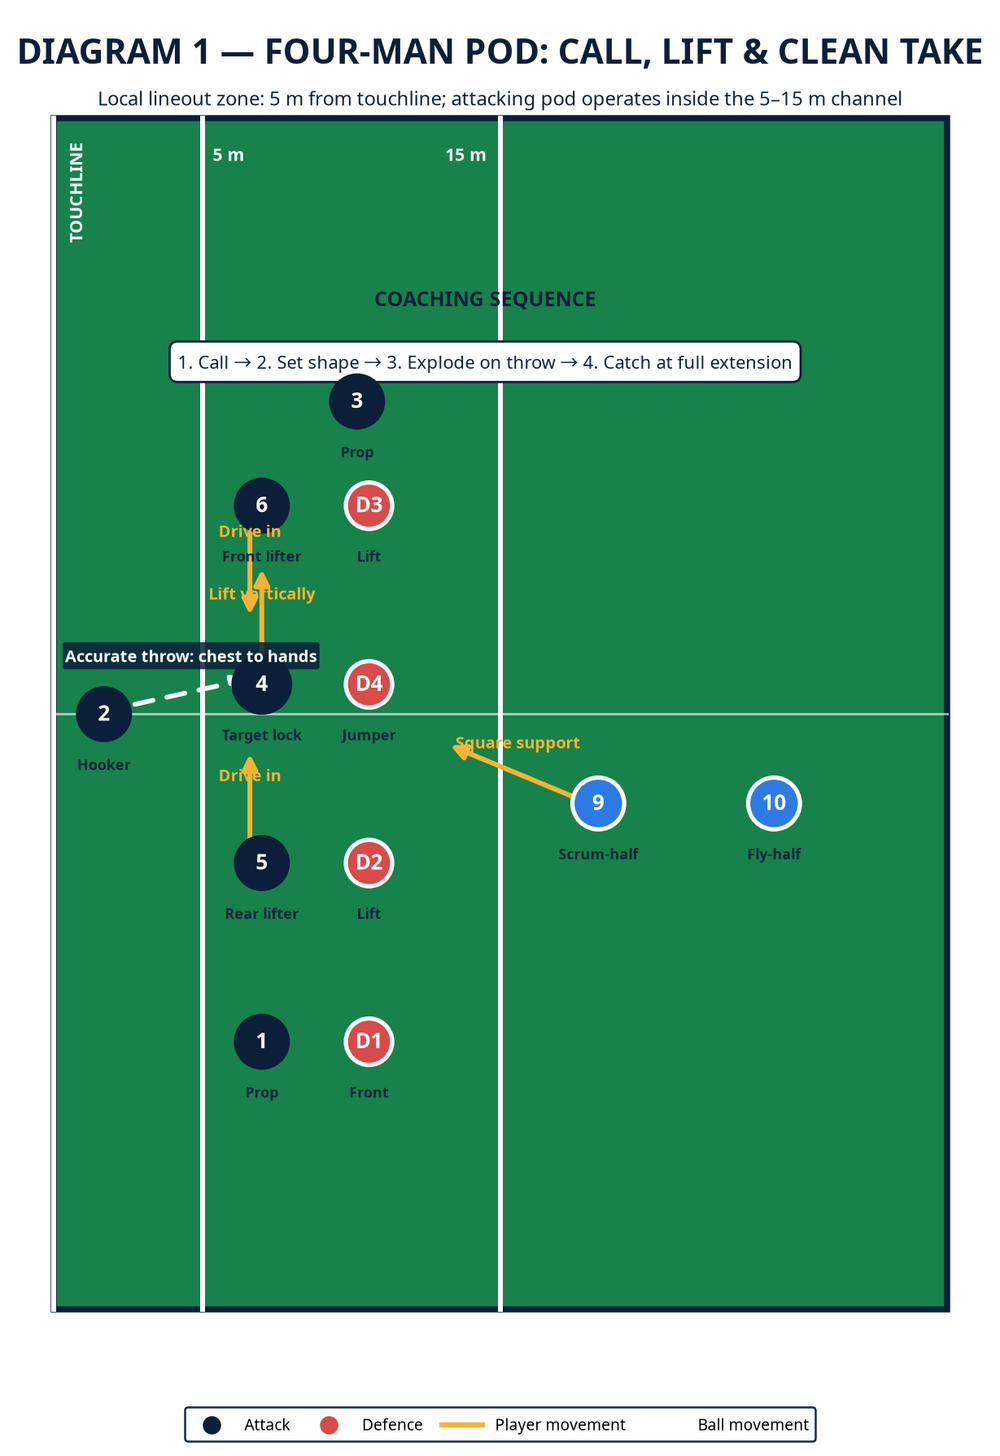
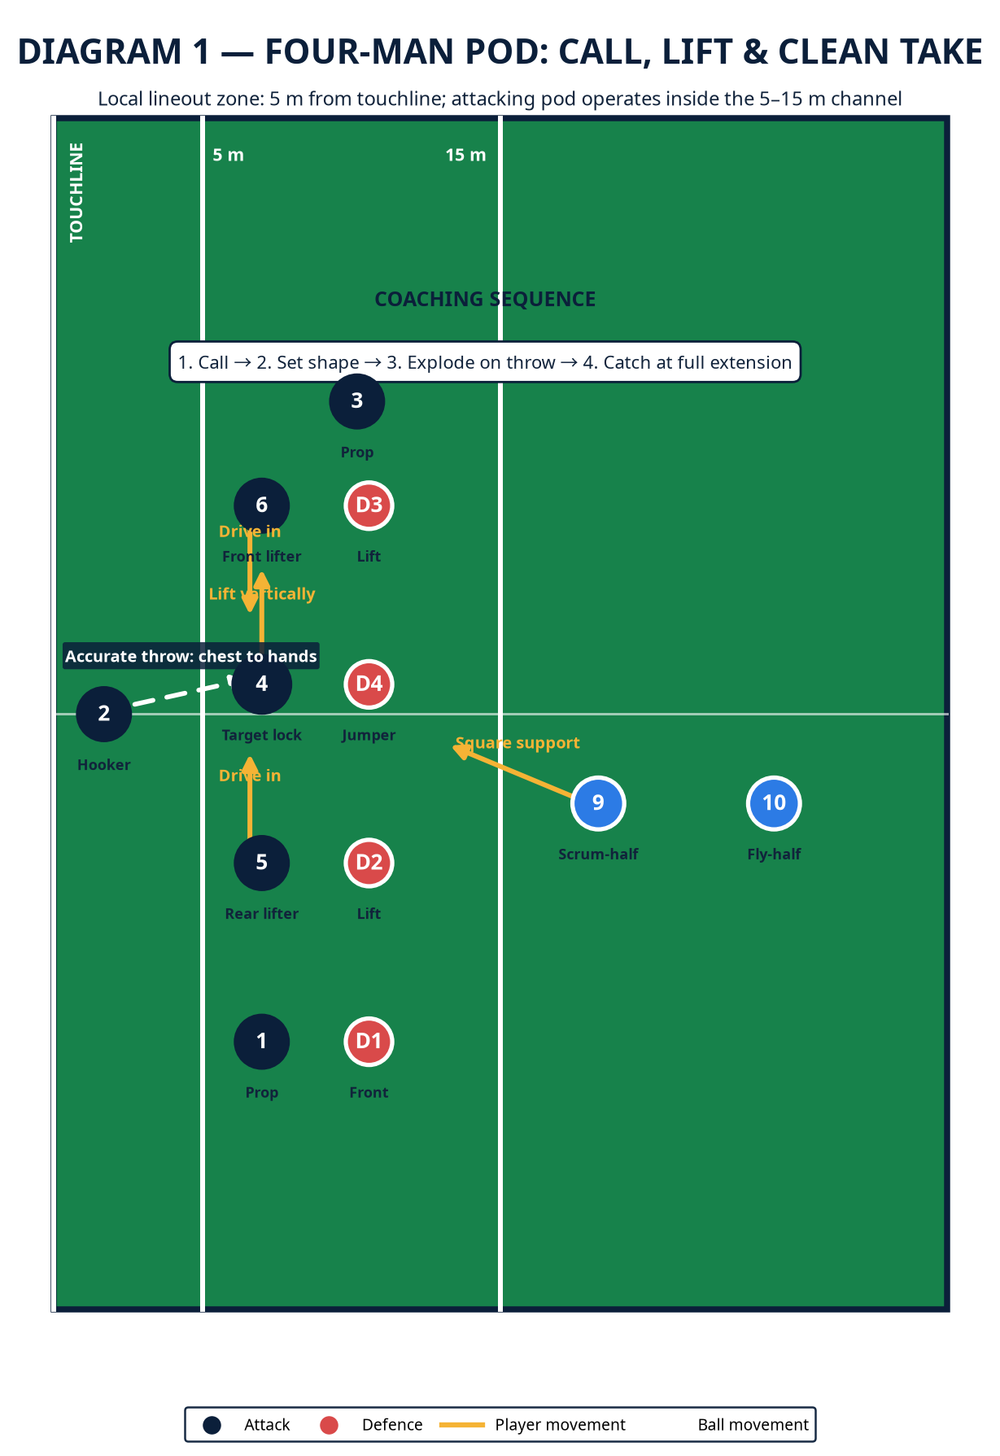
Mark a 25 m long by 30 m deep working area alongside one touchline on the 100 m × 70 m pitch. Paint or cone the 5 m and 15 m lines, then add a 10 m attacking corridor beyond the 15 m line for No. 9, No. 10, No. 12 and No. 13. Put a cone at the mark of touch and a second cone 0.5 m infield on each side to reinforce the legal gap. Use one ball, 20 flat cones, four hit shields, two coloured call cards, and a stopwatch.
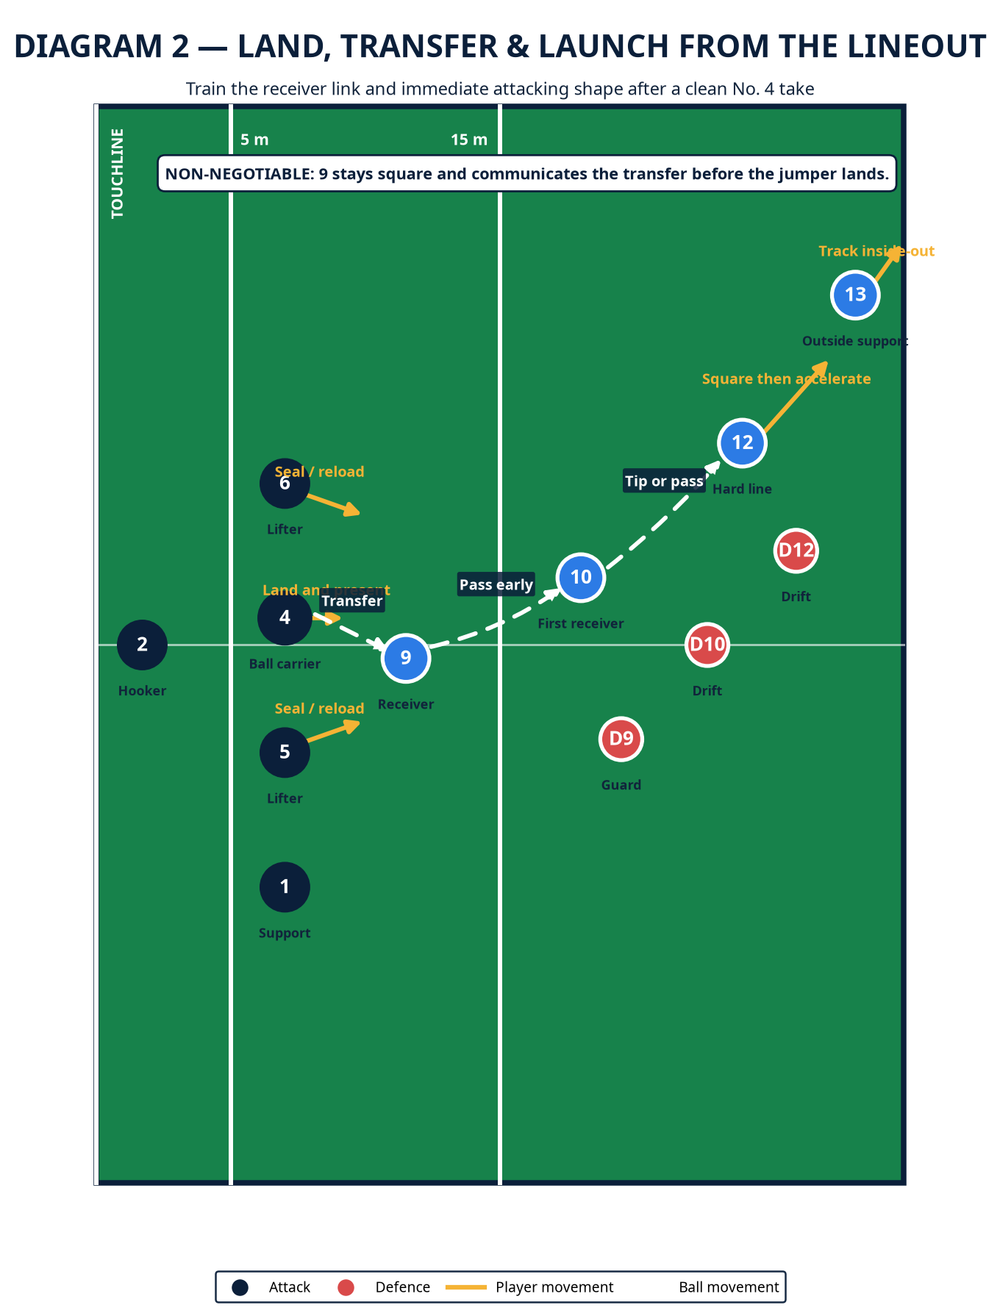
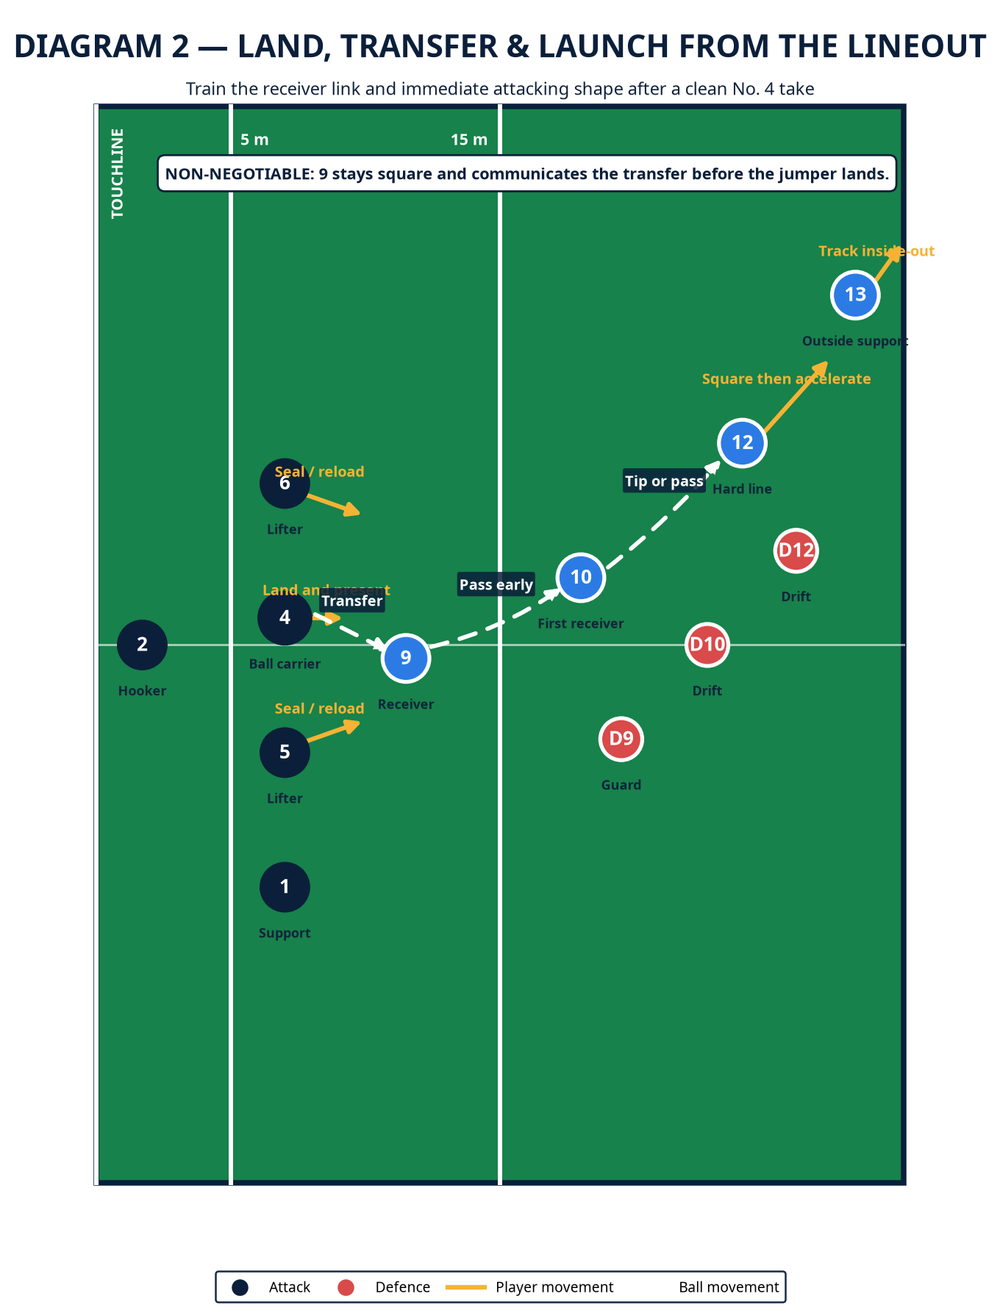
The attacking lineout has No. 2 as thrower, No. 4 as the target lock, No. 6 as front lifter, No. 5 as rear lifter, and Nos. 1 and 3 as support/reload players. No. 9 starts 2 m behind the attacking lineout and inside the 5–15 m channel; this is the receiver position shown in the first diagram. No. 10 is 7 m deeper, with No. 12 on a hard unders line and No. 13 tracking outside-in. Start with four defenders opposite the lifting pod, then add two defenders in the launch channel. The non-throwing side cannot outnumber the throwing side in a formed lineout, so match numbers as you progress.1
Safety gate: Lifting players may pre-grip, but No. 4 does not leave the ground until the ball has left No. 2's hands. On every repetition, lifters return the jumper to the ground safely as soon as possession is won.1
Step-by-Step Instructions
Call and picture. No. 4 calls a simple colour-and-number code, for example “Blue Four”. No. 2 repeats the call, then all six forwards hold their starting picture for two seconds. The coach checks that No. 9 can see both the jumper and No. 10.
Build the pod. On No. 4's trigger, No. 6 and No. 5 step into a tight, balanced lifting shape; aim for hips square to touch and feet no wider than shoulder width. No. 4 presents hands high, eyes on No. 2, and stays tall through the chest. Rehearse this without a ball twice from each side.
Throw and lift. No. 2 throws a straight ball to No. 4's chest-to-hands window, roughly 6–8 m from touch. Only as the ball leaves the thrower's hands do Nos. 5 and 6 extend vertically. Demand a still target: the throw should arrive at full extension, not chase a drifting jumper.
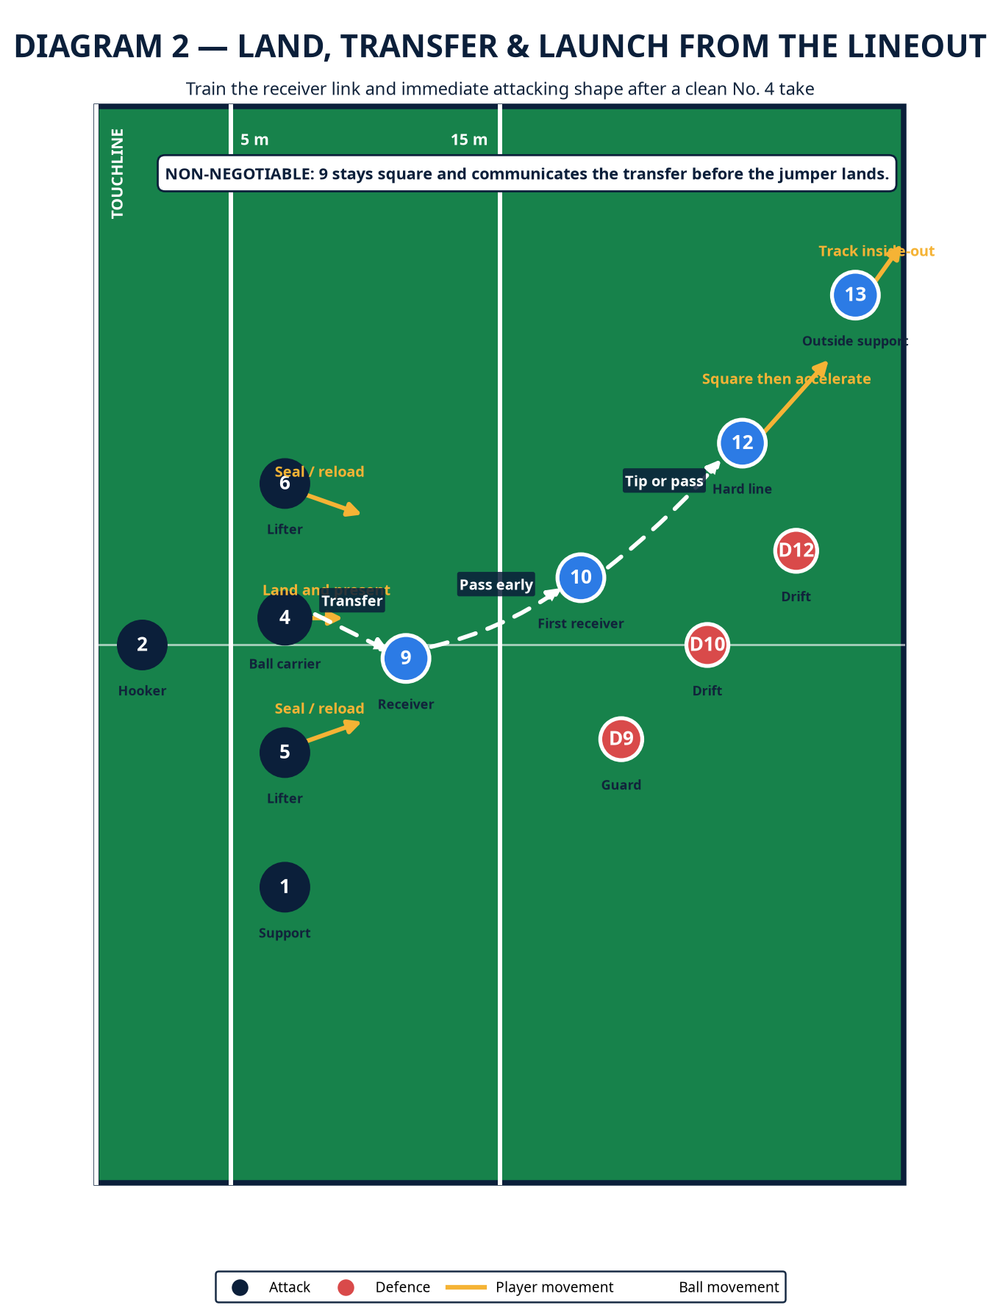
Win and land. No. 4 catches with two hands, calls “mine”, and brings the ball to the sternum. Lifters stabilise for one beat, then lower in control. No. 1 and No. 3 close the space to give the jumper a safe landing platform and a clean presentation option. Run four unopposed repetitions, alternating front and middle targets.
Transfer to nine. As No. 4 descends, No. 9 stays square, names the transfer, and receives a short, soft pass at chest height. Give the unit a three-second clock from No. 4's catch to No. 9's first touch. A dropped transfer does not count as a successful lineout, even if the catch was clean.
Launch the first wave. No. 9 passes early to No. 10, who catches and fixes the first guard. No. 12 runs a hard, square unders line; No. 13 tracks inside-out for the second pass or a tip from No. 12. The two lifters reload behind the ball as first cleaners, rather than admiring the take.
Compete and score. Add the four lineout defenders first; their job is to read, contest legally, and create pressure without contact before the throw. Then release the two launch defenders on No. 9's first touch. Attack has eight seconds to cross the 25 m exit cone. Play six repetitions from each touchline, rest 45 seconds after every three, then review one unit cue only.
Key Coaching Points
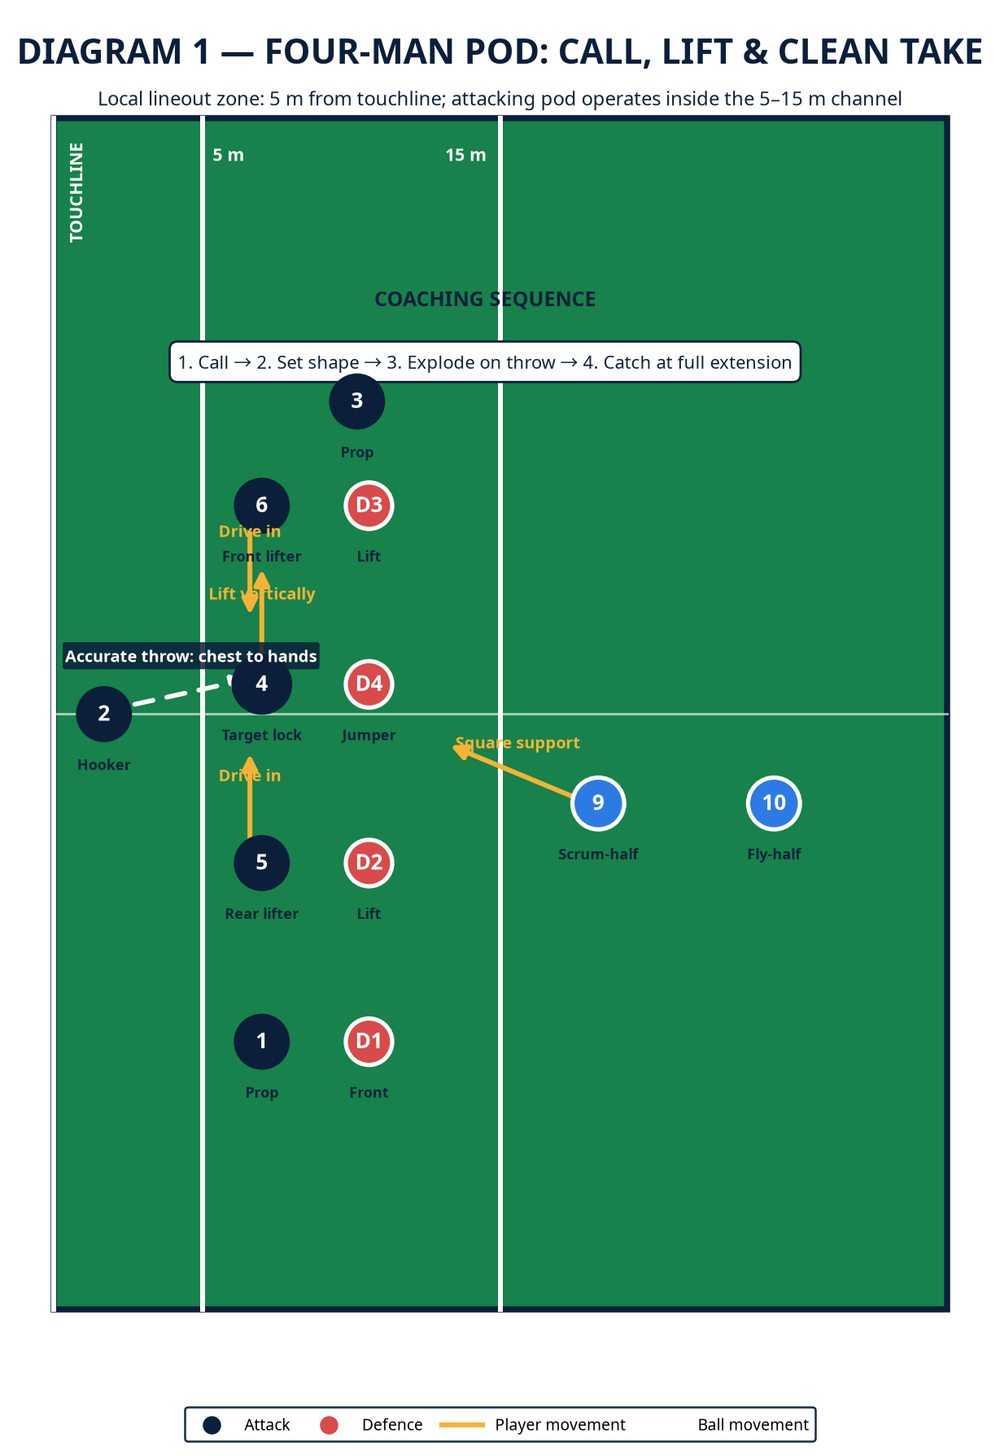
The first teaching point is clarity before speed. A late or vague call causes the hooker and pod to operate off different pictures, so require the call, repeat, and visual confirmation before any movement. Second, coach the lifters to generate force through legs and a vertical finish, never by pulling No. 4 sideways; the catch point must remain inside the pod's base. Third, No. 4 must catch high and bring the ball to a protected chest position before looking for the transfer.
Fourth, make No. 9 the conductor. The scrum-half's feet should be square, hands early, voice decisive, and first two steps towards No. 10 rather than towards touch. Fifth, insist that No. 10 receives early enough to challenge the guard, not after the defence has drifted. Finally, grade the rep by the final picture: ball secured, jumper safely lowered, No. 9 square, and at least one forward immediately reloading.
Common Mistakes
| Error the coach sees | Immediate correction |
|---|---|
| No. 4 drifts toward the 15 m line before take-off | Reset the target cone and insist on a vertical lift; do not compensate with a curved throw. |
| Lifters extend before the ball leaves No. 2's hands | Freeze the film, reset the cadence, and use “throw—then lift” as the single cue. |
| No. 9 waits flat-footed behind the pod | Move No. 9 to the marked receiver cone and require the verbal transfer call before the jumper lands. |
| No. 10 catches too deep or too wide | Bring the first-receiver cone 2 m closer, then grow the depth only after three clean launches. |
| Lifters watch the pass after landing No. 4 | Give each lifter a named reload task: nearest lifter tracks inside; far lifter becomes the second cleaner. |
Variations & Progressions
Start easier by removing defenders and allowing No. 2 to call the target loudly. This lets younger or less experienced units learn the timing without visual noise. Progress one adds a live opposing jumper and lifters, but the defence must contest only the air ball and cannot tackle after the transfer. Progress two is a decision version: No. 9 calls either “nine” for a direct carry, “ten” for the launch shown, or “maul” for a bind-and-drive option after No. 4 lands. Keep the same eight-second exit target so decisions remain purposeful.
For an advanced challenge, do not reveal the call card until the unit is set, give No. 2 a five-second throw clock, and make the launch defenders fully live. If the ball goes beyond the 15 m line, the lineout has ended and the attack can play normally; use that rule to reward a fast, accurate release.1
Age Adaptations
For Under-8 and Under-10, remove lifting completely. Use a two-player catch-and-transfer version from a 5 m channel, with a coach feeding the ball, and emphasise communication, catching shape, and running into space. For Under-12 and Under-14, use local age-grade rules as the non-negotiable guide; usually the safest progression is an uncontested throw with a grounded target, then controlled non-contact movement into the launch pattern.
For Under-16, introduce lifting only when players have demonstrated safe pre-grip, balanced foot positions, verbal discipline, and a controlled return to ground. Run a coach-led safety check before every set. At open age, make the entire drill competitive, retain the strict landing standard, and add a second attacking option so the defence must defend the lineout rather than guess the launch.
Coach's Finish
Finish by asking: “Can we name the target, win the ball, and put No. 10 on the gain line in under three seconds?” If not, return to the weakest link rather than adding repetitions.
