Build-Up from the Back: Beat the High Press with a 4-3-3 Structure
Coach a clear 4-3-3 build-up structure that helps players create width, free the number 6, and play through or around an organised high press.
Equipment Needed
Overview
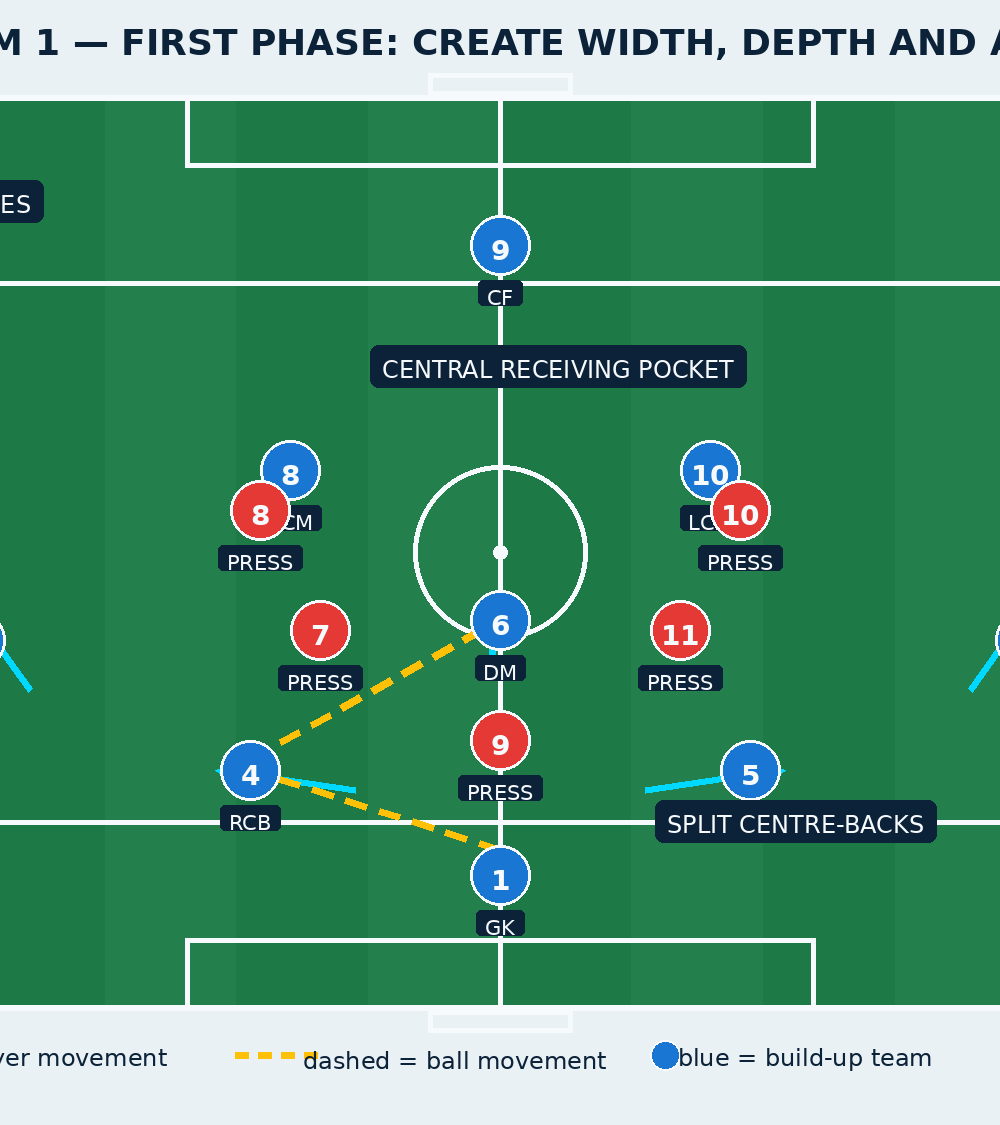
This build-up from the back play gives your team a repeatable first-phase structure to beat an organised high press. Goalkeeper 1 becomes the spare player, centre-backs 4 and 5 stretch the first line, and holding midfielder 6 receives beyond the first pressure. Draw pressure to one side, identify the free player, and progress with control.
Use it from goal-kicks, restarts with the goalkeeper, or any settled possession inside your defensive third. The reference picture is an 11v11 team on a 105 x 68 m pitch, comfortably within a standard full-size range of 100–110 m by 64–75 m. In training, rehearse the first phase in the bottom 50 x 68 m, then extend the same principles into a full-pitch game.
| Unit | Starting role | Non-negotiable outcome |
|---|---|---|
| 1, 4, 5 | Goalkeeper and centre-backs | Make the first pressing line travel and keep a safe return pass. |
| 2, 3, 6 | Full-backs and defensive midfielder | Offer width, a central connection, and a third-man exit. |
| 7, 8, 9, 10, 11 | Advanced unit | Stretch depth and width so the next pass can break the press. |
Setup
Set out a 50 x 68 m working area from the goal line to just beyond the centre circle, using the width of the pitch. Mark two 5 m-wide full-back lanes on the touchline side and a central receiving pocket, approximately 8 m wide, just above the edge of the penalty area. Use one full-size goal, 12–16 cones, bibs for the pressing team, and a good supply of balls with goalkeeper 1.
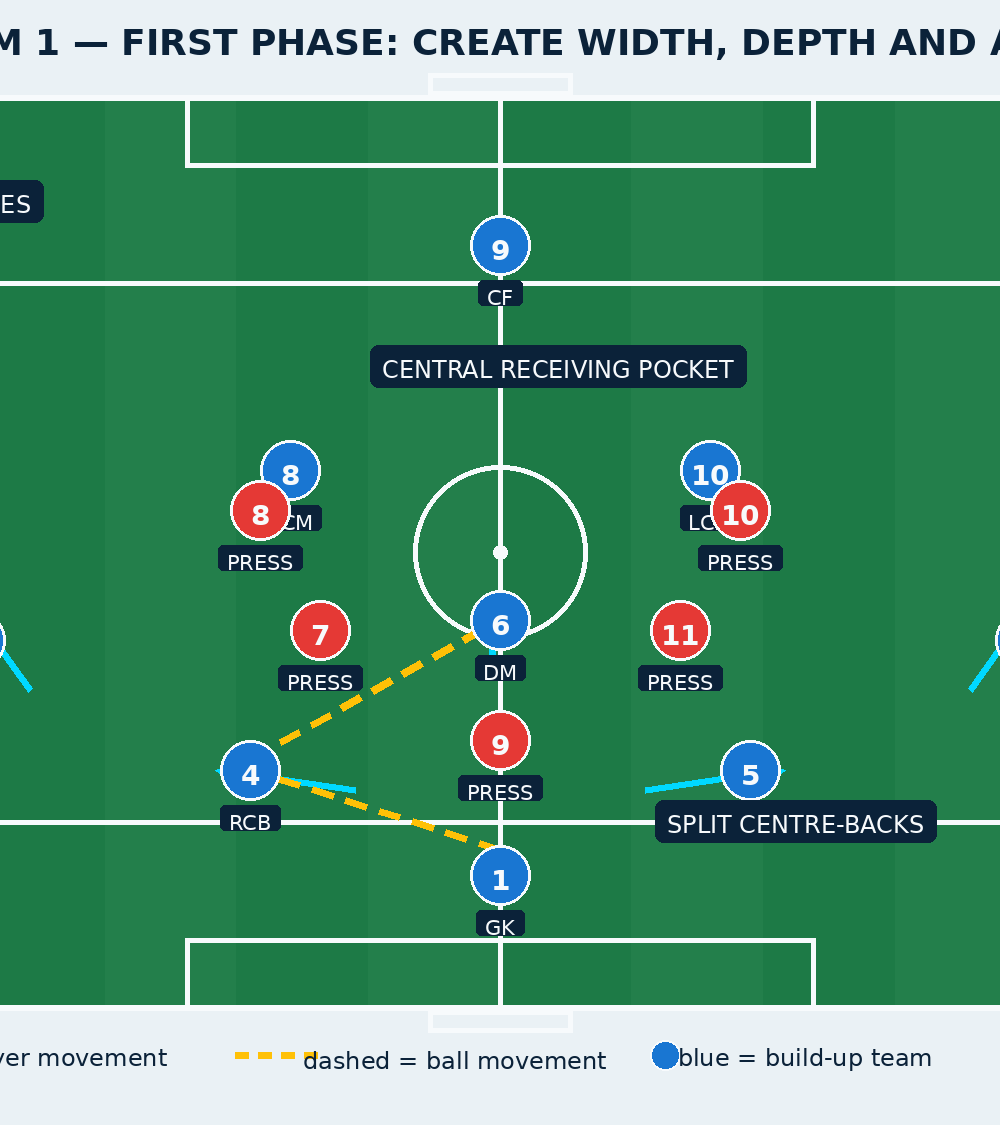
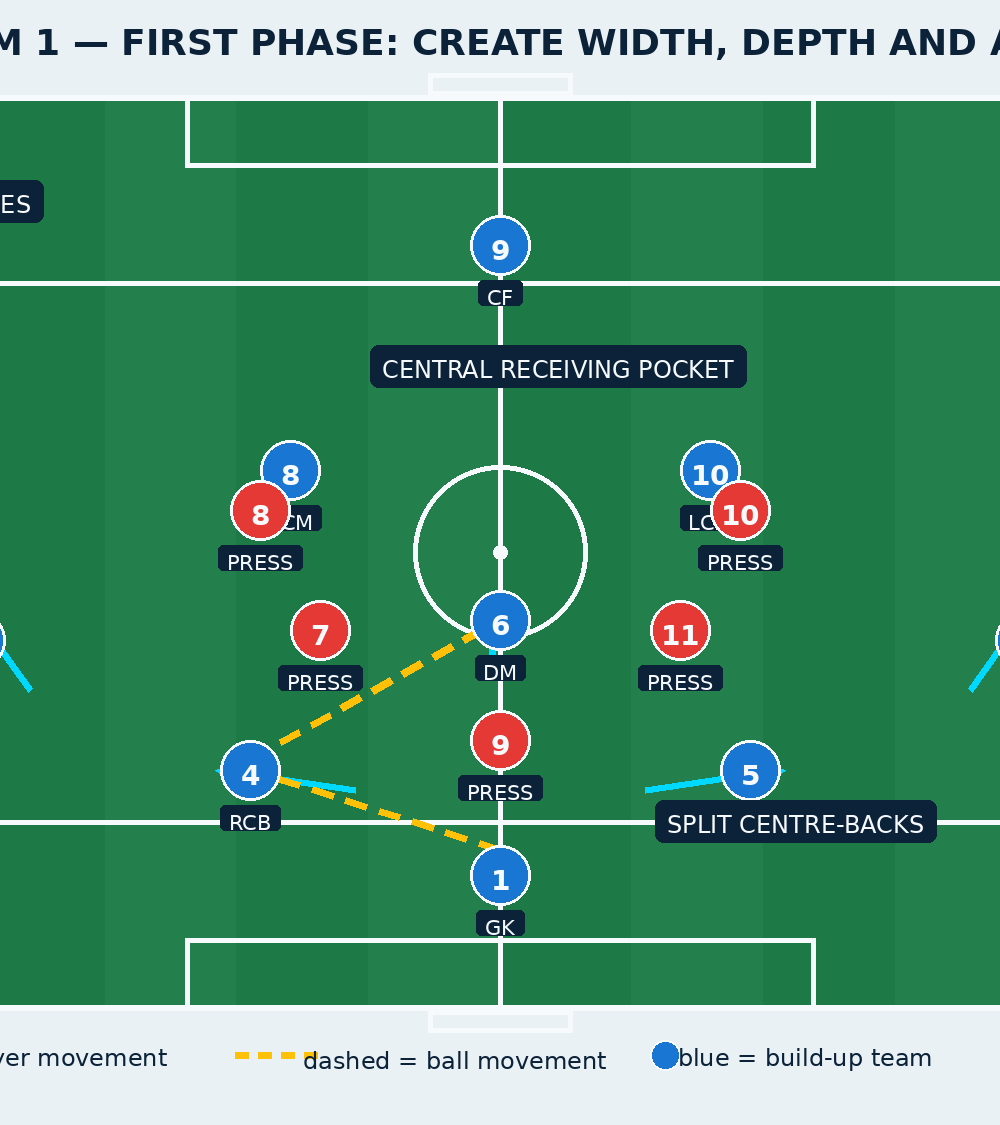
Start 1 centrally, 6–8 m from the goal line. Split 4 and 5 to the outside edges of the penalty area, 18–22 m apart. Position 2 and 3 8–10 m wider and 8–12 m higher than their nearest centre-back. Number 6 begins 12–15 m ahead of the centre-backs, moving on a different vertical line from the ball. Place 8 and 10 in the half-spaces beyond 6, with 7 and 11 high and wide and 9 central to occupy the opposition centre-backs. Begin against three pressers; once the pictures are clean, progress to five or six pressers.
Step-by-Step Instructions
1. Establish the starting picture
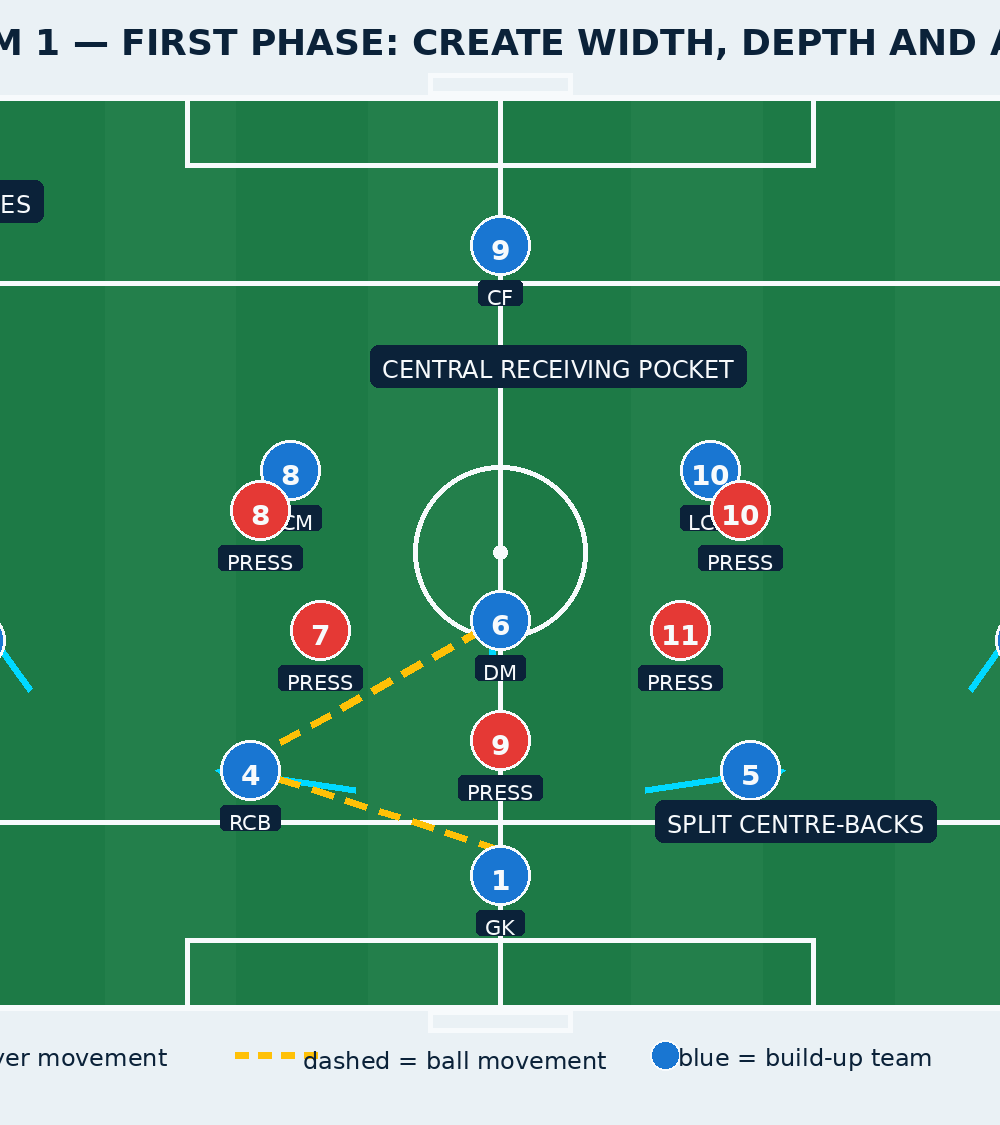
On the coach’s call, 1 places the ball and scans both sides before the first touch. Centre-backs 4 and 5 immediately split, while 2 and 3 step into their outside lanes. Number 6 checks away from the ball by 3–4 m, then returns at an angle. The detail matters: 6 must not stand squarely behind the nearest pressing forward or he becomes hidden from 1 and the centre-back.
2. Invite the first presser
Goalkeeper 1 opens their body to receive across the goal and plays a firm, grounded pass into the centre-back on the side with space. For example, 1 plays to 4. Number 4 receives on the back foot, with their first touch taking the ball 1–2 m away from the first presser. The far centre-back 5 stays available as the safety switch, rather than creeping too high too early.
3. Fix the press and identify the free player
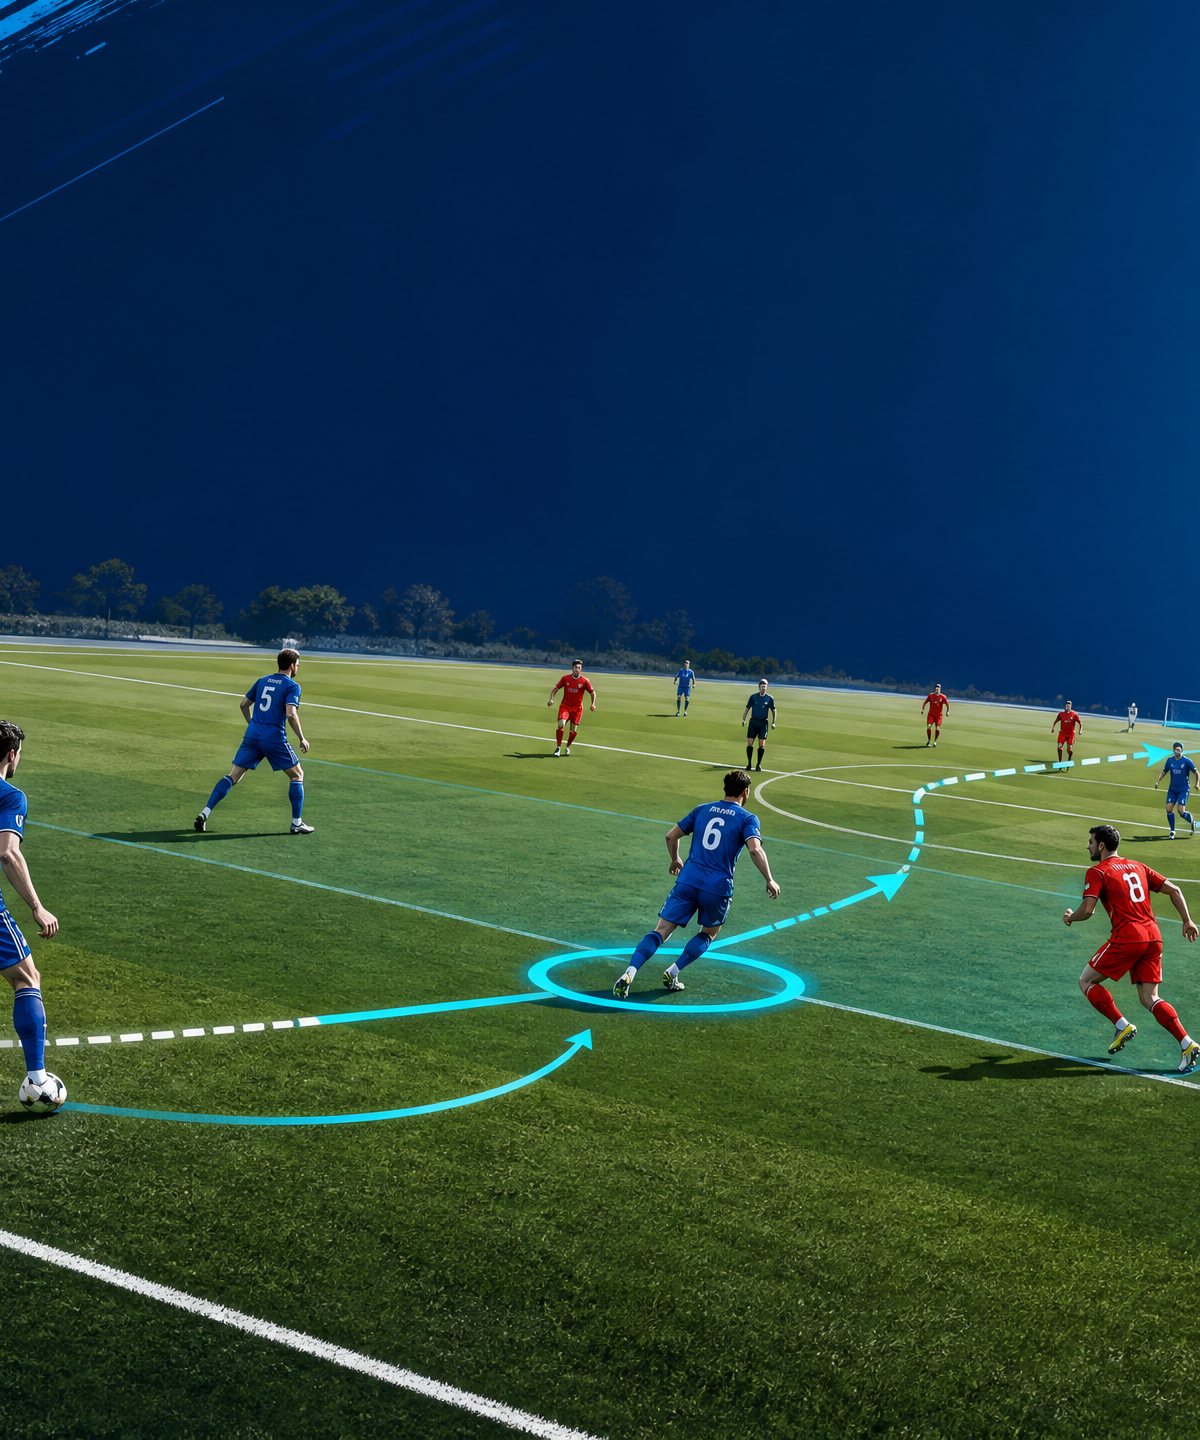
As the ball travels to 4, the nearest opposing forward presses on a curved run. Coach 4 to recognise what that run has removed. If the presser blocks the direct route back to 1 and shuts the pass to 6, 4 should carry the ball forward 3–5 m to tempt a second presser. If the press arrives late, 4 can play directly into 6. The key coaching question is: Which teammate has become free because the defender moved?
4. Use the third-man connection
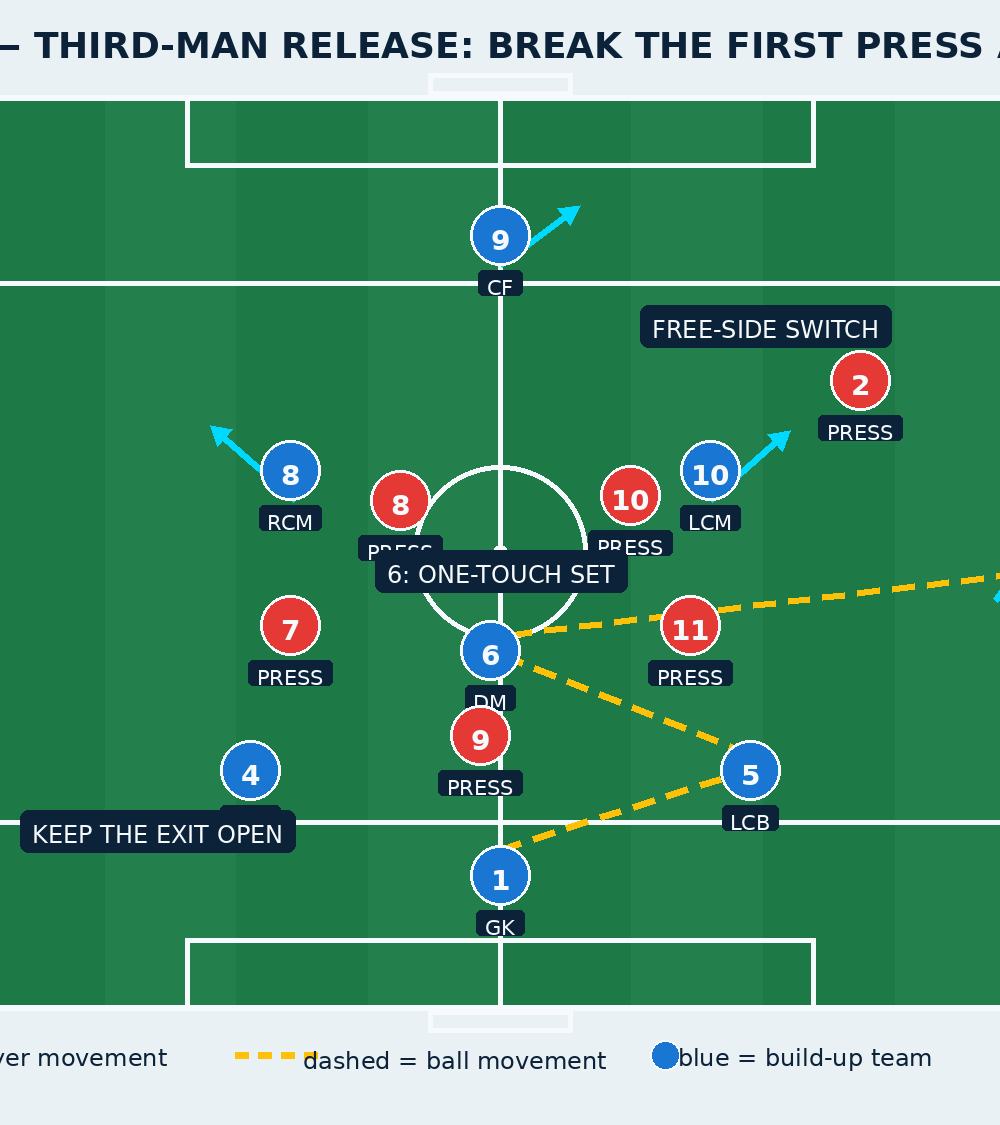
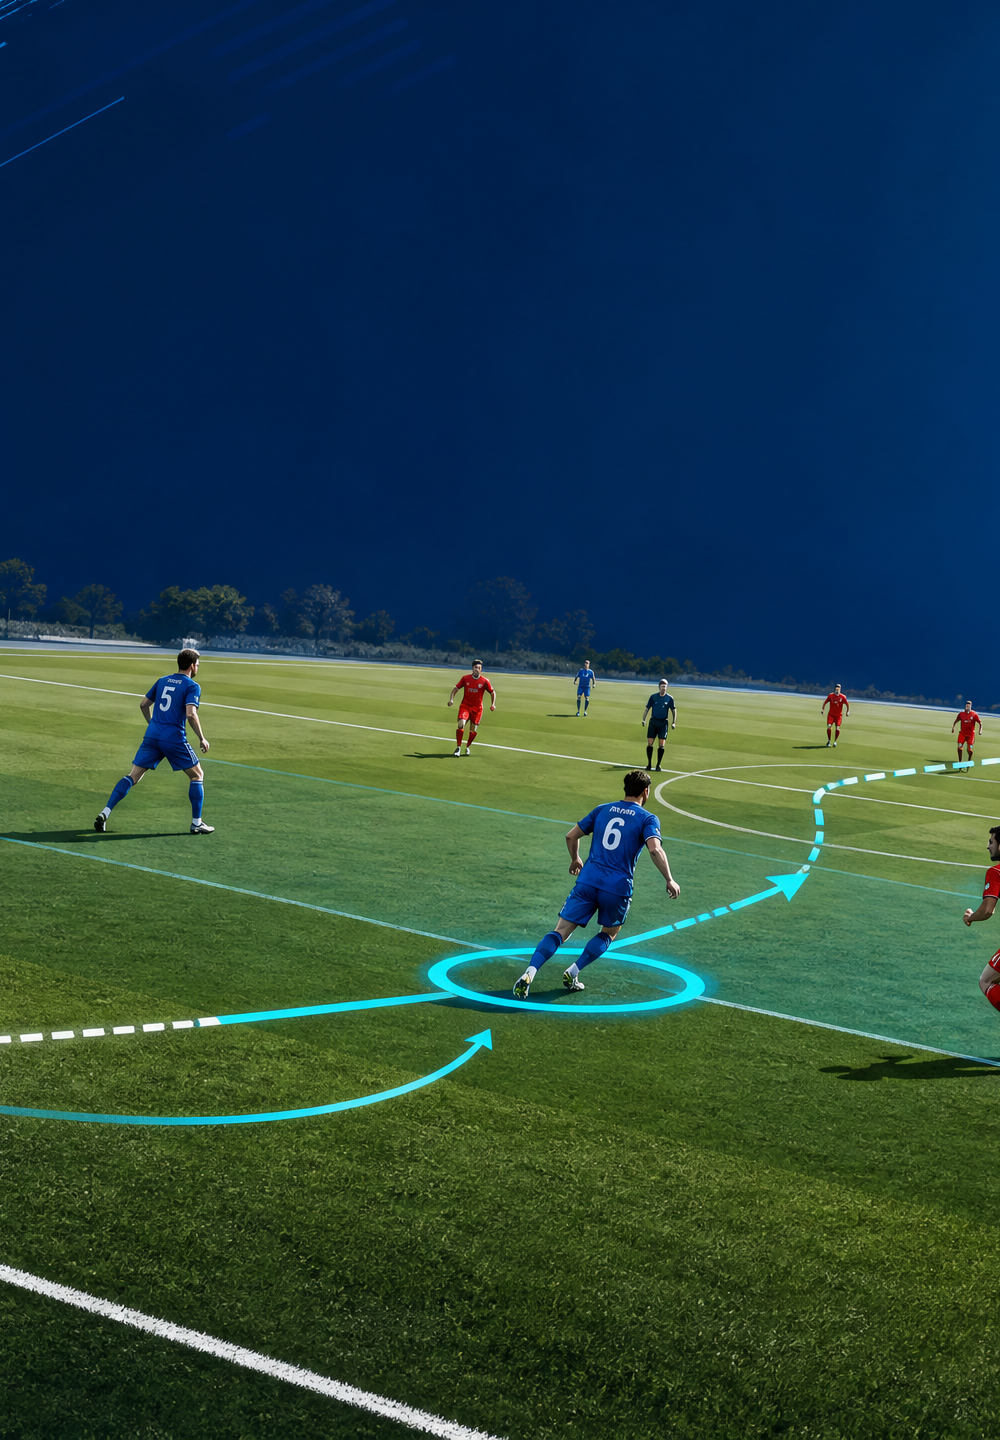
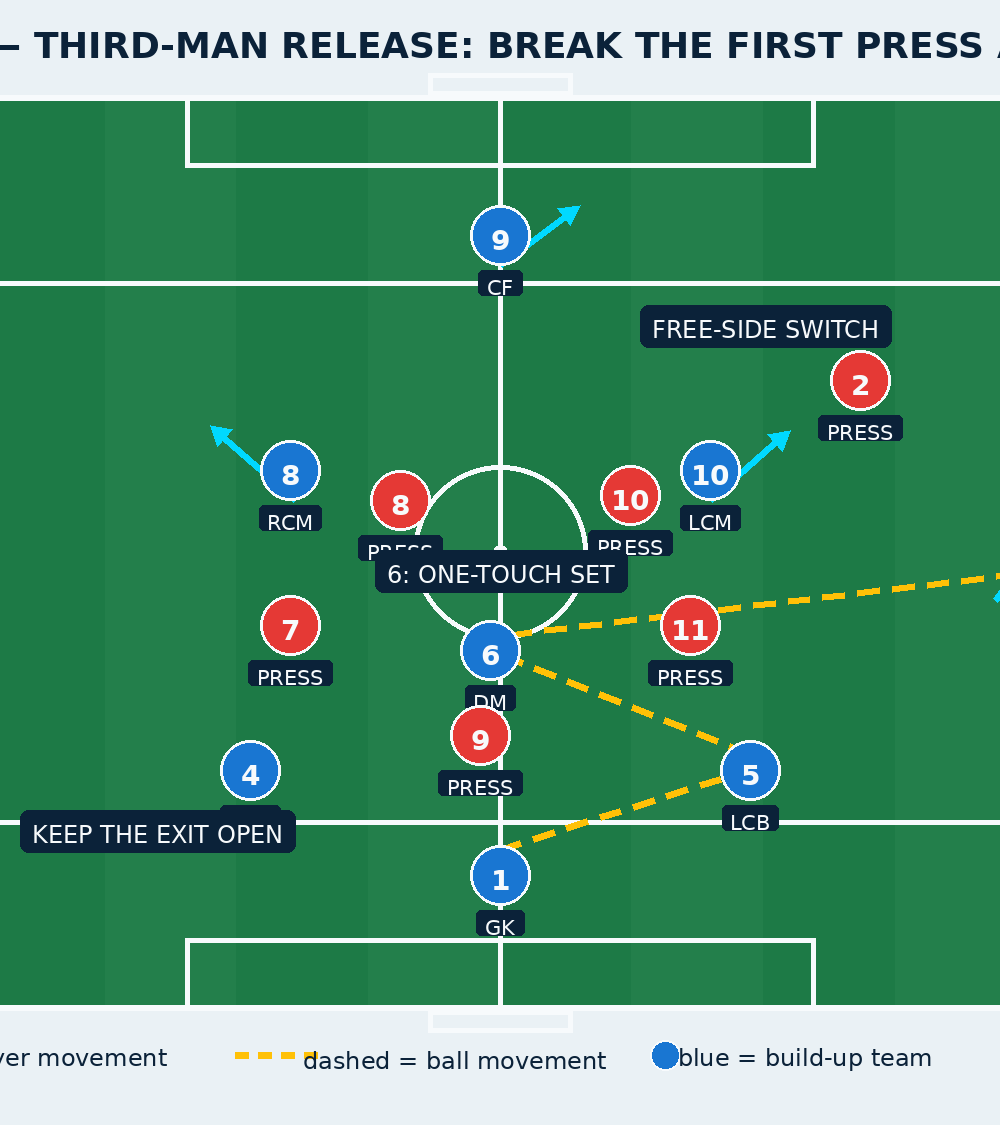
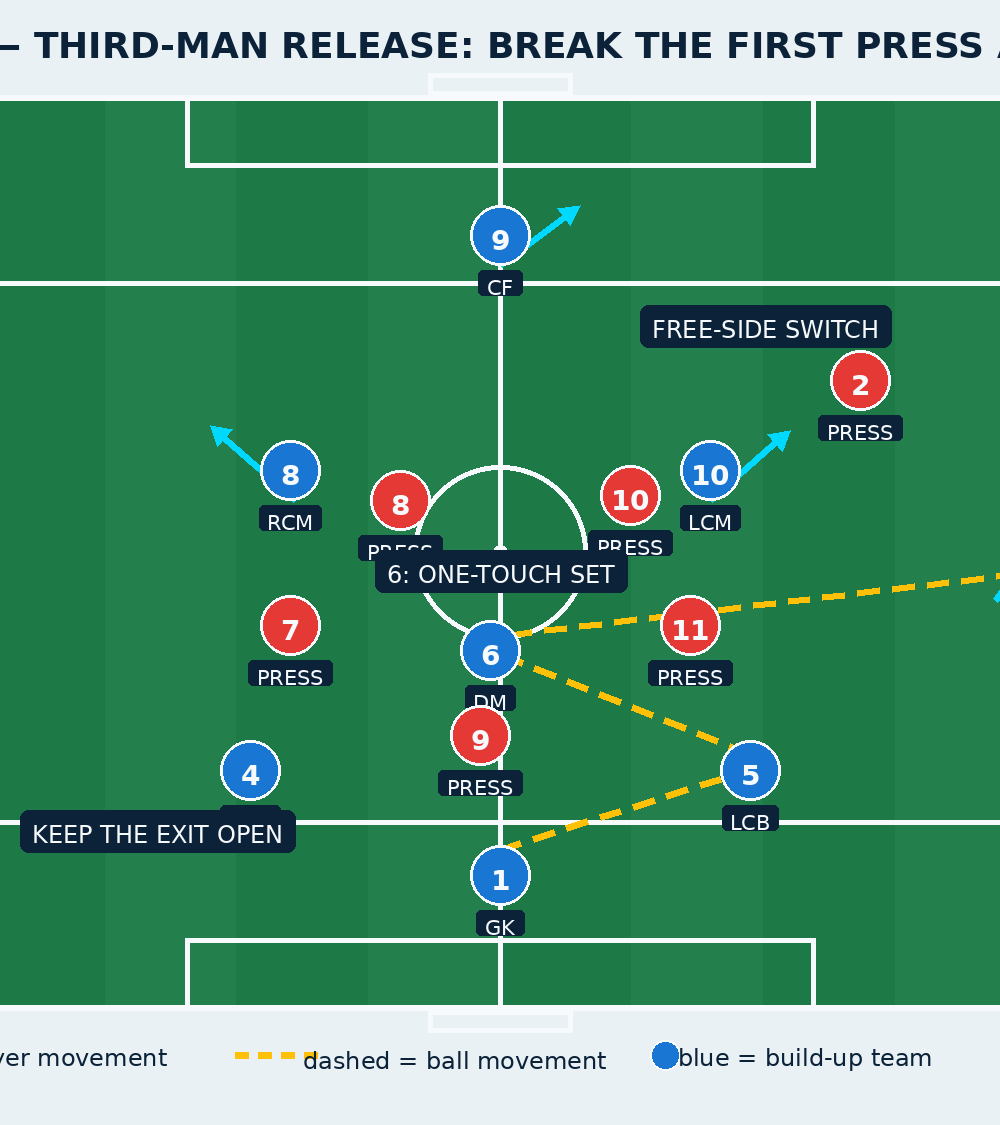
When 6 is screened, 4 plays into 2 or 8 and receives a return at a new angle, or uses 5 as the third player. The receiver should set the ball with one or two touches rather than dribble into congestion. This tempo change is the trigger for 6 to arrive beyond the first line, side-on and able to play forward. Demand an early call from 6: information before the pass, then a clear cue such as turn, set, or switch.
5. Break the first line and release the free side
Once 6 receives facing forward, their first priority is to find 8, 10, 7, 11, or 9 between or beyond pressure. If the central lane is closed, 6 uses the opposite centre-back or the free full-back to switch the point of attack. The switch should travel with enough pace to arrive before the defensive block can slide across. The receiving full-back takes the first touch forward, not back toward the line.
6. Finish the action with a forward outcome
After the switch, the wide player plays forward into 7 or 11, or combines with 8 or 10 in the half-space. Number 9 either pins a centre-back or checks into a bounce-pass position. Count the play as a success only when the build-up team reaches a forward player under control, dribbles across the halfway line, or plays through a designated central gate. If the press wins the ball, they have six seconds to finish in the big goal; this gives every defensive-third mistake a realistic consequence.
Key Coaching Points
| Coaching point | Coach it on the grass |
|---|---|
| Width before the ball moves | Freeze the starting frame if 2, 3, 4, or 5 are within one pressing run of each other. Ask for 10–15 m of lateral separation. |
| Receive side-on | Goalkeeper, centre-backs, and 6 should see both the incoming ball and the next pass. A closed body shape invites pressure. |
| Move after passing | Every pass changes the picture. The passer must either support underneath, overlap outside, or create a new diagonal line. |
| Use the free player, not the obvious player | Coach scanning before the ball arrives. The best next pass is usually created by the opponent’s pressing movement. |
| Pass with purpose | Ground passes into pressure must be firm enough to beat a stepping defender but played to the receiver’s far foot. |
| Protect the middle on loss | While one full-back advances, the far centre-back and 6 must remain connected to stop the counter. |
Common Mistakes
The most common error is that 4 and 5 split but then receive flat-footed and face their own goalkeeper. Correct it by rehearsing a back-foot first touch before opposition is introduced. A second error is that 6 stands in the cover shadow of the central forward. Use a mannequin or flat marker to show the blocked line, then coach 6 to check off the line and arrive on an angle.
Third, full-backs often move wide but too early and too high, leaving the centre-back with a 25–30 m pass under pressure. Hold them 8–12 m above the centre-back until the ball is secure. Fourth, players mistake bravery for risk and force a pass through a closed central lane. Reinforce that recycling through 1 or switching through 5 is a positive reset, not a failure. Finally, when the ball is lost, players admire the pass. Build a five-second counter-press or recovery sprint into every repetition.
Variations & Progressions
Start with unopposed shadow play in the 50 x 68 m area, then add passive pressers who may screen but not tackle. This lets players recognise the picture without making the pattern robotic.
Progress to a 6v4 plus goalkeeper in a 42 x 44 m rectangle: 1, 4, 5, 2, 3, and 6 build against four pressers and score by finding a target player in either high gate. Reduce the possession team to two touches once they can keep the distances. This increases the speed of scanning and ball circulation.
For the game-realistic version, play 11v11 on 75 x 68 m with the build-up team restarting every action from 1. Award two points for breaking the first press into a controlled forward pass and one bonus point if the far-side full-back or winger receives the switch. Allow the pressing team to score in six seconds after a regain.
Age Adaptations
For Under-8 and Under-10, use a 30 x 25 m area with 4v2 or 5v3, name the roles goalkeeper, defender, wide player, and helper, and remove the requirement to use 6. Give players unlimited touches at first and award a point for three passes plus a forward dribble through a gate.
For Under-12 and Under-14, use 7v5 in a 45 x 50 m area, introduce the numbered roles, and make 6’s angled support the main learning outcome. Let the coach restart frequently so the spacing habits become automatic. Use a neutral player if the group cannot retain possession long enough to see the third-man action.
For Under-16 and open-age groups, use the full 11v11 reference structure. Add opposition cues: a single striker, two strikers, or a winger jumping to the full-back. Demand verbal information, scan counts before receiving, and immediate defensive rest positions after each forward pass. The final standard is simple: play with composure, attract pressure deliberately, then attack the space the press has surrendered.

