Crossing & Finishing Drill: Overlap, Three Runs, One Decisive Finish
Coach a decisive wide overload, three coordinated box runs and purposeful first-time finishing in one match-realistic attacking practice.

Equipment Needed
Crossing & Finishing: Overlap, Three Runs, One Decisive Finish
Overview
This crossing and finishing drill coaches the relationship between a wide player, an overlapping full-back and three runners entering the box. It gives players a repeatable final-third pattern, but the end product remains decision-led: read the goalkeeper, identify the defenders’ protection and select the cross that the picture demands.
Use it in the main attacking block of a 75–90-minute session, after a short technical activation. It fits teams using wide forwards and attacking No. 2/No. 3 full-backs, and transfers directly to match situations where a team has created a wide overload.
Session message: The cross is only as good as the movement that creates and attacks it. Arrive late enough to lose a marker, but early enough to finish first time.
Setup
Use one half of a full-size pitch. Mark a 52 m x 44 m working area from halfway to the goal line, using full width on the attack side. This retains a realistic wide crossing angle within a senior pitch of approximately 100–110 m x 64–75 m. Mark a 7 m-wide channel on each flank and a 10 m x 8 m cut-back zone around the penalty spot. Use the full-size goal and one goalkeeper.
| Item | Detail |
|---|---|
| Players | 15: 1 goalkeeper, 8 attackers, 4 defenders, 2 servers/recovery players |
| Equipment | 16 flat cones, 12–16 balls, two bib colours, full-size goal, stopwatch |
| Structure | Blue No. 6 serves centrally; No. 2/3 overlap; No. 7/11 play wide; No. 8/10/9 attack the box |
| Work pattern | 4 x 4-minute blocks with 90 seconds for coaching and recovery |
Place No. 6 30–32 m from goal. Set No. 7 and No. 11 wide, 25–28 m from goal; No. 2 and No. 3 begin eight metres inside and behind their winger. No. 9 starts between the centre-backs, No. 8 outside the near-post lane, No. 10 just beyond the penalty area and the opposite winger outside the far-post lane. The red No. 2/3 full-back and No. 4/5 centre-backs begin passive, then progress to live recovery.
Diagram 1 — Right-sided overlap and front-post delivery
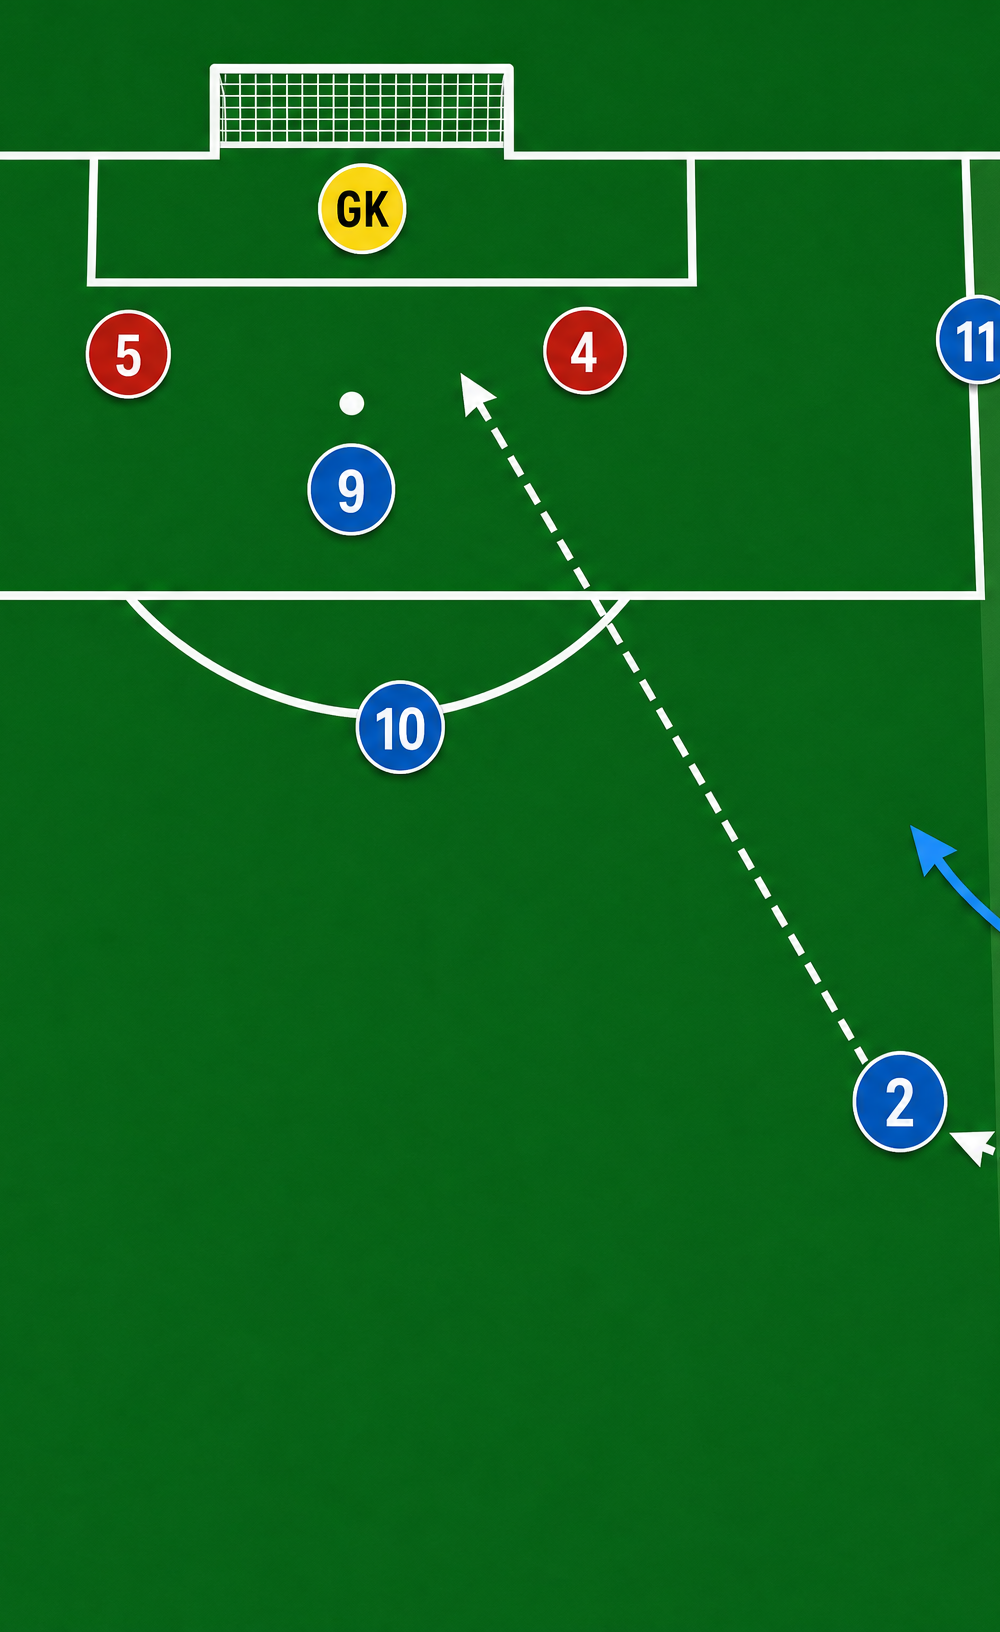
No. 7 receives wide, draws Red No. 3 and releases No. 2 on the overlap. No. 9 attacks the near-post corridor, No. 8/10 attack the cut-back area and No. 11 arrives at the far post.
Step-by-Step Instructions
Start with speed. No. 6 plays firmly into No. 7’s front foot. No. 7 opens their body, scans the defender and takes the first touch forward or inside. Require a two-touch maximum before the release.
Time the overlap. As the ball travels, No. 2 makes a curved 12–15 m run around the outside. The full-back calls early and arrives facing forward. No. 7 plays No. 2 into the channel; use a short set pass only when the defender blocks the direct lane.
Trigger three different runs. On No. 2’s forward touch, No. 9 curves across the nearest centre-back into the near-post lane. No. 8 delays and attacks the penalty-spot lane. No. 11 arrives blind-side at the far post. No. 10 stays beneath the ball for a cut-back, second ball or reset.
Select the delivery. If the goalkeeper is deep and the near-post lane is open, No. 2 drives across the six-yard box. If a centre-back protects that lane, cut the ball back into the marked zone. If the far-side defender collapses centrally, clip to No. 11. The crosser must decide before the final touch, not on the by-line.
Finish first time and react. The receiver attacks through the ball and aims into the corners. After the shot, the nearest attacker has three seconds to react to a rebound while defenders clear or play to a recovery player.
Reset and mirror. Rotate clockwise: No. 6 to winger, winger to overlapping full-back, full-back to first box runner. Alternate right and left attacks. Seek 10–12 quality finishes per four-minute block, not a high volume of untidy crosses.
Diagram 2 — Mirrored left-side pattern and far-post attack
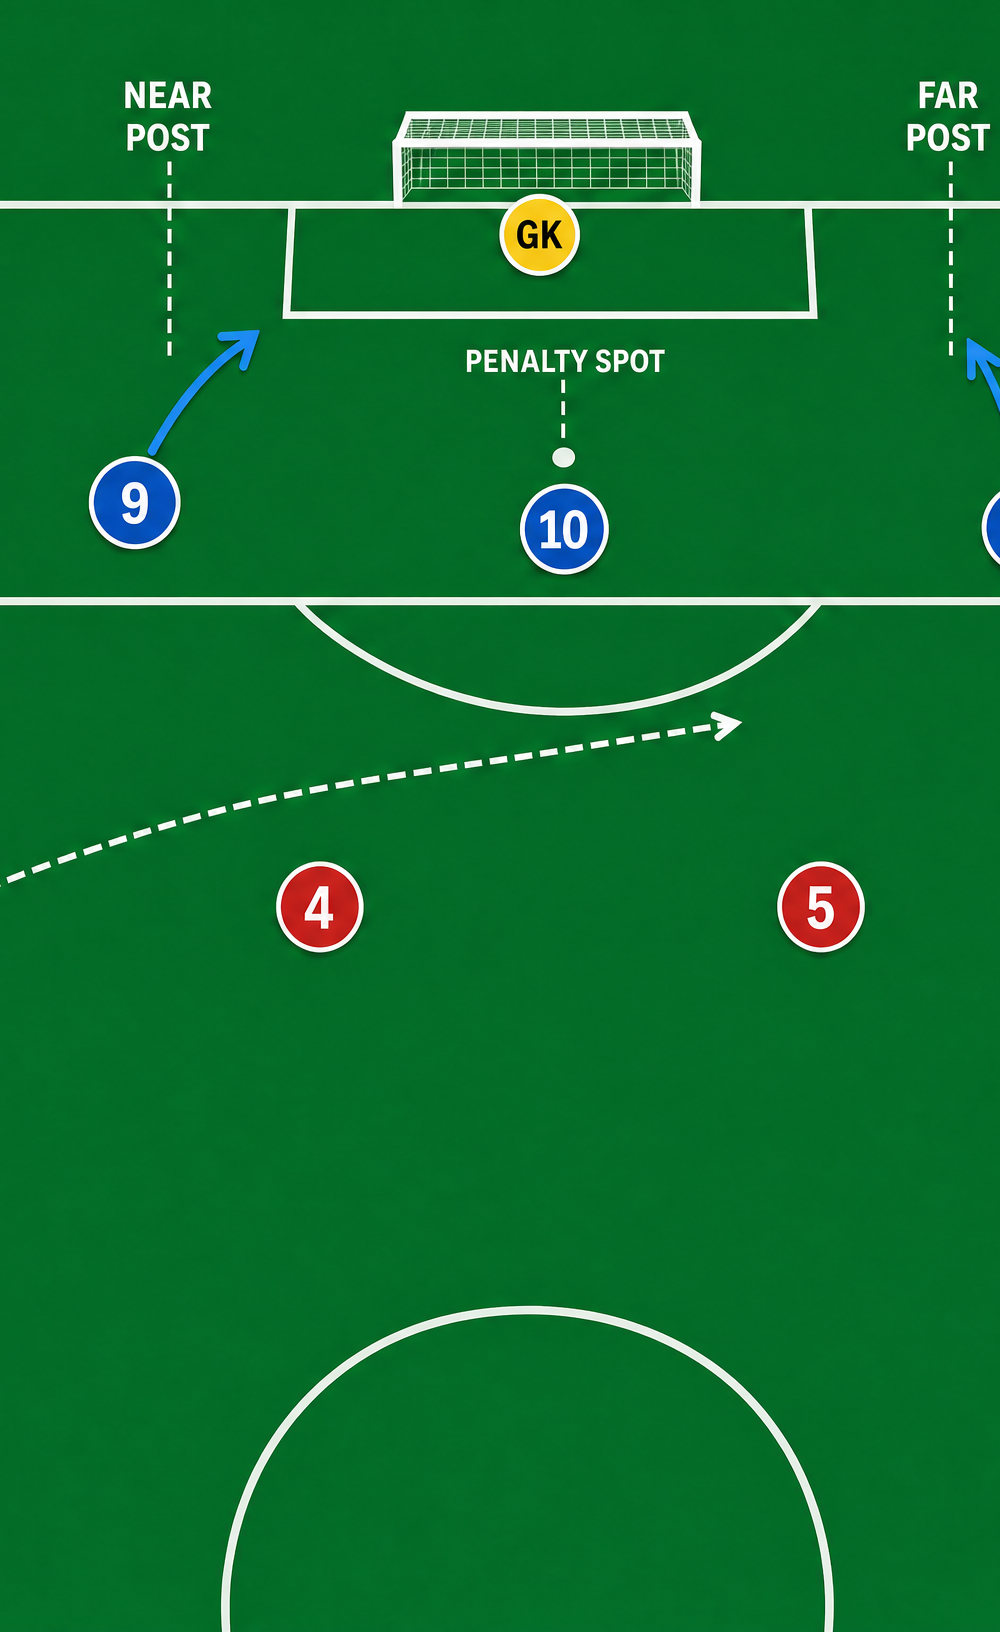
Mirror the exercise so No. 11 combines with No. 3. Keep the same order of arrivals—near post, penalty spot and far post—so the players learn to create three distinct finishing pictures on either flank.
Key Coaching Points
Threaten before releasing. The winger’s first touch must engage the full-back; a static player makes the overlap easy to screen.
Curve the runs. Ask No. 9 to begin just behind the defender’s shoulder, curve into the near-post corridor and arrive side-on. Straight runs are easy to track and often offside.
Occupy separate lanes. One runner attacks near post, one the penalty-spot cut-back lane and one the far post. Two attackers in one lane make the defender’s decision easy.
Deliver a finishable pass. A driven cross travels through the middle-to-lower half of the ball with a stable ankle. A cut-back goes into the late runner’s path, never behind them.
Read the goalkeeper. The goalkeeper’s starting line and movement are information. Players should change delivery if the goalkeeper commits, holds deep or is screened.
Demand the second action. The crosser follows the delivery, No. 10 guards the edge and the far-side runner reacts to rebounds.
Common Mistakes
| Common error | Immediate coach intervention |
|---|---|
| No. 2 overlaps too early and ends alongside No. 7. | Freeze the picture: travel on the pass, not before it. Start the run eight metres deeper. |
| No. 7 delays or plays behind No. 2. | Mark a release line 18 m from goal; the ball must leave before No. 7 reaches it. |
| All runners sprint front post. | Re-state the lane roles: No. 9 near post, No. 8/10 penalty spot, No. 11 far post. |
| The cross floats to the goalkeeper. | Move the delivery point 3 m closer, then demand a driven ball through the six-yard-box corridor. |
| Finishers wait for the ball. | Begin two metres deeper and require them to cross the defender’s line as the ball is delivered. |
Diagram 3 — Cut-back against a protected six-yard box
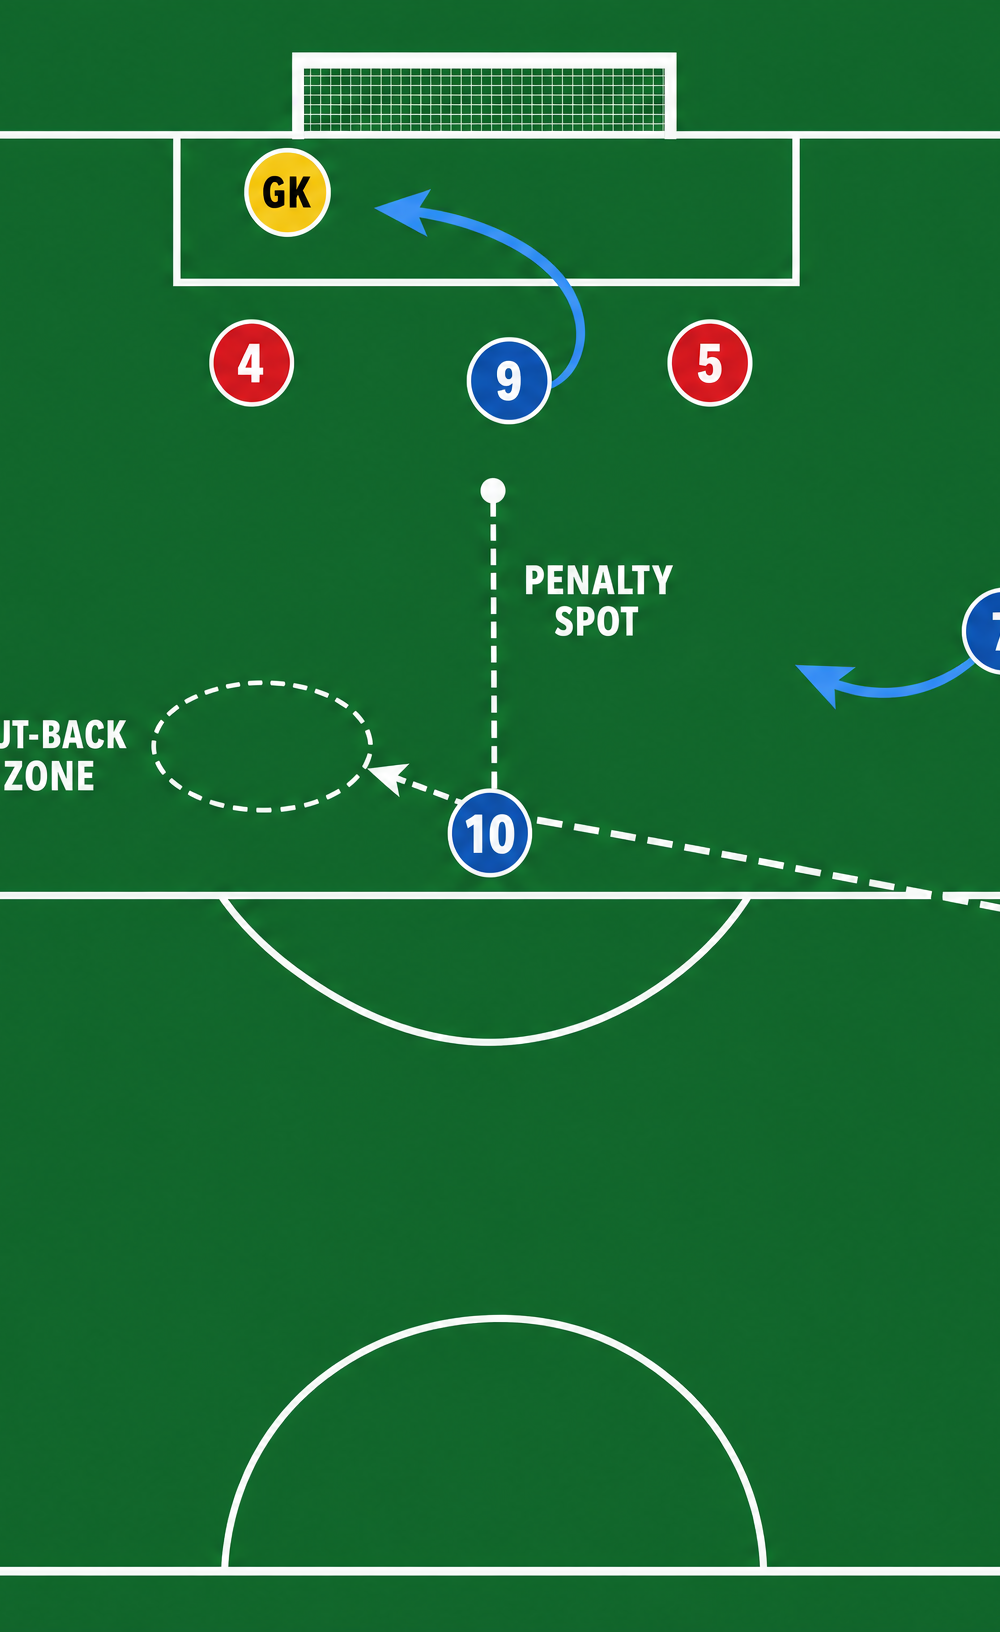
When defenders protect the six-yard corridor, No. 7’s inside movement draws the full-back, No. 2 overlaps and the late No. 10 becomes the primary finisher from the penalty-spot zone. Reinforce the message that the best cross is sometimes the pass back.
Variations & Progressions
Begin with a six-minute unopposed wave. Call front, cut-back or far before the pattern so players master the routes and service weight. Keep the goalkeeper active.
Progress to four recovering defenders plus transition. The red full-back may recover after No. 7’s first touch. When red clears, they have six seconds to carry or pass through a two-cone gate at halfway. This rewards early, decisive delivery and gives attackers a counter-press action.
For the advanced block, use a decision-led score: one point for a shot on target, two for a first-time goal and three for a goal created by exploiting an overload. A floated cross with no runner loses possession. Play 6 x 90-second competitive rounds and rotate the defensive unit every two rounds.
Age Adaptations
| Age group | Adaptation |
|---|---|
| Under-8 / Under-10 | Use 30 m x 24 m, mini-goals or a goalkeeper and two finishers. Start unopposed; emphasise running into space and a clean strike. |
| Under-12 | Use 40 m x 32 m with one recovering defender. Keep near- and far-post roles and mark the cut-back target with a cone gate. |
| Under-14 / Under-16 | Use the full 52 m x 44 m area with two centre-backs, a full-back and a live goalkeeper. Ask players to read the goalkeeper before crossing. |
| Open age / senior | Use all four defenders, live transition and scoring. Remove target cones so players solve the picture at match intensity. |
Coach’s Final Check
Before moving on, ask: Did the winger create an advantage before releasing? Did the runners arrive in three different lanes? Did the delivery match the space available? If not, reduce the pressure, correct the timing and rebuild the pattern. If yes, add live defenders and reward purposeful finishing.

