

Football
Dynamic Slalom to Finish: Dribbling Through Cones with a #9 Finish
A high-repetition attacking practice that sharpens close control, the explosive exit touch and composed finishing after a direct feed.

What you need
1 full-size goal, 1 football per player, 6 orange cones for the slalom, 8 boundary cones, 2 target markers, 8–10 training bibs, stopwatch or visible countdown timer
Overview
This is a purposeful ball-mastery-to-goal practice for the centre forward, wide forward or attacking midfielder. The player receives from #10, dribbles through a staggered six-cone slalom, accelerates out of the final action and finishes under a time-and-touch demand. Use it before a 1v1 or small-sided game, when clear, repeatable repetitions matter.
Do not let this become a cone dance. #9 must leave the final cone with a positive touch, scan early and strike with intent. On a full adult pitch of 100–110 m x 64–75 m, place the 30 m x 24 m practice area centrally in the final third to preserve a realistic finishing picture.[^1]
Session at a glance
| Detail | Coach prescription |
|---|---|
| Main outcome | Close control in traffic, acceleration after the final move, and composed finishing |
| Players | 4–10 players: #9 works, #10 feeds, GK protects the goal; remaining players rotate behind #10 |
| Working area | 30 m long x 24 m wide, with an 11 m x 4 m staggered slalom lane |
| Work:rest | 6–8 seconds per repetition, then 30–40 seconds while rotating; complete 3 x 4-minute blocks |
| Scoring target | One point for target, two points for a finish after the non-dominant-foot exit |
Setup
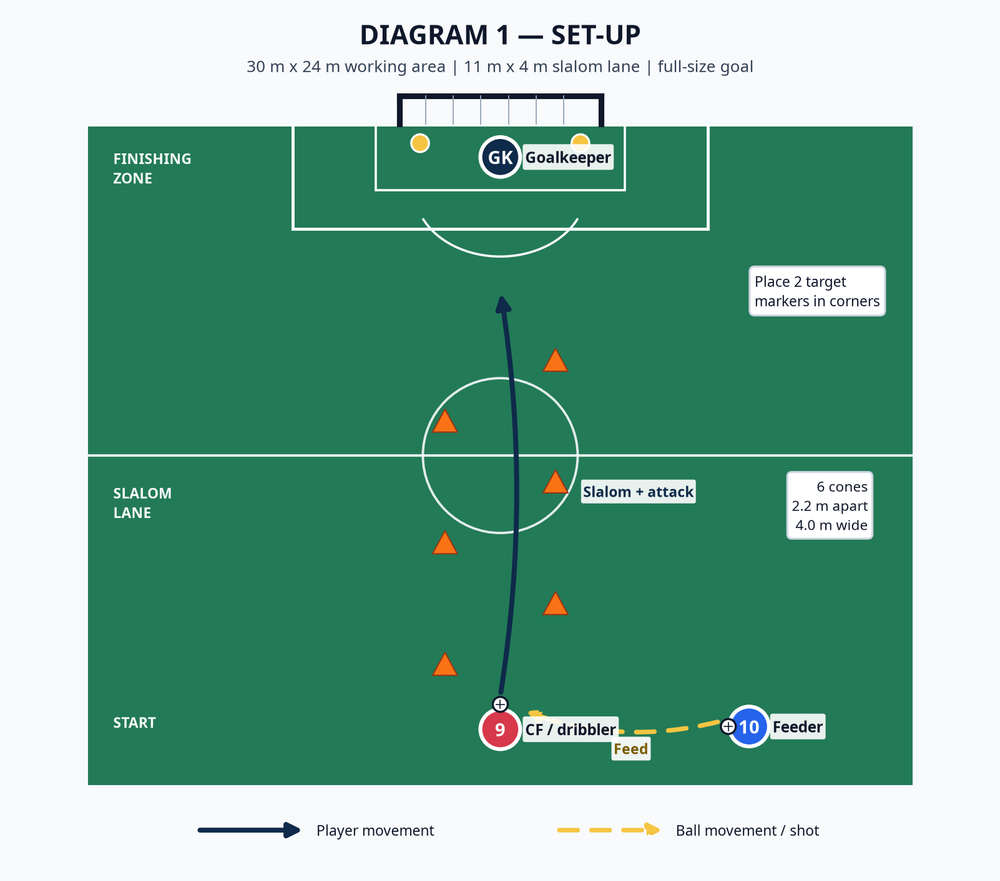
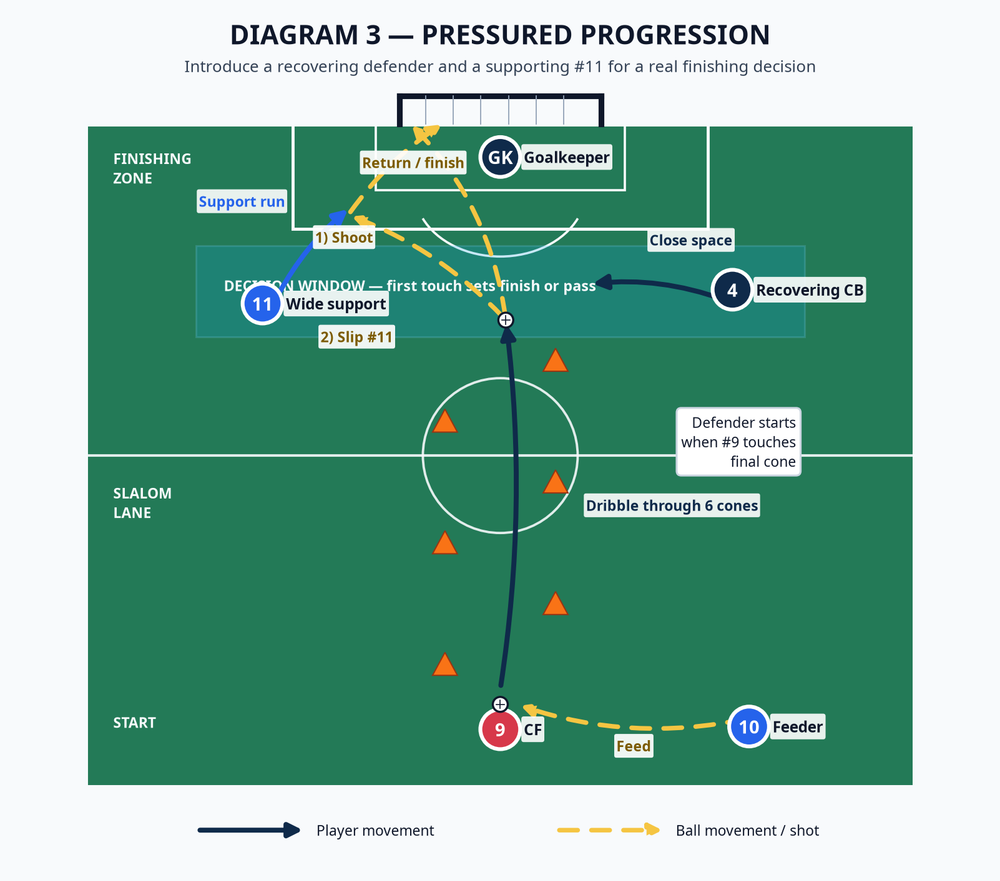
Use a full-size goal and start the goalkeeper on the goal line, slightly favouring the near post. Mark a 30 m x 24 m rectangle. The central slalom lane is 11 m long and 4 m wide: set six cones 2.2 m apart, alternating 2 m left and right of the centre line. Put #9 at the bottom with a ball and #10 eight metres to the right at a slight diagonal.
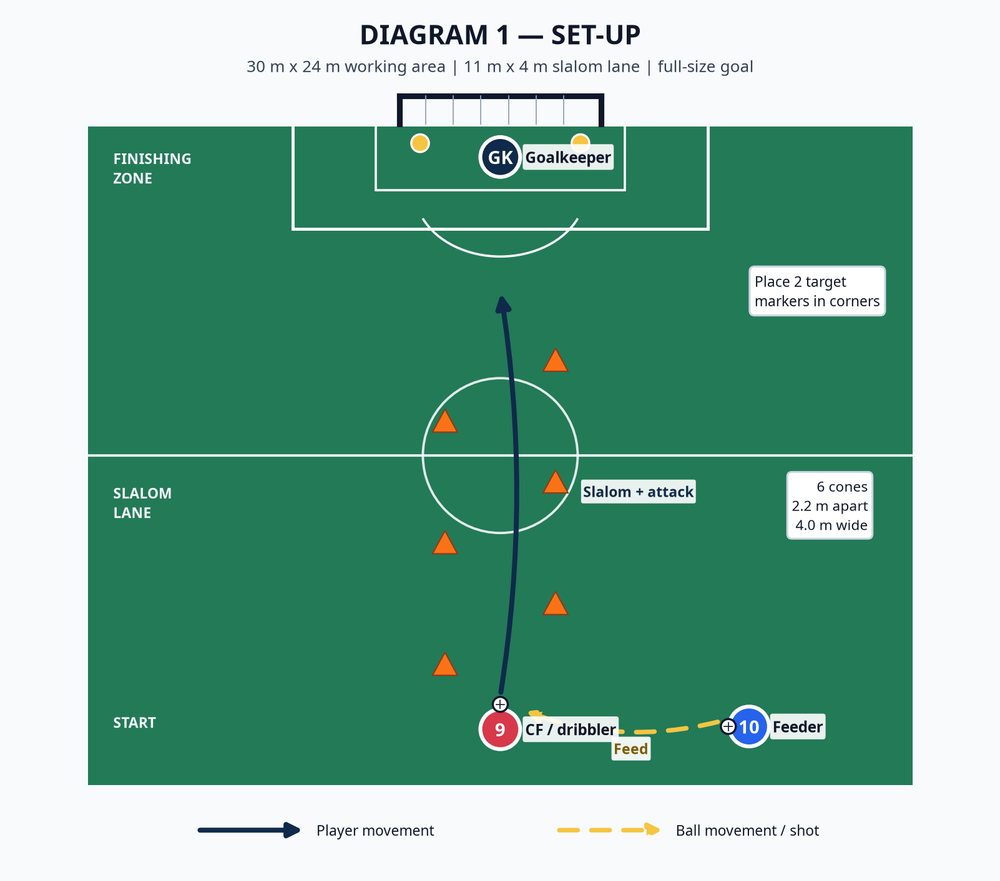
The feeder serves firmly into #9’s front foot; that is the first picture the player must solve. With a larger group, add a second station only when you can protect the space between shooting lines. Collect balls from outside the practice, never across the goalmouth.
Step-by-Step Instructions
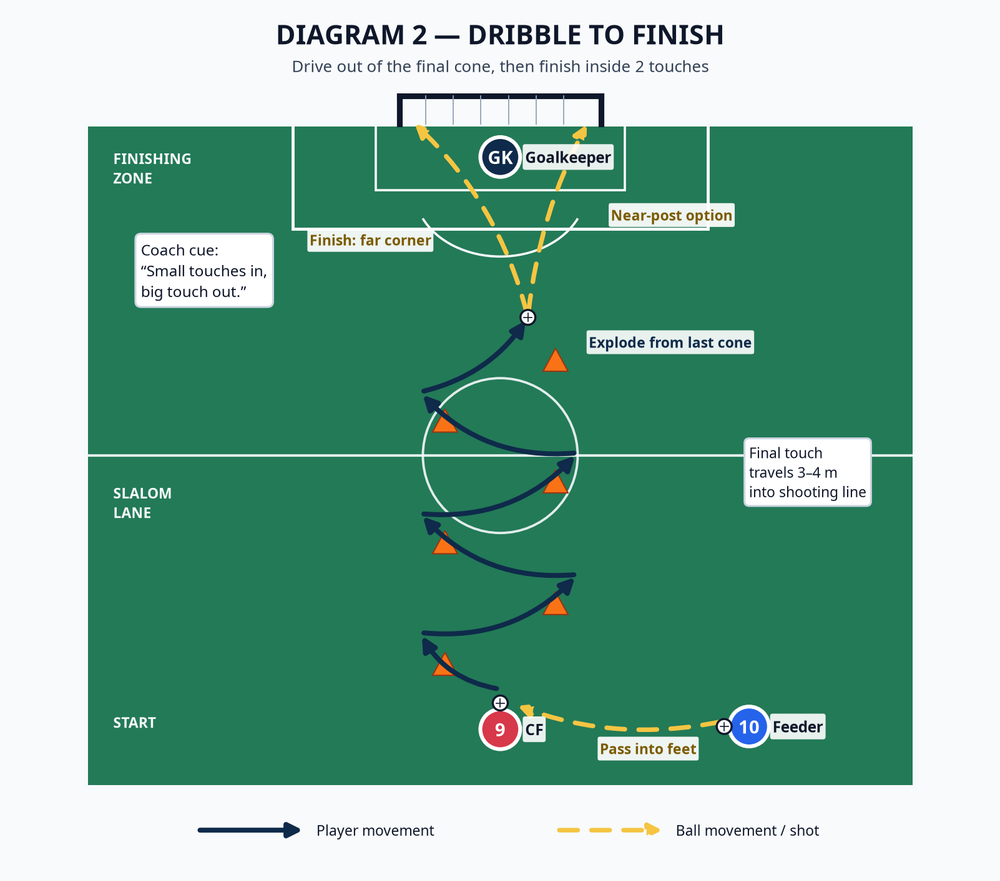
Set the starting picture. #9 begins two metres behind the first cone, side-on to receive. #10 checks that the goal is clear, then plays a crisp pass into #9’s front foot. The pass should arrive with enough pace to demand a soft first touch, not a chase.
Receive with a plan. #9 takes the first touch across the body and enters the slalom immediately. Insist on a scanning glance at the goalkeeper before the second or third cone. The player may use either foot, but must protect the ball with the far foot when moving around each cone.
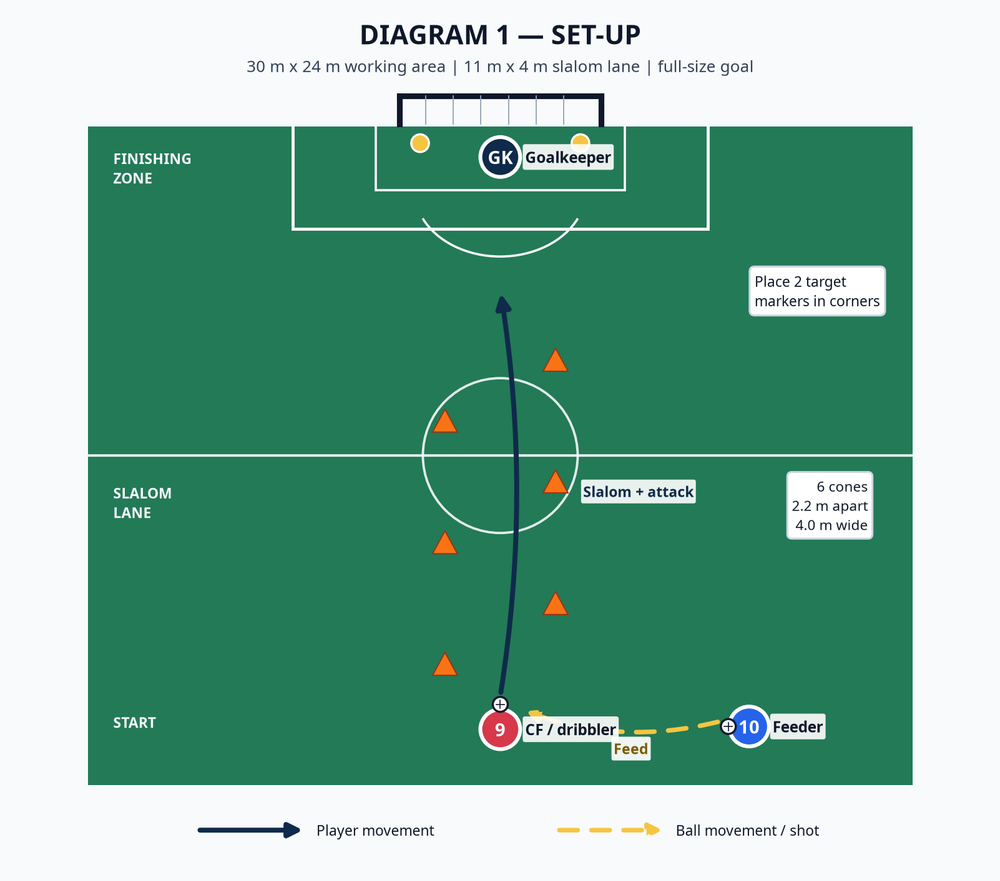
Manipulate through the lane. The player threads between all six cones, using short, frequent touches. Encourage outside-of-the-foot touches when the ball is moving away from the body and inside cuts when changing line. A ball striking a cone is a reset, not a disaster: demand the next action at game speed.
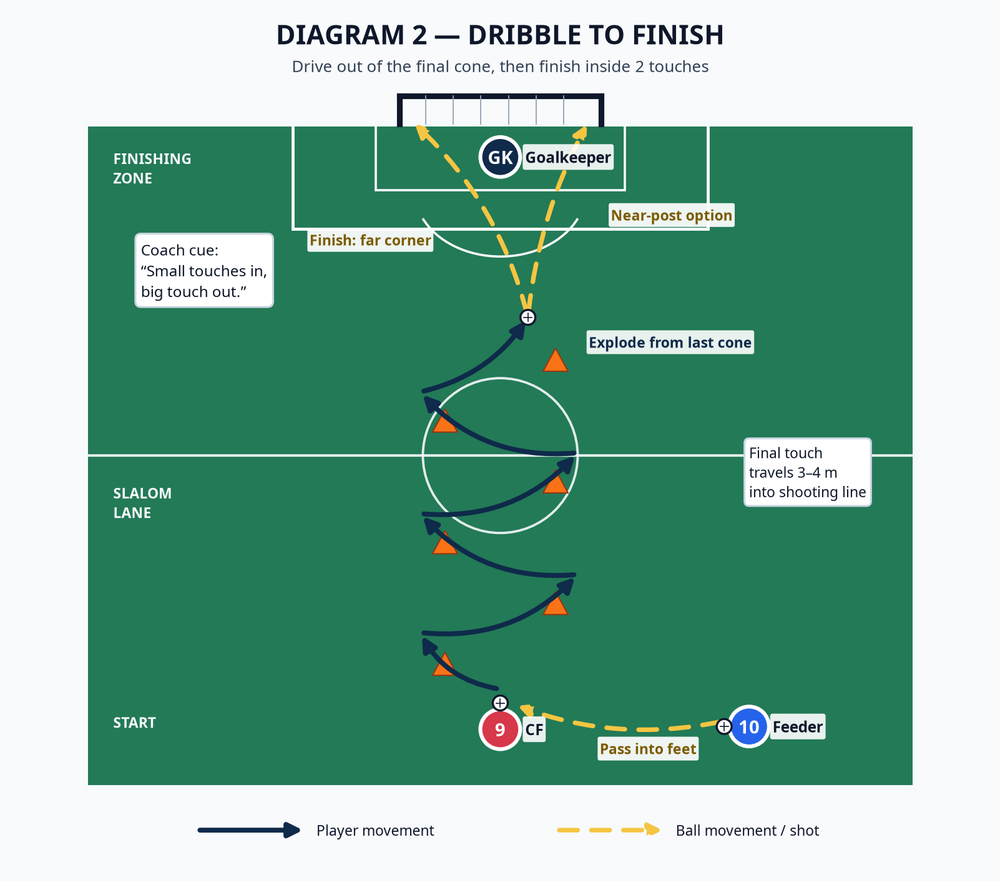
Make the exit touch decisive. At the sixth cone, #9 pushes the ball 3–4 m into the shooting lane. This is a different touch from the slalom touches: it should be longer, forward and away from the defender’s imagined pressure. The coach calls go as the player exits to reinforce the change of tempo.
Finish within two touches. #9 has a maximum of two touches after leaving the last cone. Encourage a placed side-foot finish to the far corner when the body is open, or a driven near-post strike when the goalkeeper gives that space. The shot must be taken before the player reaches the edge of the six-yard-box equivalent marked by the small penalty area.
Rotate with purpose. #9 becomes the goalkeeper’s ball-retriever, then joins the feeder queue; #10 becomes the next #9. This keeps the practice flowing and gives every player a clear observation job: the next #9 watches the current player’s exit touch and finish.
Coach in short windows. Allow three or four uninterrupted repetitions, then coach one detail for 20 seconds. Use a clear challenge such as: Can you score twice in a row with a positive last touch and a finish away from the goalkeeper?
Key Coaching Points
| Detail to coach | Head-coach language |
|---|---|
| First touch | Receive side-on and take the ball where you want to go, not where it came from. |
| Ball contact | Small, sharp touches through the traffic; feel the ball with both feet. |
| Body position | Lower your centre of gravity; use the arm and shoulder to protect the ball. |
| Change of speed | The last cone is your trigger: big touch, lift your head, attack the goal. |
| Finishing picture | See the keeper, then choose the corner. Do not shoot just because the cones are finished. |
| Mental standard | If you lose the ball, react instantly and still finish the action. |
Common Mistakes
| Error to spot | Immediate correction |
|---|---|
| #9 watches the ball throughout | Pause the player at cone three, ask what the goalkeeper is doing, then restart with a mandatory scan. |
| Touches are too large inside the slalom | Narrow the lane by 0.5 m and demand one touch between each cone before returning to normal width. |
| The player exits with the ball under their feet | Place a flat marker 3.5 m beyond the final cone; the exit touch must travel beyond it. |
| Players shoot with no balance | Require a final plant foot beside the ball and a finish into a named target before adding power. |
| Feed is slow or inaccurate | Make #10 accountable: a pass outside the receiving box is repeated by the feeder, not chased by #9. |
Variations & Progressions
Begin with the unopposed pattern until the receiving and exit-touch standards are secure. Then add one constraint at a time, rather than changing the entire task.
| Option | Organisation | Coaching emphasis |
|---|---|---|
| Easier: wide lane | Widen the slalom to 5 m, use five cones at 2.5 m spacing and permit three finishing touches. | Confident first contact, both-foot dribbling and clean technique. |
| Progression 1: time target | Start a visible count when #9 receives; the shot must be released within 7 seconds. | Quicker scanning, a more aggressive final touch and no extra set-up touch. |
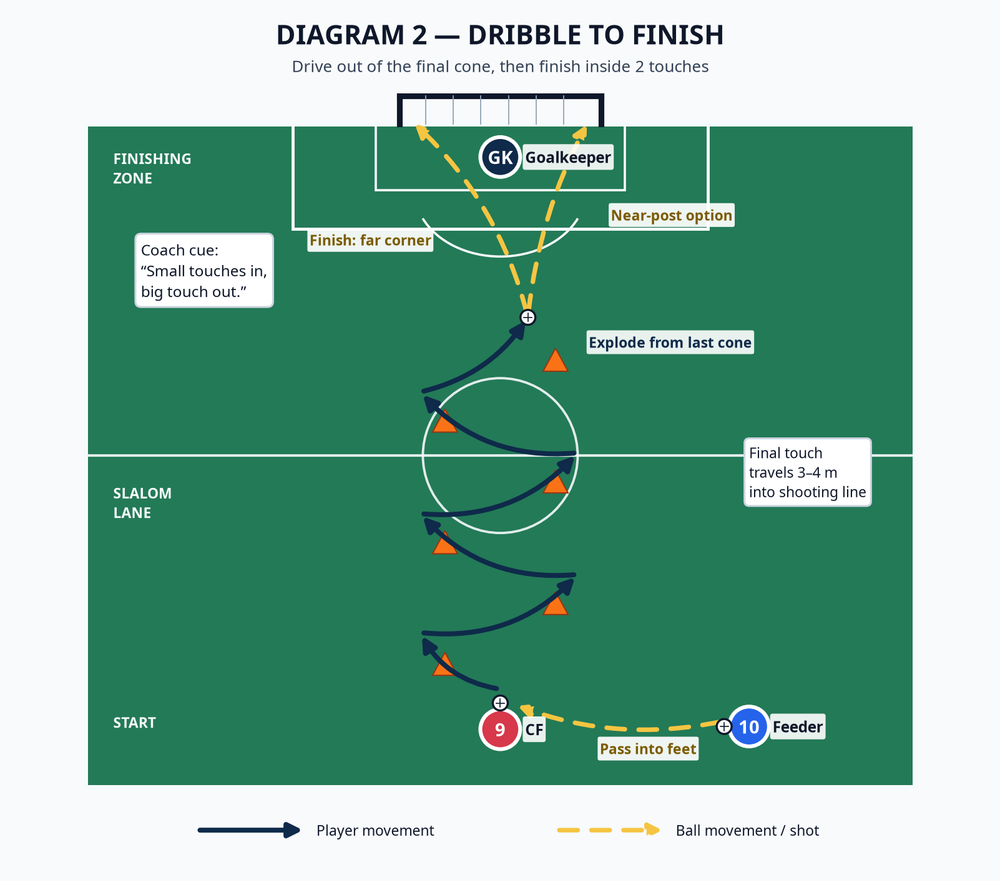
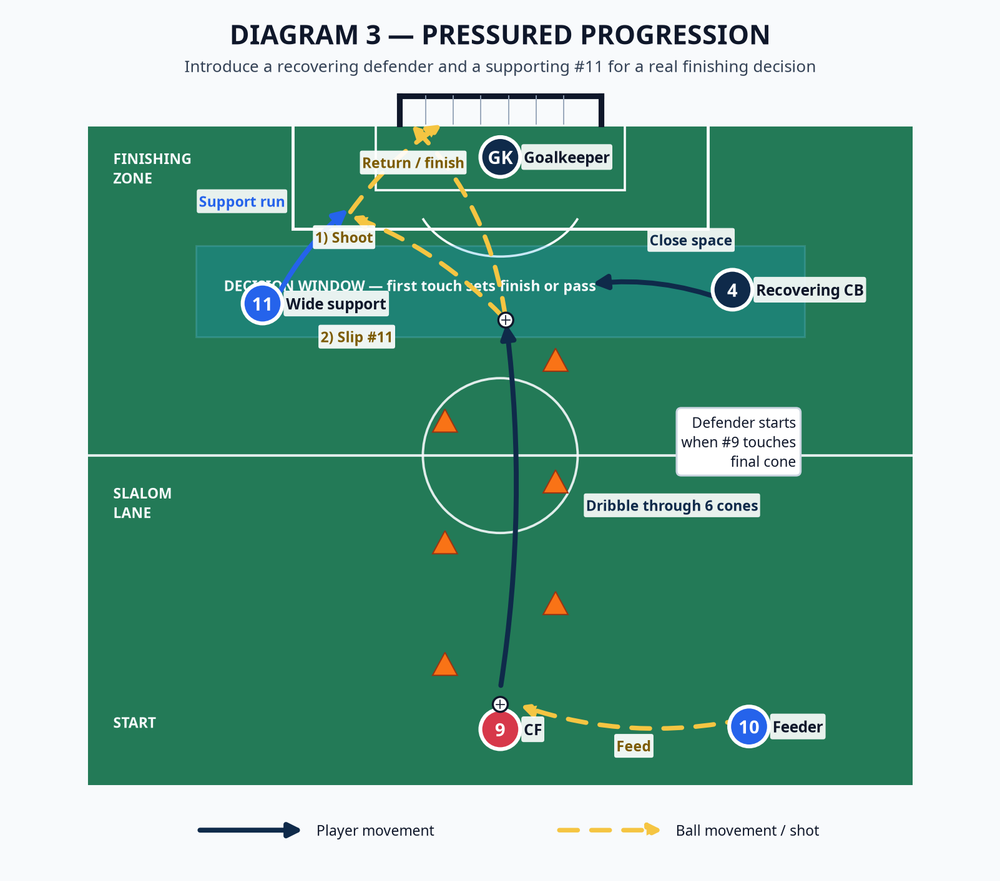
| Progression 2: live recovery | #4 starts 5 m to the side and can chase once #9 touches the sixth cone. #9 must finish or protect and release. | Recognising the real pressure line rather than rehearsing a shot. |
| Progression 3: support decision | Add #11 wide left. In the decision window, #9 can shoot or slide #11 in for a first-time return. | Head-up decision making, weight of pass and supporting angle. |
In the final progression, do not reward a predictable shot. Give one point for a goal and one additional point for the correct decision against #4’s recovery line. If #4 blocks the direct lane, the best outcome may be the slip pass to #11, not a forced finish.
Age Adaptations
| Group | Adaptation | Non-negotiable outcome |
|---|---|---|
| Under-8 | Use five cones, 2.5 m apart in a 12 m x 18 m area; remove the goalkeeper and finish through two mini-goals. | Lots of ball contacts, fun and a clear change of direction. |
| Under-10 | Use six cones in a 20 m x 20 m area; allow three touches after the final cone and alternate feet by round. | First touch into space and basic scanning. |
| Under-12 | Use the full 30 m x 24 m organisation; add a goalkeeper and a 7-second time target in the final block. | Explosive exit touch and purposeful finishing. |
| Under-14 to Under-16 | Keep the full set-up but make #4 live and add #11 in the final progression. | Fast decisions under pressure and a finish that reflects the goalkeeper’s position. |
Coach’s Delivery Notes
Run three four-minute blocks: rhythm and technique, then a two-touch finish, then pressure or support. Take no more than 45 seconds between blocks. Finish by asking players for the cue that changed their action: small touches in, big touch out, eyes up to finish.
[^1]: The IFAB, Laws of the Game 2025/26 — Law 1: The Field of Play
