

Netball
Dodging & Leading: The First-Step Advantage (3v3)
A progressive 3v3 Netball drill that teaches C, WA and GA to unbalance defenders, lead into space and link quickly under game-realistic pressure.

What you need
2–3 netballs, 6 flat cones, 6 contrasting training bibs, stopwatch or whistle
Dodging & Leading: The First-Step Advantage (3v3)
Overview
This 22-minute attacking drill teaches C, WA and GA to create a first-step advantage: move the defender’s feet, explode into a passing lane, and release the ball early. It progresses from a repeatable dodge-and-lead pattern to an 8-second live 3v3 phase, so players learn both the action and the decision that follows it.
Use it when your unit is being held by tight one-on-one defence, feeds are late, or attackers bunch near the transverse line. The diagrams use a regulation 30.5m x 15.25m court, divided into three equal thirds, with a 4.9m-radius goal circle.1 Keep early reps in the centre-to-attacking-third channel to preserve width.
Coach’s intent: “Win the defender’s first step, then ask the feeder to deliver into the space created.”
Setup
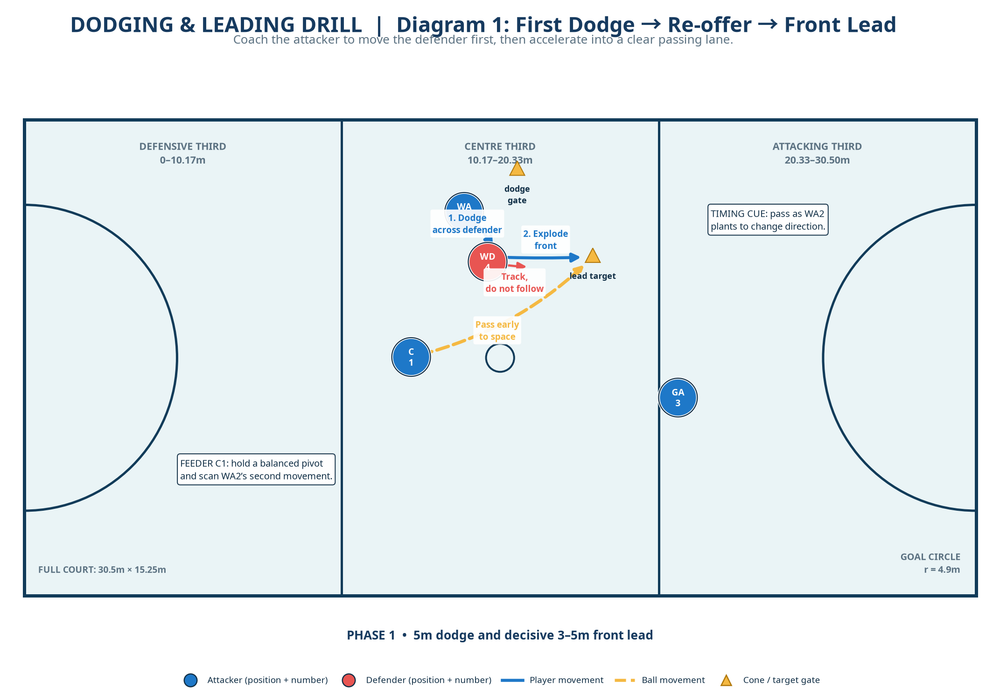
Set the practice on the attacking half. Mark a dodge gate with two cones 1.5m apart, 2m inside the centre third and 1m from the sideline. Put a lead target 4m forward and 2m infield, then a support gate 5m behind it. The goal circle is the live target in Phase 3.
| Item | Quantity | Coaching use |
|---|---|---|
| Netballs | 2–3 | One active ball; one spare with the coach to maintain tempo. |
| Flat cones | 6 | Two for the dodge gate, two for the front-lead target, two for C’s support gate. |
| Bibs | 6 | Blue for C1, WA2 and GA3; coral for WD4, GD5 and GK6. |
| Stopwatch/whistle | 1 | Start the 8-second live-clock in Phase 3. |
The six on-court roles are C1, WA2, GA3 against WD4, GD5 and GK6. These are standard World Netball positions with specified court areas; keep the pattern in legal spaces in a full-court application.1 Coach from 3m off-court near the transverse line.
| Role | Starting picture | Non-negotiable job |
|---|---|---|
| C1 | Ball in centre third, 3m from the transverse line | Hold a strong pivot, scan, and pass to space. |
| WA2 | 1m behind the dodge gate, marked by WD4 | Sell a false line, then explode into the front lead. |
| GA3 | 5m ahead and infield of WA2 | Trigger a curved second lead as WA2 receives. |
| WD4 / GD5 / GK6 | Goal-side or ball-side, according to their role | Apply legal, game-realistic pressure without grabbing or blocking the drill’s flow. |
Step-by-Step Instructions
Phase 1 — First Dodge, Re-offer and Front Lead (6 minutes)
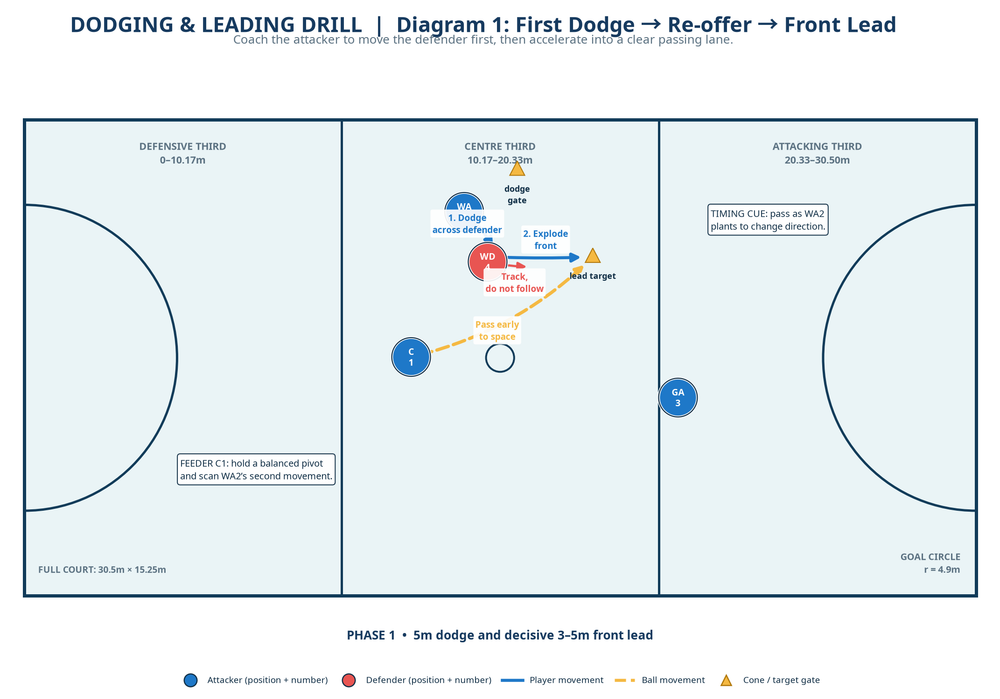
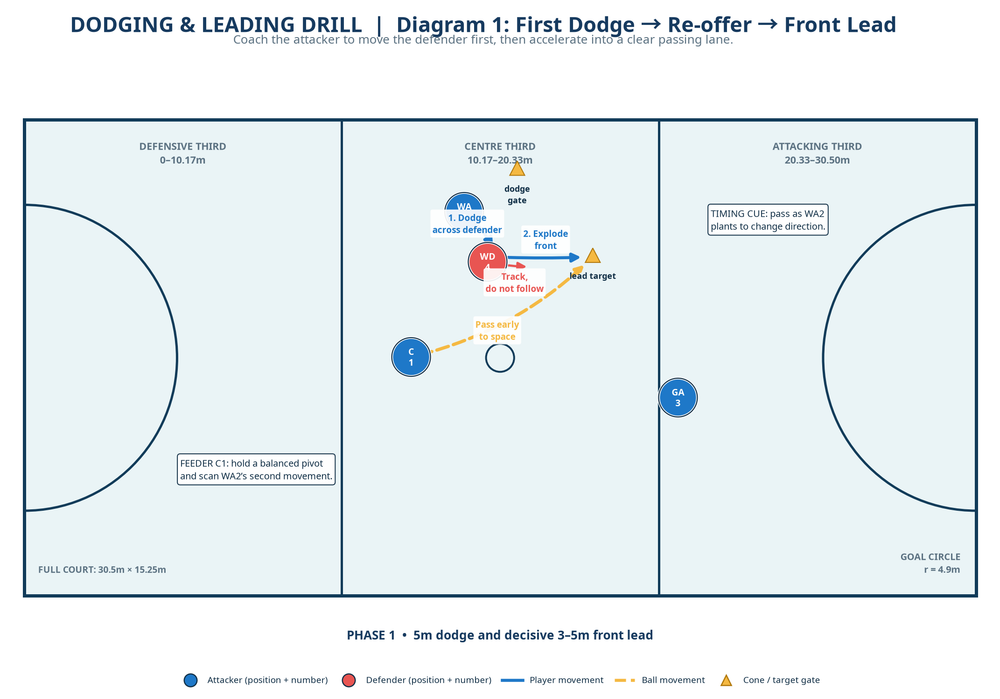
- C1 starts with the ball in the centre third. WA2 is fronted or side-marked by WD4 at the dodge gate; defenders work at 70% pressure.
- On C1’s visual cue, WA2 takes two committed steps across WD4’s body, selling the false route with eyes, shoulders and hips.
- As WD4 shifts, WA2 plants the outside foot and accelerates 3–5m into the lead target. The lead finishes in front of the defender.
- C1 passes on the plant, just ahead of WA2’s outside shoulder.
- Freeze every third rep. Check daylight, early release and defender movement. Run four reps each side.
Phase 2 — Catch, Pivot and Link (7 minutes)
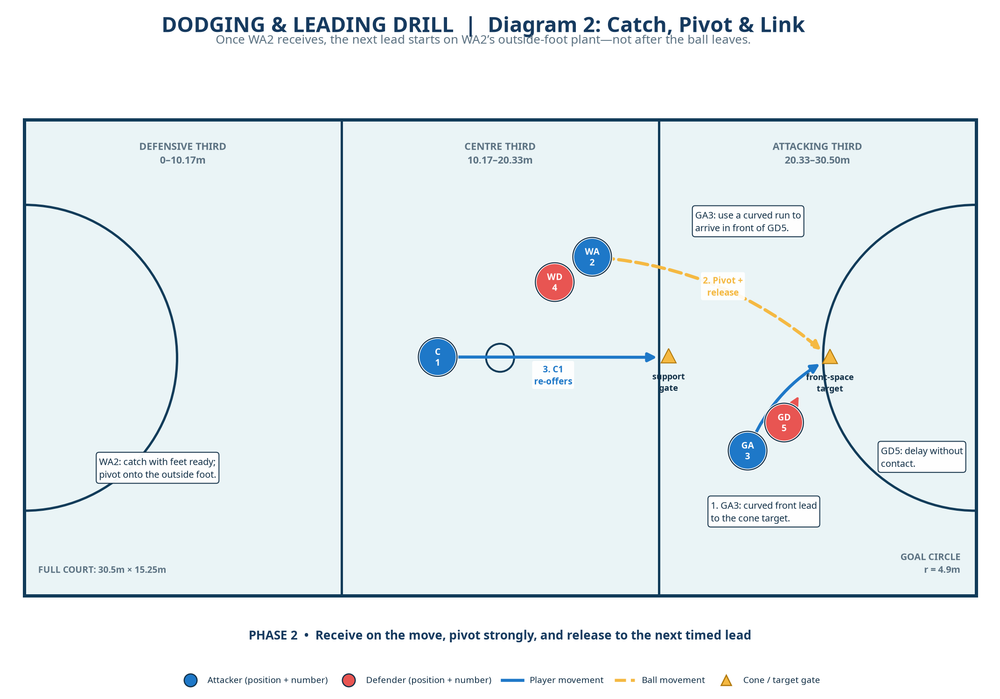
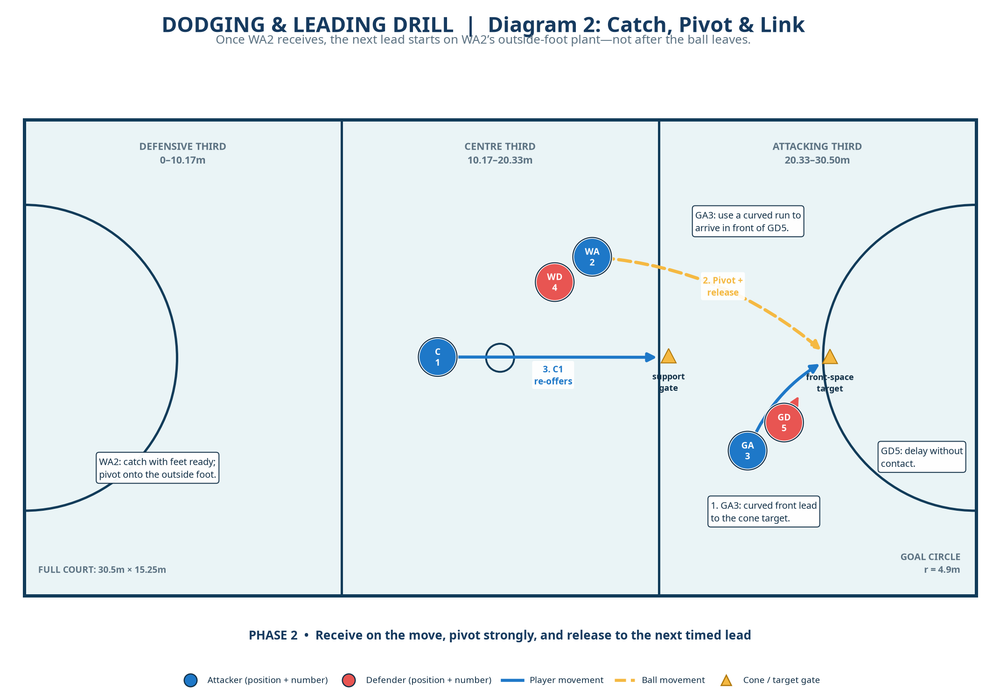
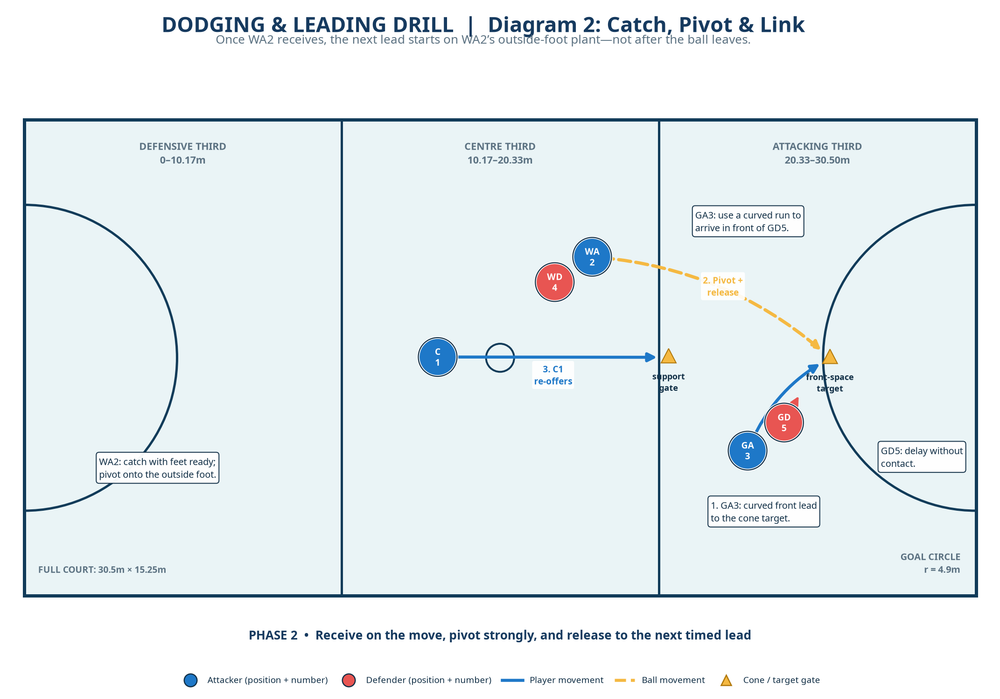
- Keep the first action, then let C1’s pass travel to WA2. WA2 catches on the move, lands balanced and pivots to face the attacking third.
- GA3 runs only when WA2 secures the ball and plants the pivot foot.
- GA3 curves 4–6m to the second target, arriving on GD5’s ball-side shoulder.
- WA2 fires a flat pass to GA3; if covered, use C1’s support re-offer.
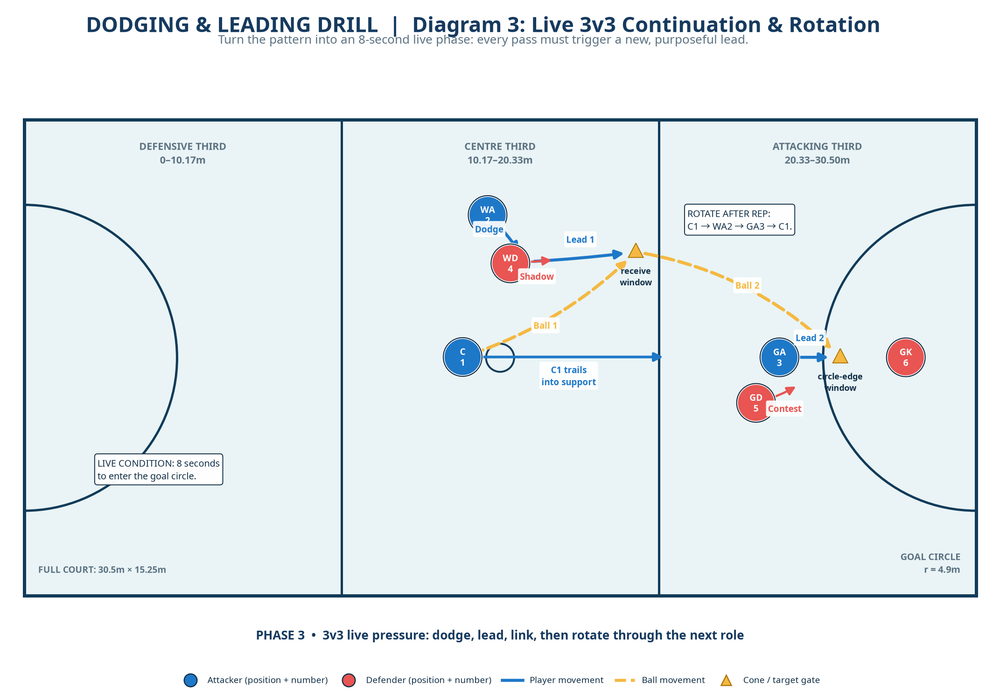
- After two linked passes, rotate C1 → WA2 → GA3 → C1 and WD4 → GD5 → GK6 → WD4. Give one coaching cue per rep.
Phase 3 — Live 3v3 Continuation (9 minutes)
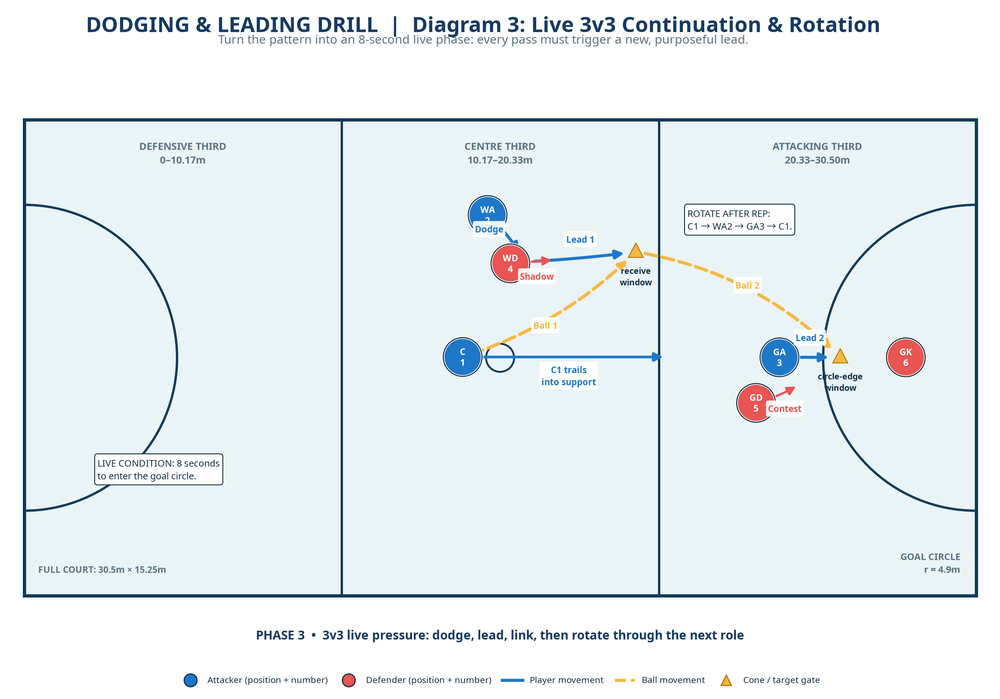
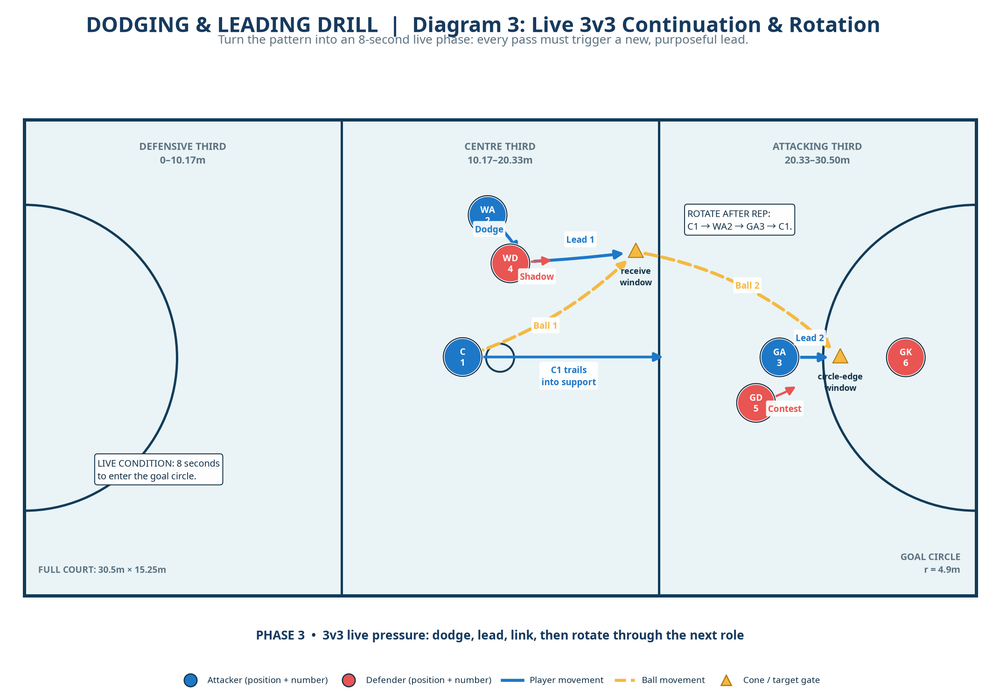
- Make all defenders live. Start C1 in the centre third and begin an 8-second clock on the whistle.
- Attackers must enter the goal circle on time. Every pass triggers a purposeful lead; a static attacker loses possession.
- Award one point for a circle entry, a bonus point for a moving receipt at the circle edge, and defenders one point for a clean intercept or forced turnover.
- Defenders contest legally and communicate: deny the first lead, hunt the second pass, or protect the circle edge.
- Rotate cyclically after each rep. Complete two sets of four reps, then ask which lead made the clearest passing window.
Key Coaching Points
- Move the defender first. Sell the false route with a sharp change of pace, hips and eyes.
- Lead through space. Receive at speed, 3–5m beyond the dodge, with hands early and body between ball and defender.
- Feed early and flat. Use the plant foot as the cue; a late pass invites an intercept.
- Build the next lead off the catch. GA3 goes as WA2 receives, creating two quick threats.
- Keep width. C1 supports behind and infield, not in WA2’s corridor.
- Demand legal pressure. Game intensity only helps when footwork, space and contact are respected.2
Common Mistakes
| Common error | What it looks like | Immediate correction |
|---|---|---|
| Decorative dodge | WA2 takes a side step but never moves WD4’s balance. | Require two committed steps across the defender before the front lead. |
| Late feed | C1 holds until WA2 is stationary. | Coach “pass on the plant”; if late, the rep does not score. |
| Flat second lead | GA3 runs straight down-court into GD5. | Place the target cone infield and demand a curved route. |
| Crowded support | C1 trails directly into WA2’s space. | Mark the support gate and require C1 to re-offer from it. |
| Ball watching | The next attacker waits for the pass to leave. | Use the catch/pivot as the verbal trigger: “Catch—go!” |
Variations & Progressions
| Option | How to run it | Coaching focus |
|---|---|---|
| Easier: shadow defence | Defenders mirror but cannot intercept for the first two minutes. | Body shape, footwork and passing timing. |
| Harder: double dodge | WA2 must fake one way, re-offer, then front lead before C1 may pass. | Patience, balance and the feeder’s scan. |
| Harder: floating interceptor | Add a seventh player as a neutral interceptor in the centre of the channel. | Scanning, reset choices and protection of the ball. |
Age Adaptations
For Under 8, remove defenders, shorten the lead to 2–3m, and praise balanced landings. For Under 10, use a passive WD and one cue: “dodge, plant, go.” For Under 12, run Phases 1–2 with one active defender and a 10-second live clock. For Under 14, use the complete 3v3 design. For Under 16 and Open, add the floating interceptor or a second re-offer after a denied pass; players must choose, not merely repeat, the pattern.
