

Football
Direct Free Kick: Wall Disruption and Near-Post Delivery
A session-ready direct free-kick routine that uses a two-player presentation, wall disruption and a driven near-post delivery to create first-contact and rebound finishes.

What you need
2 match balls, 1 full-size goal, 4–5 training mannequins or wall defenders, 8 flat markers, 12 cones, Bibs
1. Overview
This is a direct free-kick wall-and-delivery play for a dead-ball position 21–24 m from goal, preferably 2–4 m to one side of the penalty arc. It gives the opposition three problems at once: who strikes the ball, whether the wall must react to the decoy, and who owns the near-post corridor. The intended finish is a firm, inswinging ball into the 6–8 m zone at the near post, where #9 attacks the first contact and #11 attacks the second action.
Use it when the opposition sets a four- or five-player wall and leaves the near-post channel open to protect the direct shooting line. Run it on a regulation-sized pitch within the normal 100–110 m by 64–75 m range, but rehearse only the attacking third so players can repeat the detail without wasted running. The routine works best once your team can recognise the goalkeeper setting early behind the wall.
Coach’s outcome: create a decisive first touch in the six-yard area, or keep the cleared ball alive through #8 at the edge of the box.
2. Setup
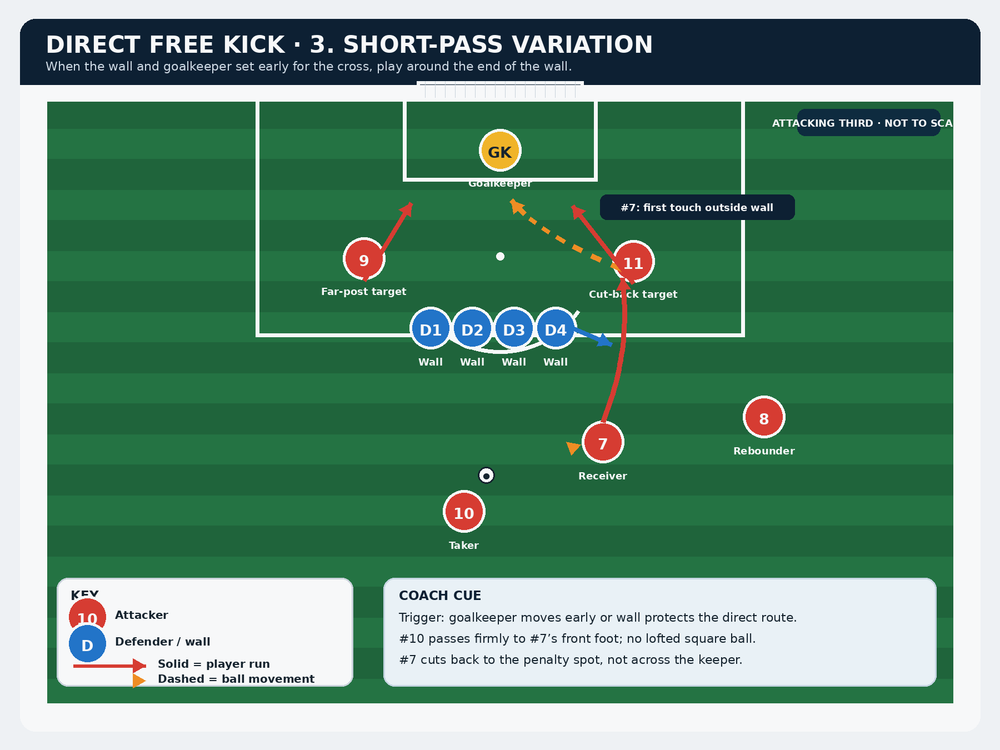
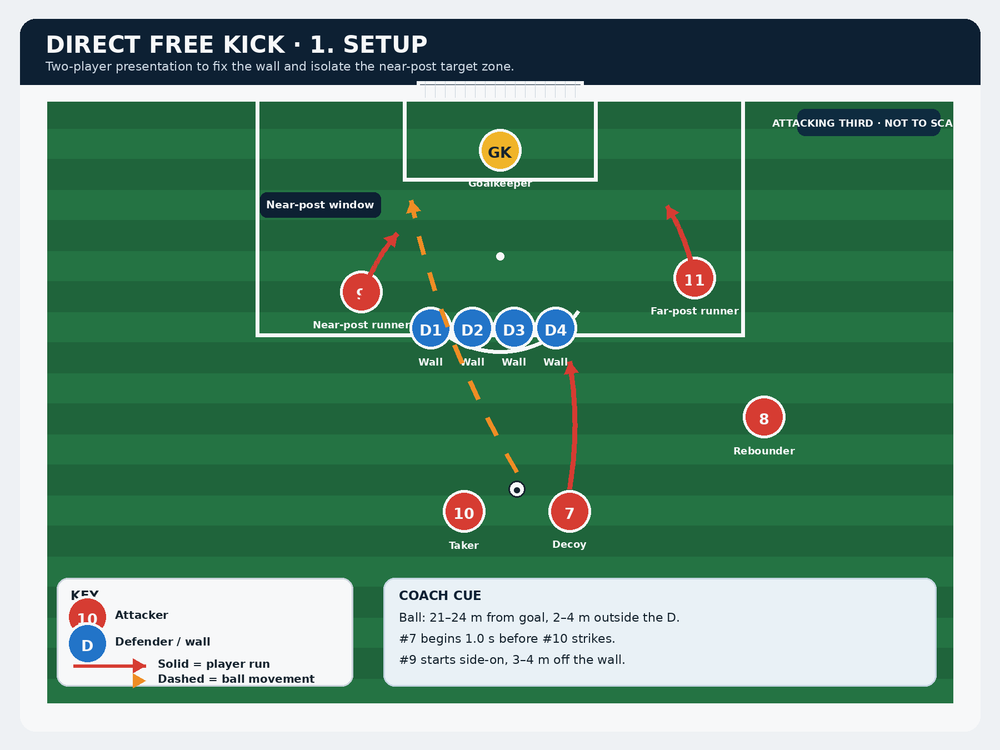
Set the ball 21–24 m from goal. Put four defenders in a wall 9.15 m from the ball, with a goalkeeper behind them. Mark a 2 m by 3 m near-post target window beginning 6 m from the goal line. Use the full-width goal, the penalty area and the penalty spot as natural references; no additional pitch markings are required.
| Role | Starting position | Job in the play |
|---|---|---|
| #10, attacking midfielder / taker | 1.5 m left of the ball, two steps back | Delivers the driven inswinging ball. |
| #7, winger / decoy | 1.5 m right of the ball, one step back | Sells the strike, then runs around the wall. |
| #9, centre forward | 3–4 m outside the near end of the wall | Attacks the first contact in the target window. |
| #11, wide forward | At the far side of the box, level with the edge of the area | Attacks any flick, rebound or goalkeeper spill. |
| #8, central midfielder | 3 m outside the penalty area, central-right | Secures the clearance or shoots first time. |
| #1 plus D1–D4 | Goalkeeper and wall | Provide realistic live resistance in training. |
Use 11 players: five attackers, four wall defenders, one goalkeeper and one server/coach if available. Prepare two balls at the start point so the next repetition begins quickly. Required equipment is one full-size goal, 4–5 mannequins or defenders, eight flat markers, cones, bibs and at least two match balls.

3. Step-by-Step Instructions
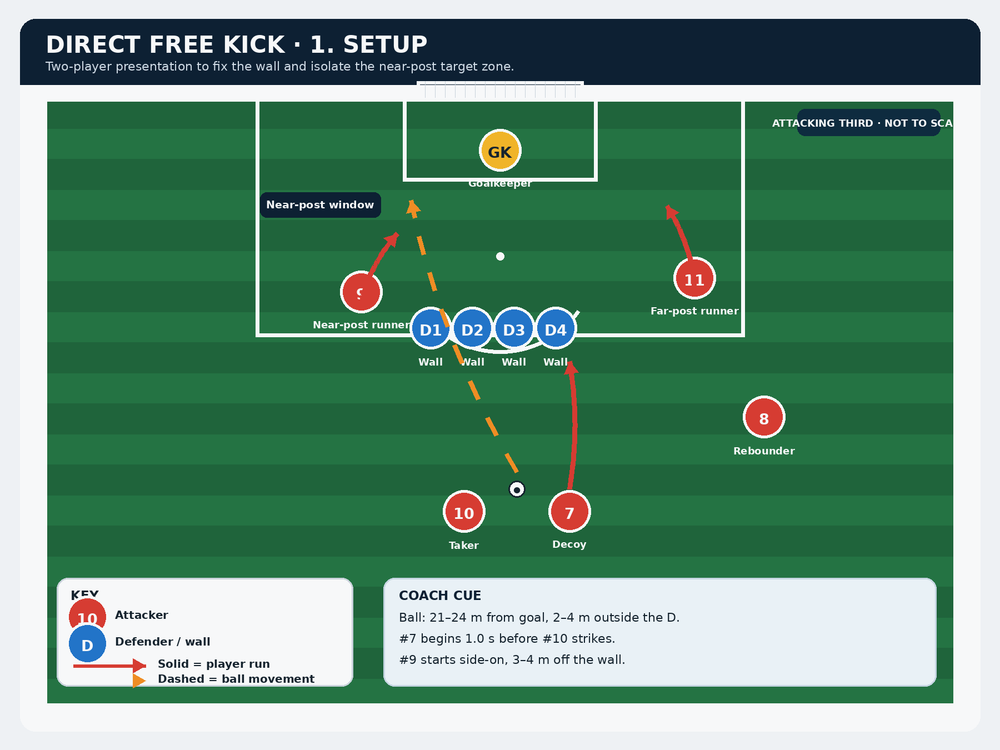
Set the picture. #10 places the ball and stays composed. #7 joins them with both players facing goal. #9 checks away from the wall, #11 stays out of the goalkeeper’s eye-line, and #8 scans for the likely clearance lane. Do not allow runners to stand inside the six-yard box before the kick.
Fix the wall. Ask the goalkeeper and wall to settle as they would in a match. The coach confirms that D1, the defender nearest the target side, is protecting the direct route. This is the reference that #10 and #9 must read.
Give the trigger. On the call “set,” #7 takes a short pause. On “go,” #7 begins a convincing three-step run-up. #9 and #11 remain still for the first two steps; their delayed starts stop defenders from simply following them early.
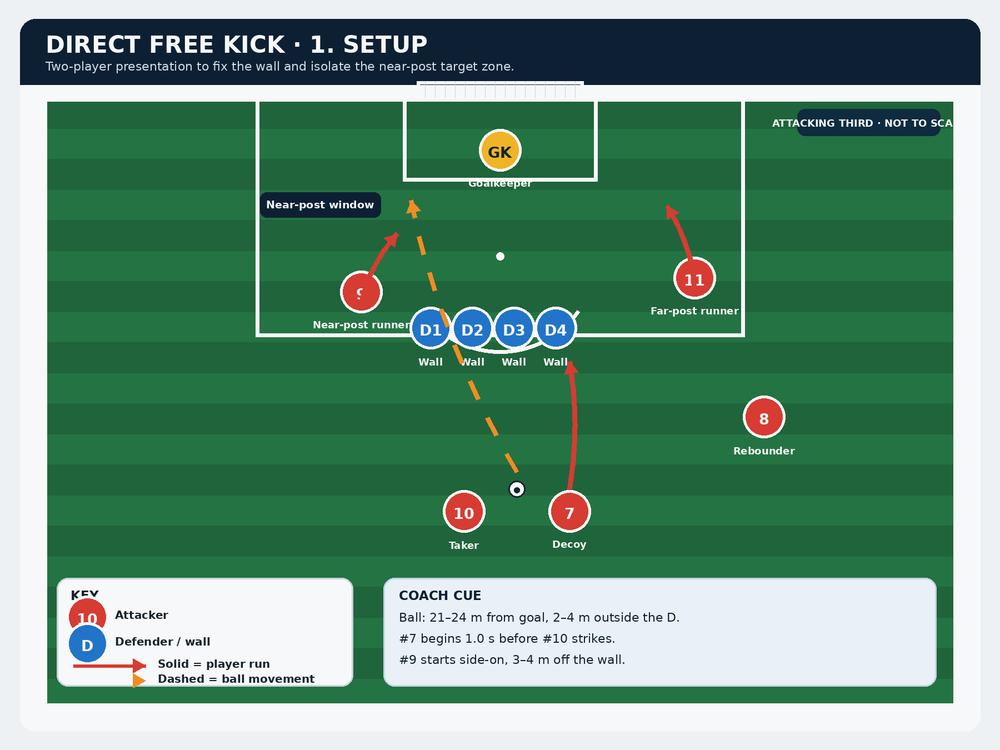
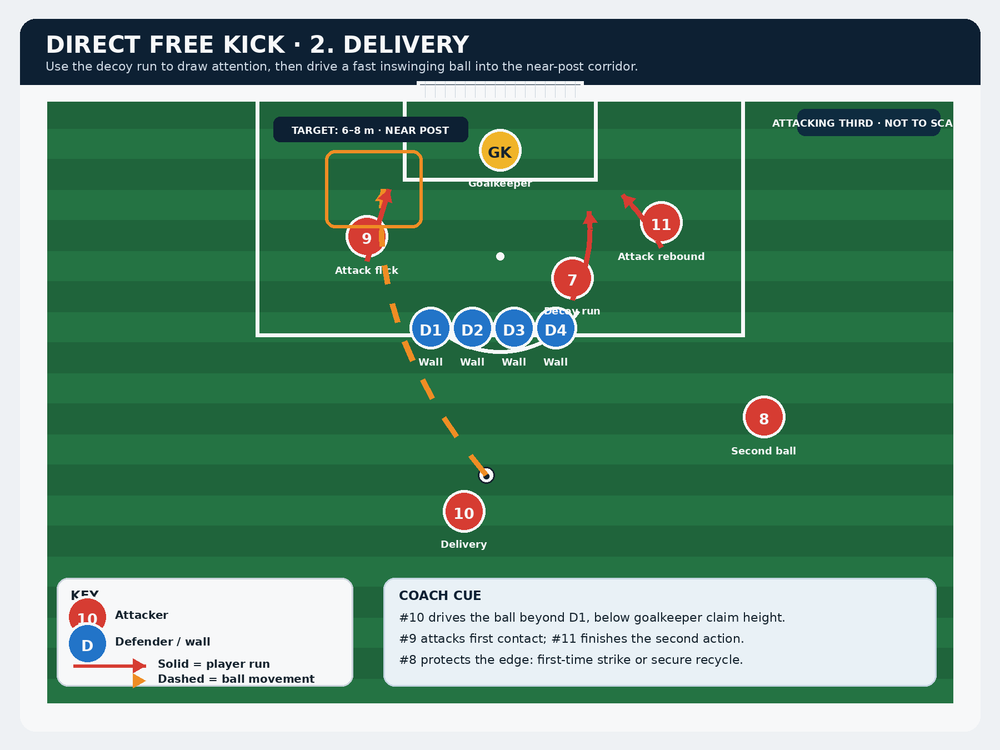
Sell, then clear the lane. At approximately 1.0 second before #10 strikes, #7 steps over the ball without touching it and accelerates around the outside of D4. #7 must not block #10’s swing path or enter the wall. Their run should drag a marker, obstruct the goalkeeper’s view, or force the wall to hesitate.
Deliver with purpose. As #7 clears the ball, #10 strikes through the lower half with an in-swinging surface. The ball travels beyond D1, enters the near-post window at 6–8 m from goal, and arrives with enough pace that the goalkeeper cannot simply walk forward and claim it. A soft floated cross is not the objective.
Attack the first and second actions. #9 bends across the front of D1 and meets the ball with the forehead, inside of the foot, or a controlled shoulder contact. The priority is to direct it across goal, not to force a spectacular finish. #11 arrives one stride later to finish a flick, blocked header or spill. #7 continues beyond the wall for a cut-back option if the ball is under-hit.
Finish the phase. #8 stays balanced at the top of the area until the ball enters the box. If cleared, #8 either strikes first time when the ball is cleanly set or plays the next pass wide and restarts the attack. Coach the reset: return immediately to starting spots, change the target side after three repetitions, then repeat.
4. Key Coaching Points
| Coaching focus | What to demand |
|---|---|
| Deception | #7’s approach must look like a genuine shot: eyes on the ball, fast last two steps, no early glance toward the wall. |
| Timing | #7 leaves first; #10 strikes as #7 reaches the outside shoulder of the wall; #9 starts as the kicking foot swings. |
| Delivery | Demand a driven, dipping inswinger that travels just beyond the first defender, not a hanging ball for the goalkeeper. |
| First contact | #9 runs across the defender’s line and redirects the ball across goal. Attack the ball; do not wait beneath it. |
| Rest defence | #8 stays outside the area and scans both the clearance and the counter-attack route. |
| Communication | Establish one cue only—“go”—so every attacker has the same launch reference. |
5. Common Mistakes
| Error coaches will see | Immediate correction |
|---|---|
| #7 starts too early or slows at the ball. | Rehearse the three-step approach without a ball; demand a full-speed step-over before adding defenders. |
| #10 crosses too high. | Place a ribbon or visual line at goalkeeper-claim height and score only deliveries that arrive below it. |
| #9 runs straight toward goal. | Start #9 3–4 m off the wall and coach a curved run across D1’s front shoulder. |
| #11 arrives with #9. | Hold #11’s trigger until #10’s final swing; the second arrival creates the rebound advantage. |
| #8 drifts into traffic. | Mark a 3 m second-ball box outside the penalty area and make it non-negotiable. |
6. Variations & Progressions
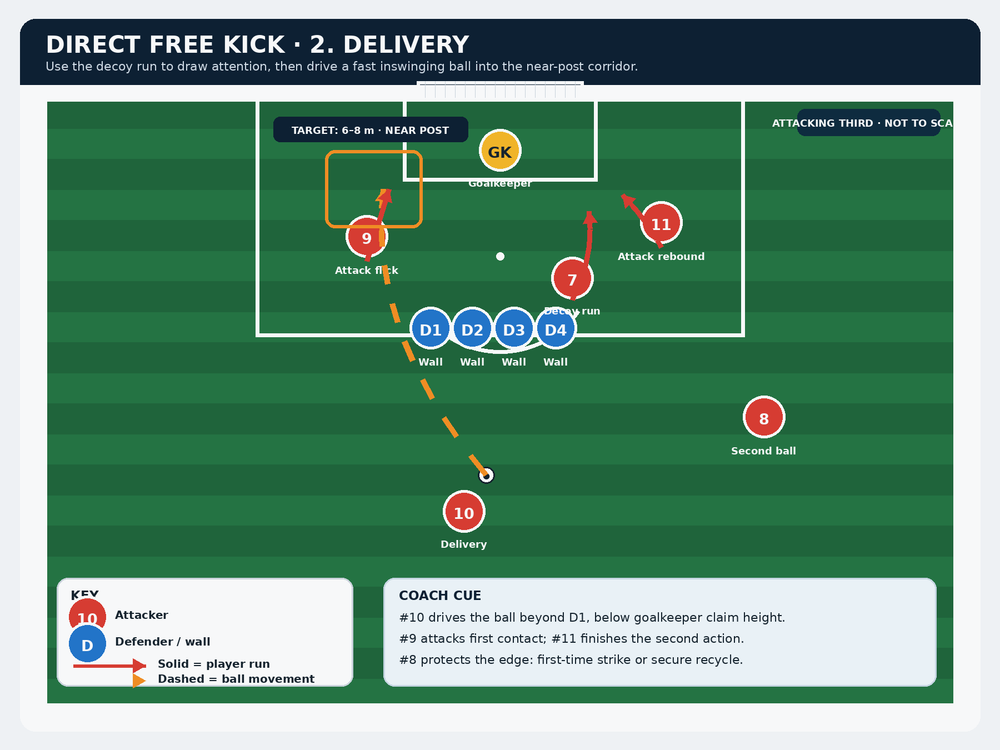
Start with passive mannequins, then replace them with a passive wall, then a live wall and goalkeeper. Give the defending group one point for a clean clearance beyond the penalty area; give the attacking group one point for a first contact and three for a goal. This creates match relevance without losing the technical repetition.
| Variation | How it runs | Why it works |
|---|---|---|
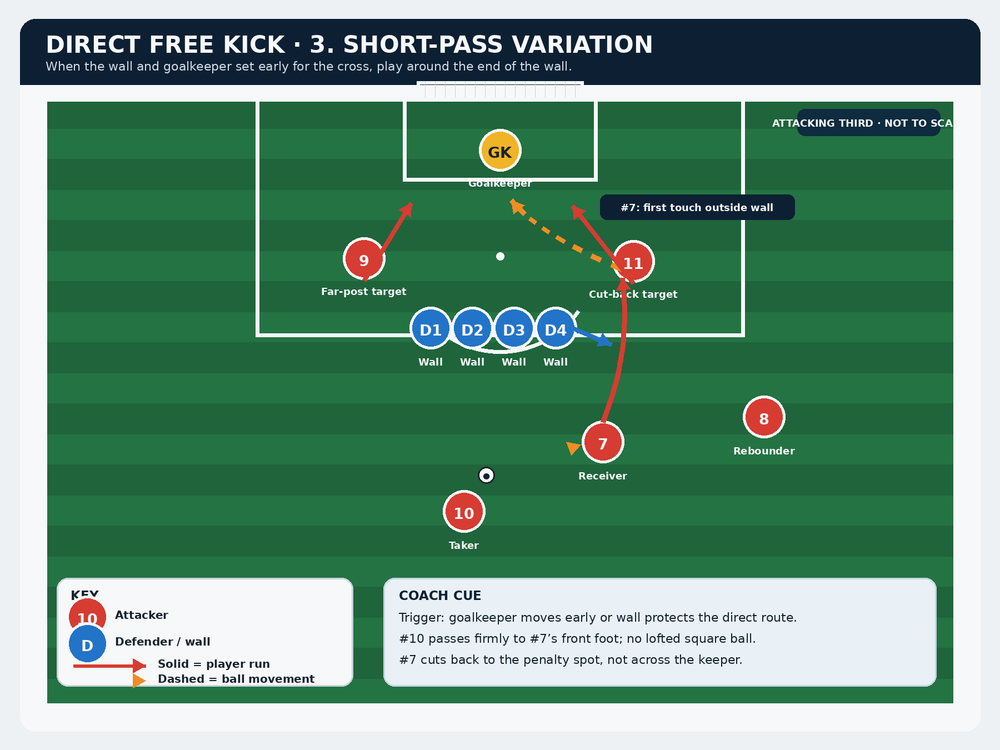
| Short pass around the wall | #10 plays firmly to #7’s front foot as #7 rounds D4; #7 drives to the by-line and cuts back toward the penalty spot. | Punishes a wall and goalkeeper that over-commit to the inswinging delivery. |
| Direct strike | #7 makes the same decoy run, but #10 bends a shot into the gap created as the wall reacts. | Keeps the goalkeeper uncertain and protects the main routine. |
| Back-post overload | #9 feints near post then leaves the ball; #11 and an extra runner attack the far-post drop zone. | Useful when the opponent crowds the near-post channel. |
7. Age Adaptations
| Age group | Adaptation | Coaching priority |
|---|---|---|
| Under 8 | Work from 12–15 m with a smaller goal, no live wall and one target runner. | Clean striking technique and a simple “run after pass” habit. |
| Under 10 | Use three mannequins or passive defenders; remove the delayed #11 run. | Recognising the near-post space and delivering below head height. |
| Under 12 | Add the two-player presentation and #8 second-ball role. | Synchronising the decoy, delivery and first run. |
| Under 14 | Introduce a live four-player wall and goalkeeper. | Reading whether to cross, shoot or use the short variation. |
| Under 16 / Open | Rehearse all three variations against scouting-led defending. | Match-speed execution, disguise and immediate recovery after the first action. |
Finish the practice with five consecutive match-speed attempts from each side. A repetition counts only when the wall is live, the trigger is clear, #9 enters the near-post zone on time and #8 is set for the second ball. That standard turns an attractive diagram into a reliable set-piece habit.
