

Football
Dynamic Wide-Channel Crossing & Finishing Drill
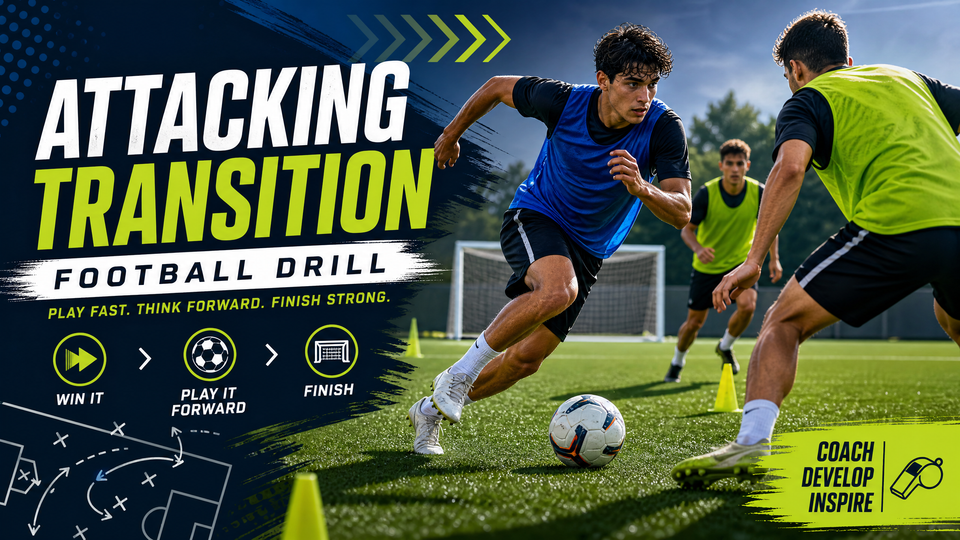
A match-realistic wide-channel practice that sharpens winger delivery, coordinated striker runs, and composed finishing under live penalty-area pressure.
What you need
1 full-size goal, 12-16 footballs, 10 flat cones, 6 bibs, 2 mannequin poles or reference cones, Stopwatch or whistle
1. Overview
This Dynamic Wide-Channel Crossing & Finishing Drill gives coaches a repeatable method for connecting wide service with coordinated penalty-area movement. The session develops the three actions that decide many attacking phases: the winger’s ability to carry the ball into a crossing position, the striker’s ability to lose a marker with a purposeful run, and the finisher’s composure when the ball arrives at speed. It also gives centre-backs and the goalkeeper a realistic opportunity to defend the box, claim crosses, and begin a transition.
Use it in the main practice block after a technical activation, ideally 48–72 hours before a fixture in which the opposition allows space in wide channels or defends crosses poorly. The operational area is one attacking half of a 105m x 68m pitch: mark a 52m-long x 64m-wide zone from the halfway line to the goal line. The shape keeps the crossing action realistic while giving repeated, high-quality finishing opportunities. Run four 4-minute blocks, with 60 seconds between blocks to coach, rotate roles, and collect balls. Aim for 10–12 purposeful attacks per side rather than chasing volume.
2. Setup
| Item | Detail |
|---|---|
| Area | One half-pitch, 52m x 64m, with the full penalty area and one wide channel active. |
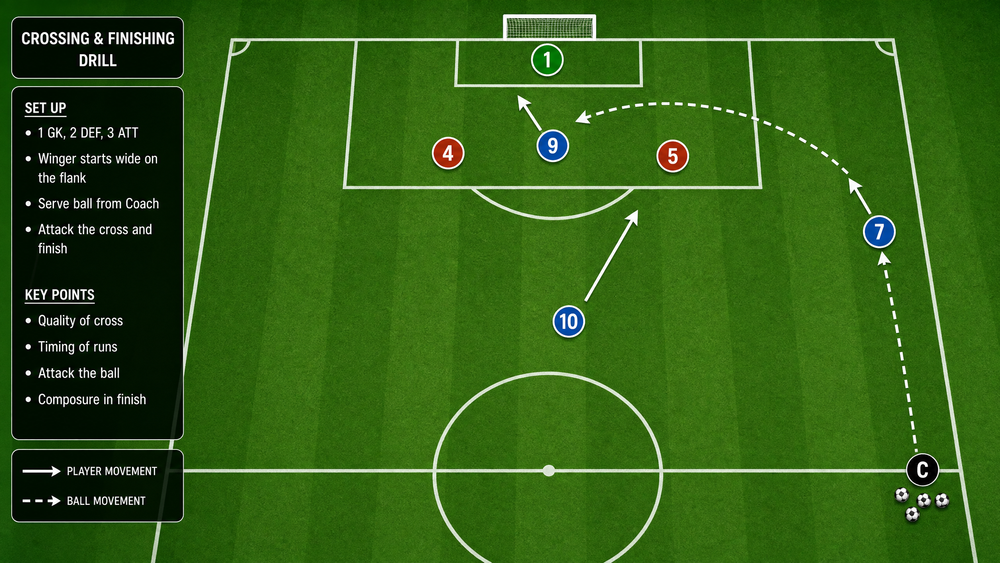
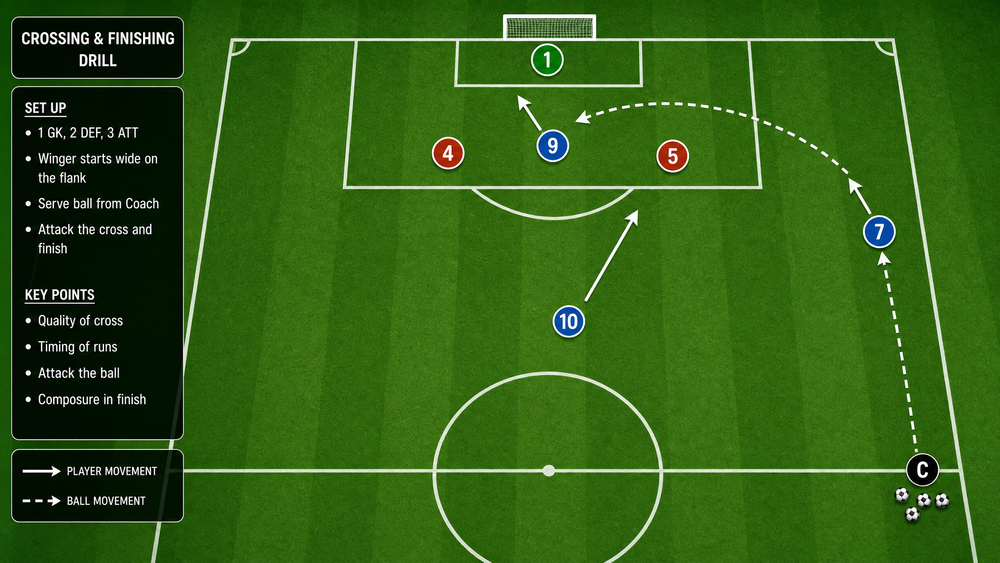
| Players | 7 players minimum: 1 GK, 2 CBs (4 and 5), 1 wide player (7 or 11), 2 attackers (9 and 10), and 1 central server (8). |
| Equipment | Full-size goal, 12–16 balls, 10 flat cones, 6 bibs, and 2 mannequin poles or cones for the wide-channel reference gate. |
| Starting positions | No. 8 starts 8m inside the halfway line. No. 7/11 begins wide, 6m inside the touchline. No. 9 and No. 10 begin 3m outside the penalty area. CBs begin between the penalty spot and the edge of the six-yard box. |
| Channel | Mark a 12m-wide wing corridor. Place the crossing gate 6–8m from the goal line and 2m outside the penalty-area line. |
Set the goalkeeper in a genuine starting position, not on the goal line. Position the central defenders so they can see ball and striker but must still react to movement. Alternate the working side after every two attacks, so right-footed and left-footed players experience both an in-swinging and an out-swinging delivery. If numbers allow, place a second queue at the opposite wing and work alternately; otherwise, rotate No. 7/11, No. 8, No. 9, No. 10, and the defenders after each block.
3. Step-by-Step Instructions
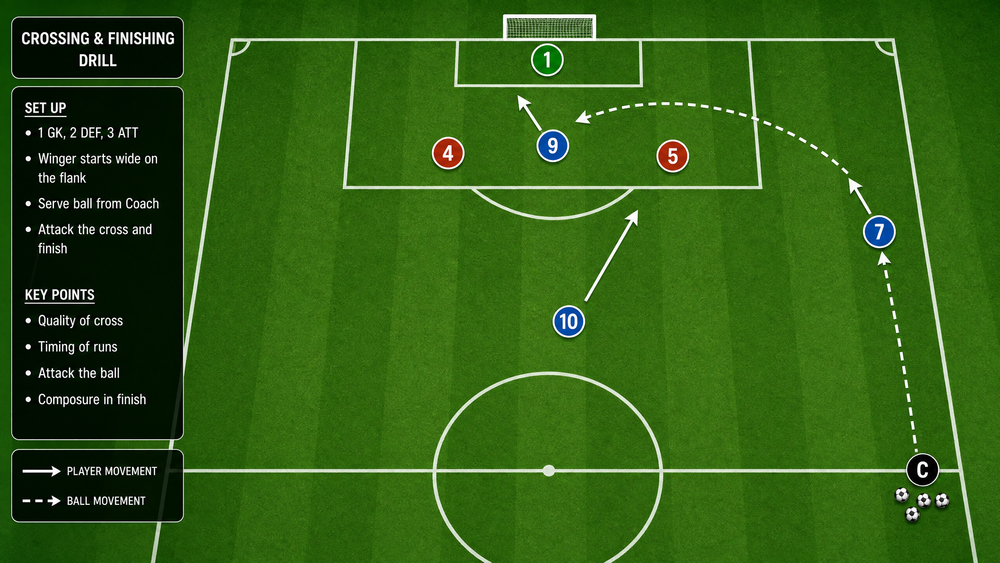
Set the picture. No. 8 begins with a stationary ball and scans before playing a firm, angled pass into No. 7/11’s front foot. The pass should travel 12–16m and invite the winger forward; do not serve behind the player unless the coaching objective is recovery running.
Create the crossing moment. No. 7/11’s first touch goes forward into the 12m-wide channel. The winger carries for 8–12m at match speed, then uses the crossing gate as a decision cue: cross early before the gate, drive to the byline, or cut back if the defender blocks the direct route. For the first block, give the winger a maximum of four touches after receiving.
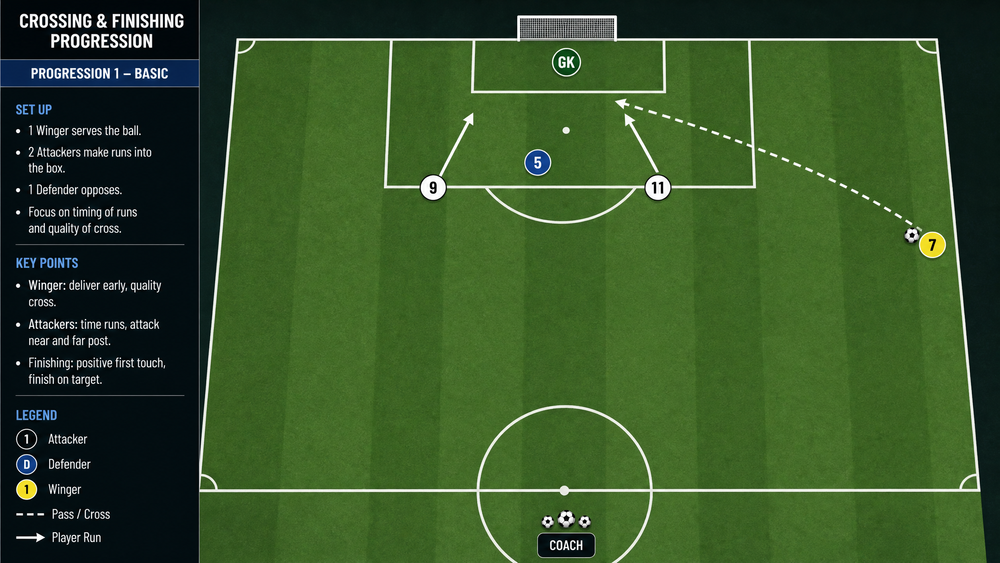
Synchronise the striker runs. As No. 7/11 takes the touch before the gate, No. 9 checks away from the near-post defender, then makes a sharp curved run across the front of the goal. No. 10 delays two seconds, then attacks the far-post lane or the penalty spot. The two attackers must never occupy the same line or ask for the same ball.
Defend realistically. CB 4 tracks No. 9’s near-post movement; CB 5 protects the central-to-far-post lane. They may intercept, block, or clear, but they cannot start their recovery run until No. 8’s initial pass is played. This maintains an attacking advantage while preserving genuine opposition.
Deliver with a target. No. 7/11 crosses into one of three stated zones: a driven ball across the six-yard box for No. 9; a clipped ball toward the far post for No. 10; or a pull-back to the penalty spot if both defenders retreat. Require the player to call the intended target—"near", "far", or "cutback"—before contact. The ball should arrive with enough pace to beat a recovering defender but with a height the attacker can finish first time.
Finish decisively. Attackers aim for one touch whenever possible. No. 9 attacks the ball through the line, using the inside of the foot, laces, or a directed header. No. 10 stays composed at the far post, opens the body, and finishes back across the goalkeeper when the delivery allows. Award one point for a shot on target and three points for a goal; defenders earn one point for a clean clearance beyond the top of the penalty area.
Manage transition and reset. If the goalkeeper claims or a defender clears, No. 8 immediately presses the first outlet pass for three seconds while the attacking players recover behind the ball. Stop after the initial transition, then reset briskly. Rotate No. 9 to No. 7/11, No. 7/11 to No. 8, and No. 8 to an attacking role every four repetitions.
4. Key Coaching Points
- Scan before the wide pass and before the cross. The No. 8 should see the wing lane before passing; the winger should see the box before committing to a delivery.
- First touch creates time. Coach the winger to take the ball forward and slightly away from pressure, with hips open toward the penalty area.
- Use a clear run trigger. The attackers move when the winger’s head comes up or the final preparation touch is taken—not when the initial pass travels.
- Differentiate the runs. No. 9 owns the near-post channel; No. 10 arrives late at the far post or penalty spot. One run creates space for the other.
- Match the cross to the run. A near-post run needs a firm, low ball; a far-post run benefits from a clipped delivery; a late runner needs a cutback behind the first defensive line.
- Finish through traffic. Demand aggressive body shape, eyes on the ball, and a calm final contact. Encourage the closest attacker to attack the cross and the second attacker to anticipate any rebound.
5. Common Mistakes
| Error coaches should spot | Immediate correction |
|---|---|
| The winger crosses without looking. | Freeze the action and ask the winger to name the target zone before the next delivery. |
| Both attackers run to the near post. | Rehearse the near/far relationship without defenders for two repetitions, then restore pressure. |
| No. 9 starts too early and stands under the ball. | Demand a check away first, followed by a late, explosive curved run. |
| The cross is floated into the goalkeeper’s space. | Move the target cone 1m farther from goal and ask for a flatter, more penetrating service. |
| Attackers try to take unnecessary extra touches. | Set a one-touch finishing condition for the next two minutes and reward shots on target. |
6. Variations & Progressions
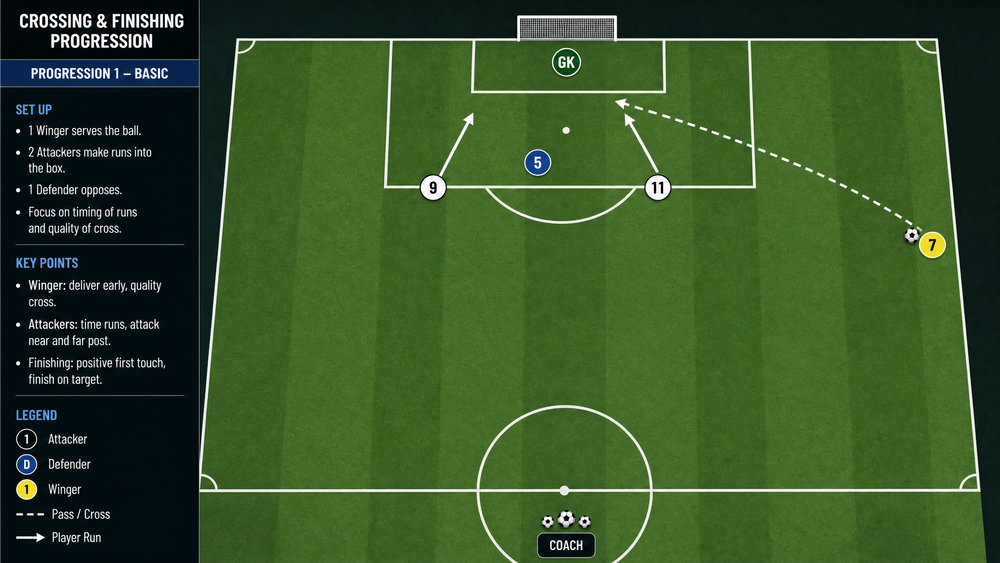
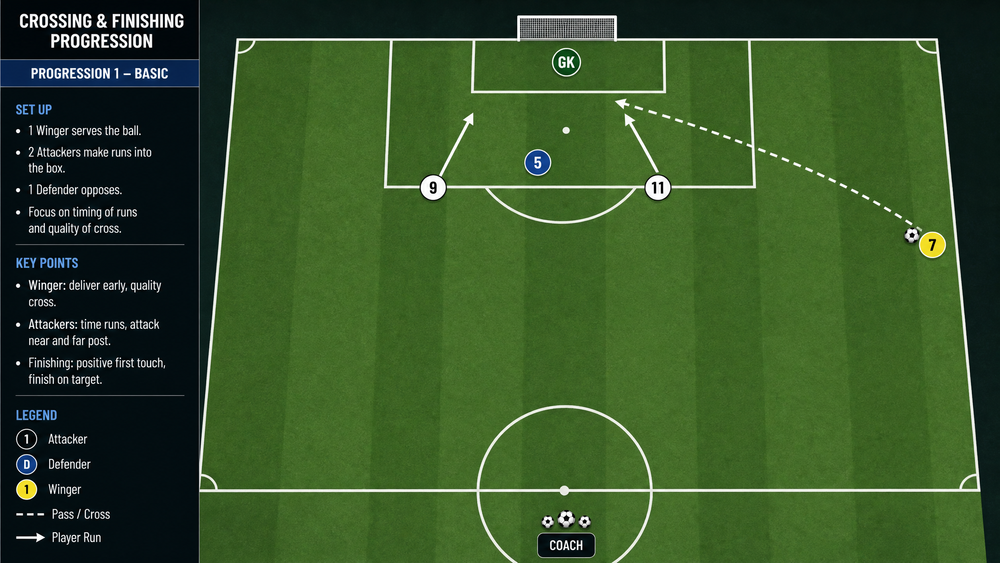
Easier: technical pattern. Remove the defenders and goalkeeper pressure for the opening five minutes. Give No. 7/11 a fixed crossing target—near post, far post, then cutback—so players learn the picture before making decisions.
Harder: full-back overload. Add No. 2 or No. 3 to overlap No. 7/11, and add an opposing full-back. The winger must now decide whether to cross early, release the overlap, or receive a return pass before delivering.
Harder: live counter-attack. On a defensive clearance or goalkeeper claim, CB 4 or CB 5 must connect with a target player on the halfway line within six seconds. This forces the attacking unit to react after losing the ball and reinforces match-realistic responsibility.
7. Age Adaptations
For Under-8 and Under-10, reduce the area to 35m x 45m, use a smaller goal if appropriate, remove defenders, and allow two or three finishing touches. Focus on positive dribbling, basic crossing technique, and the excitement of arriving to score. Avoid lengthy detail; use simple cues such as "wide, look, cross, finish."
For Under-12 and Under-14, use a 45m x 55m area with one recovering defender and a goalkeeper. Introduce near-post and far-post roles, but keep the delivery targets visible with coloured cones. Encourage players to recognise when the defender has dropped too deep and a cutback is available.
For Under-16 to open-age squads, use the full 52m x 64m setup, active centre-backs, and a live transition. Demand scanning, disguised delivery, aggressive box occupation, and immediate counter-pressing. At this level, record the outcomes by delivery type so the coach can assess whether the team’s crossing choices match the runs being made.
