

Football
7v6 Counter-Attack Transition Drill: Regain, Break, Finish
Train players to turn a regain into a composed, high-speed scoring chance while retaining protection against the next counter-attack.

What you need
1 regulation goal, 1 goalkeeper, 12–16 footballs, 24–30 flat cones, 2 sets of bibs, 2 mini-goals or a marked exit line, stopwatch
Overview
This 7v6 Counter-Attack Transition Drill trains players to turn a regain into a clear chance before the opposition can recover its defensive shape. It gives the attacking unit a repeatable language for the first ten seconds after winning the ball: secure it, find the first forward pass, stretch the pitch with purpose, then fill the box with timing. The defensive unit is equally important; it must delay the ball, protect the central lane and organise its recovery runs.
Use it in the main phase when your team needs sharper reactions after regains, particularly against opponents that commit numbers forward. The blue team has 10 seconds to score; red earns a point by winning it back and completing a controlled exit.
Session snapshot
| Item | Detail |
|---|---|
| Format | 7 blue attackers v 5 red outfield defenders + red goalkeeper |
| Working area | 70 x 52 m, set within a reference full pitch of 100 x 64 m |
| Duration | 24–30 minutes including demonstrations and progressions |
| Work-to-rest | 5 x 3-minute blocks; 90 seconds coaching/reset between blocks |
| Main outcomes | First forward pass, depth runs, wide support, finishing, rest defence |
Setup
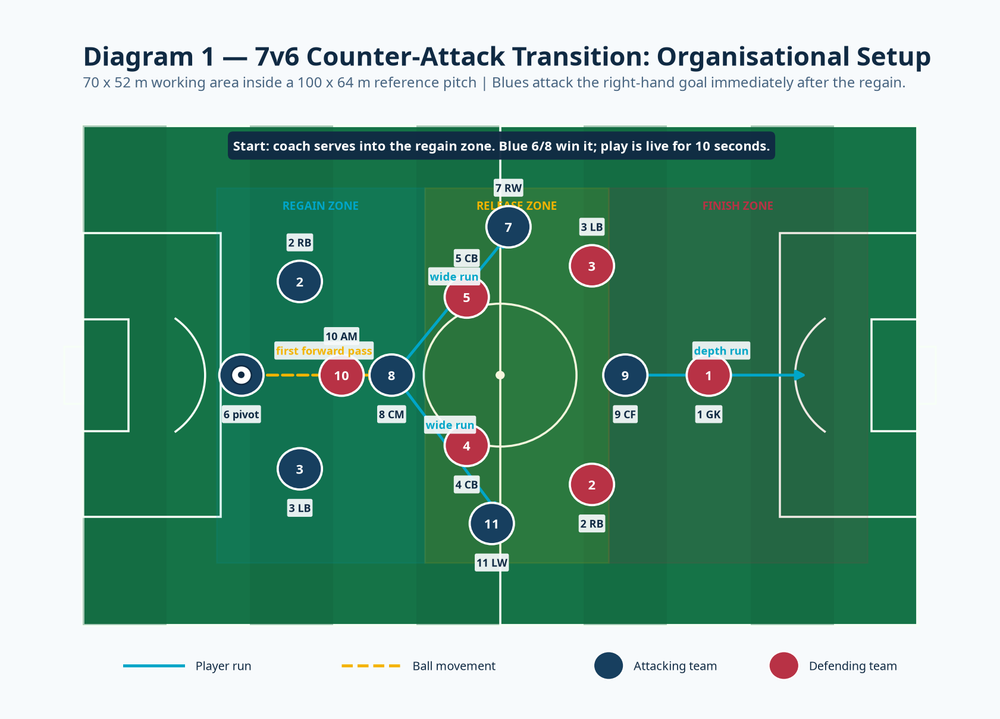
Mark a 70 x 52 m rectangle, with a regulation goal and goalkeeper at the attacking end. On a 100–110 m by 64–75 m pitch, use the final third plus central release area. Split it with flat cones into a 25 m regain zone, 22 m release zone and 23 m finish zone.
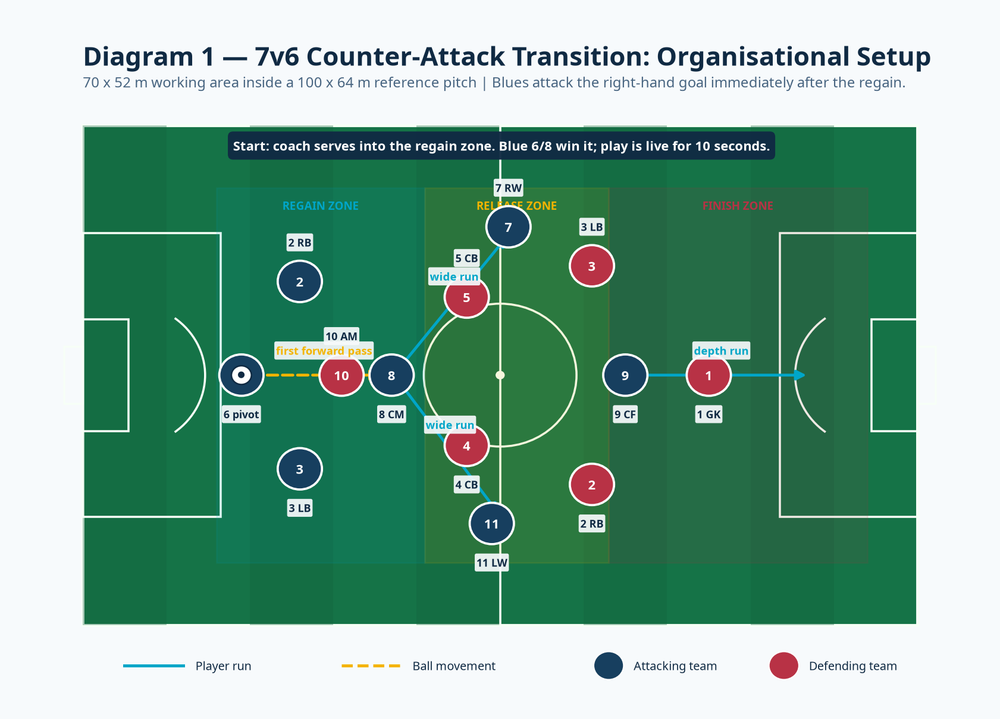
The blue team starts in the structure shown below: 6 receives in the regain zone, 8 is the nearest forward support, 2 and 3 secure the outside of the regain, 7 and 11 hold wide starting lanes, and 9 begins between the centre-backs. The red team has 4 and 5 as centre-backs, 2 and 3 as recovering full-backs, 10 as the first presser, and 1 in goal. Give the coach a ball supply at the regain-zone touchline; use two spare servers if available so the restart is immediate.
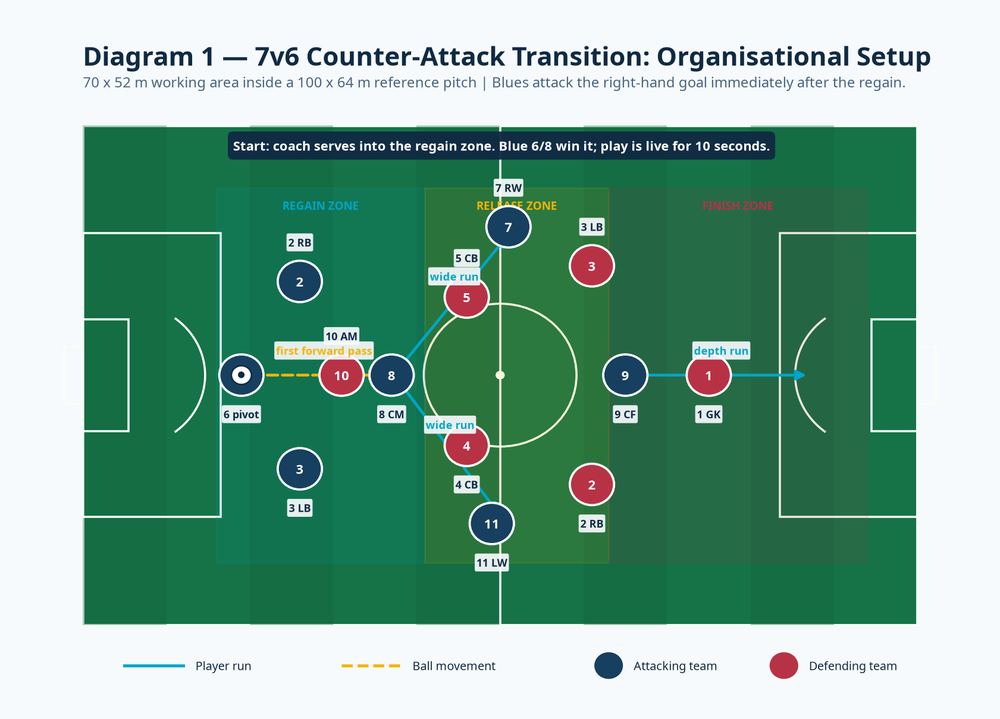
Use spare balls with the coach, 24–30 flat cones and two colours of bibs. Add two mini-goals or a marked end line at the far end only if you want red to counter after a regain.
Step-by-Step Instructions
Set the defensive picture. Red begins compactly in front of goal. Red 10 can press blue 6; blue 7 and 11 start outside, while blue 9 begins on the blind side of the deepest centre-back.
Create the turnover. The coach serves firmly into blue 6 or blue 8 in the regain zone. Call “transition” as the ball travels. That is the only trigger: the blue team is now live and has 10 seconds to score. In later repetitions, feed red 10 first and allow blue 6 or 8 to intercept, tackle or collect a loose ball to make the regain more realistic.
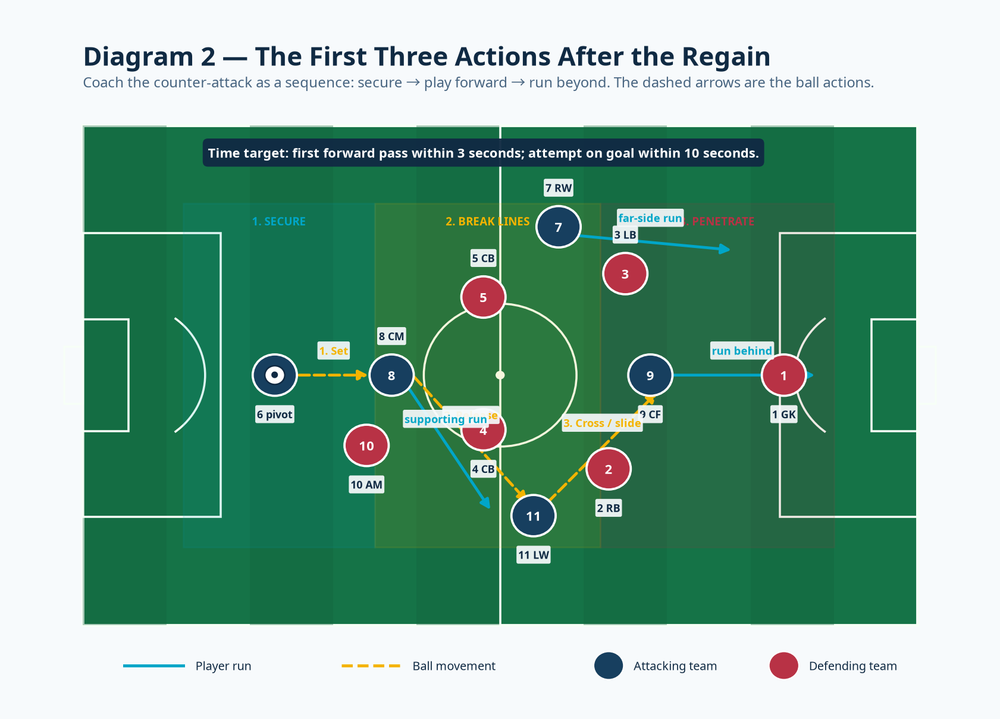
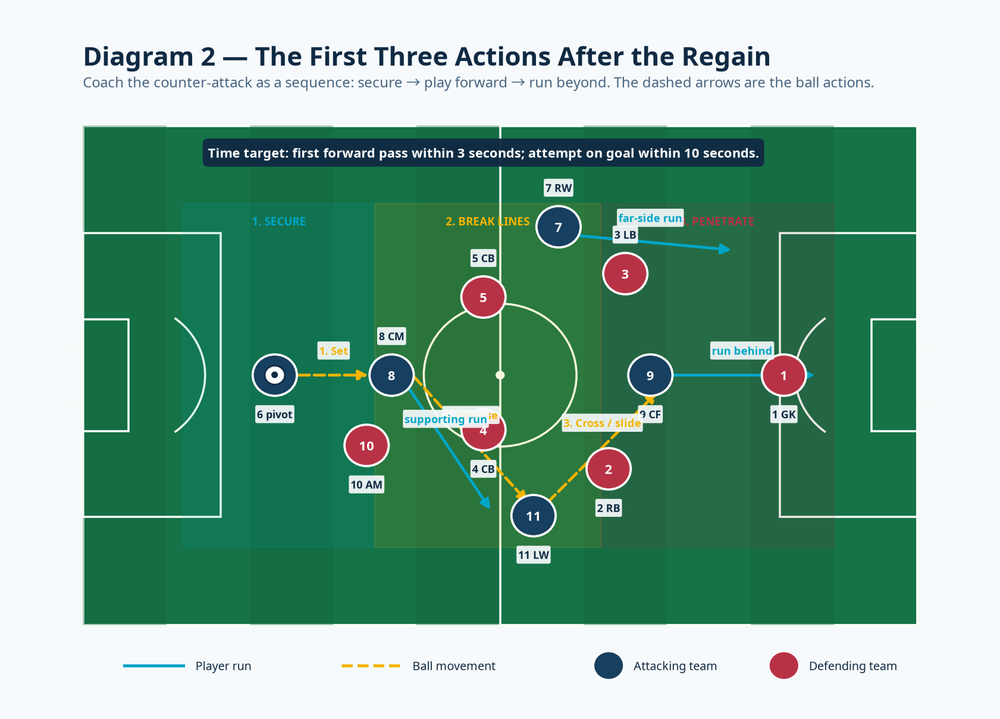
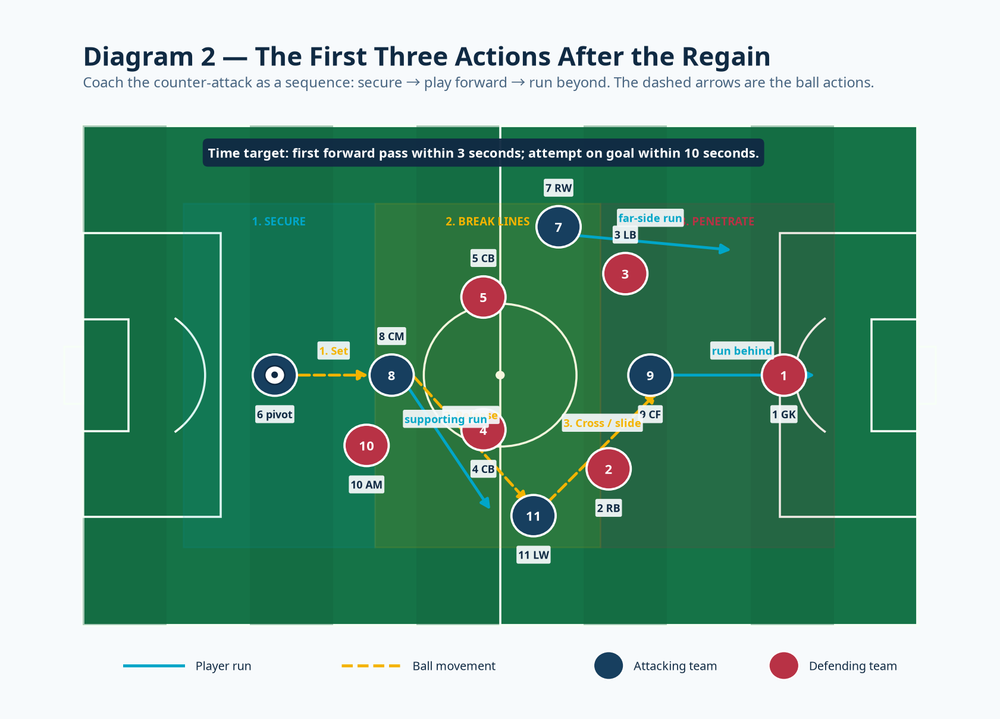
Secure the first action. The receiver takes the first touch away from pressure and plays forward within three seconds. Blue 8 supports on a different line from blue 6: one underneath, one beyond the first press.
Break the next line. As the ball travels forward, blue 7 and 11 sprint on an outward-and-forward curve. The winger furthest from the ball should arrive at the far-post corridor, not stand in the same lane as blue 9. Blue 9 pins a centre-back, then chooses either a run in behind or a short movement to receive and set.
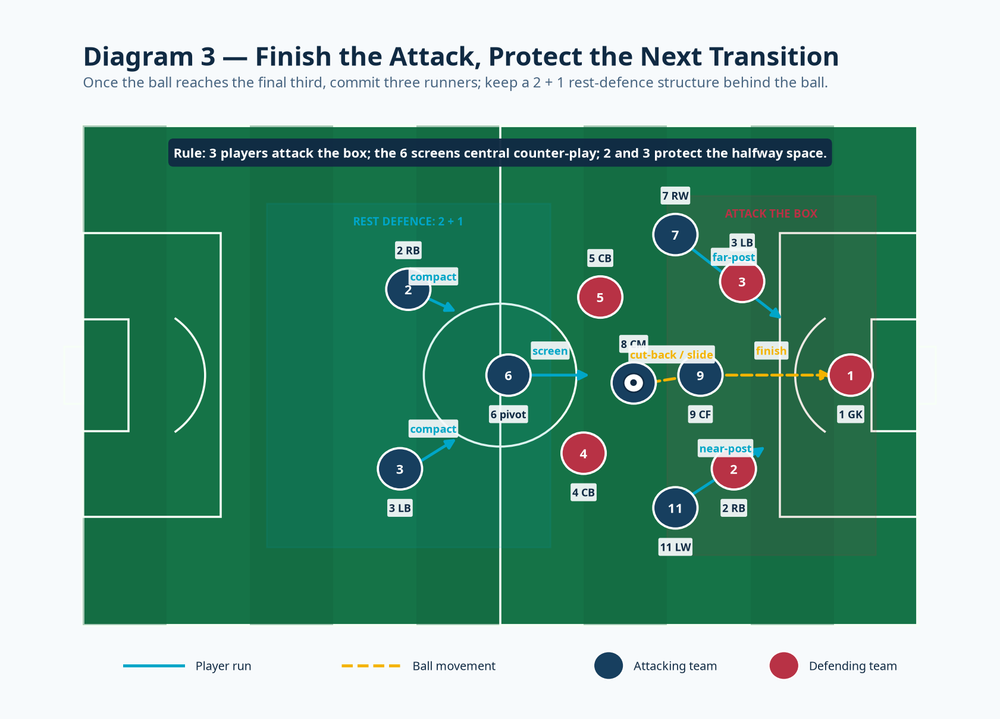
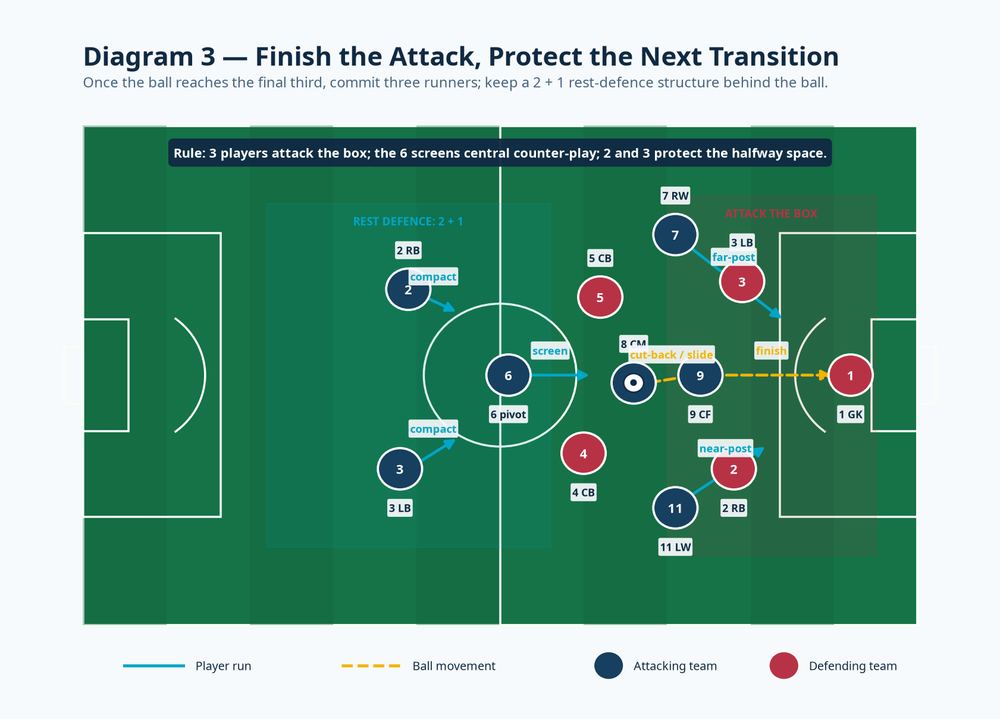
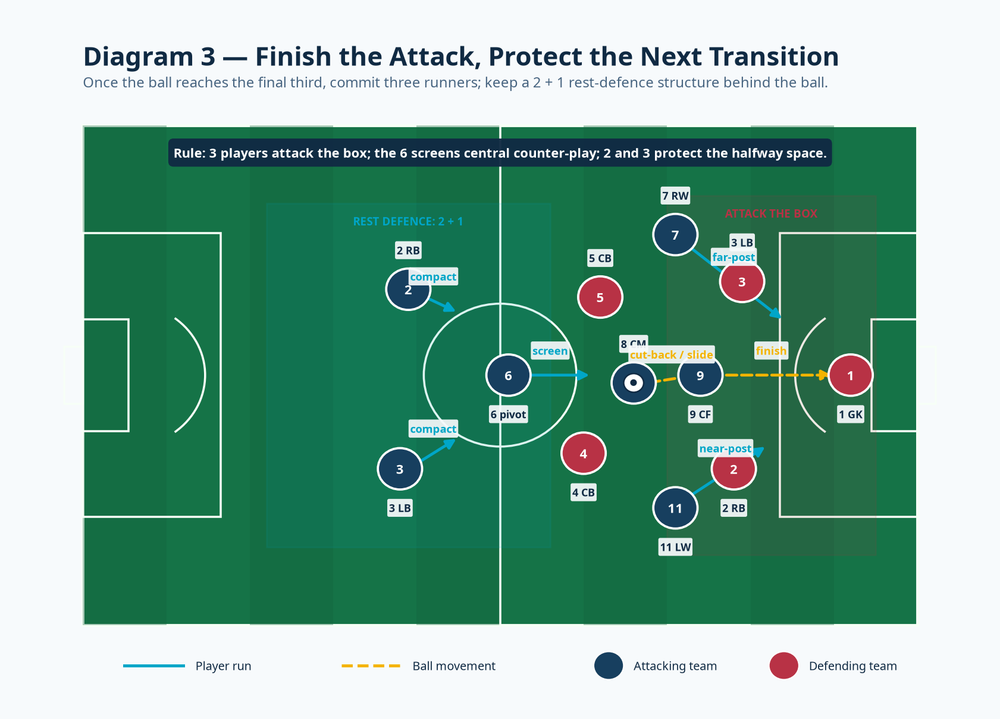
Attack the box with roles. Once the ball enters the finish zone, demand three distinct runs: near-post, penalty spot and far-post. The ball carrier chooses a slide pass, cut-back or early cross; the finish must be a decisive action, not an extra touch. Award two points for a first-time finish and one point for any other goal.
Manage the counter-transition. Blue 2 and 3 hold a compact staggered pair behind the ball, while blue 6 screens the central return pass. If red wins the ball, it has eight seconds to dribble over the regain-zone line or score in a mini-goal. The action ends immediately when the ball is dead, a goal is scored, the time limit expires or red completes its exit.
Key Coaching Points
| Coaching point | What to coach on the grass |
|---|---|
| Recognise the trigger | The regain is the cue to accelerate. First look is forward; the second look is the supporting angle. |
| First pass quality | Play through, around or over the first press with pace. A forward pass that arrives behind the receiver kills the counter. |
| Width with depth | Wingers sprint outside the full-backs, then arrive inside the box only when the ball and timing invite them. |
| Central occupation | The 9 occupies a centre-back. The 8 supports beneath or bursts beyond; do not have both players ask for the same pass. |
| Run beyond the ball | At least one runner must threaten the space behind immediately, even if the first pass goes short. |
| Attack with cover | Three commit to the final action; 2, 3 and 6 maintain the 2 + 1 rest-defence shape. |
Coach in short, specific interventions. Freeze only when the picture is genuinely unclear; otherwise use a drive-by cue: “First pass forward,” “outside lane, 11,” “pin and spin, 9,” or “three in the box, 6 protects.” The tempo must remain higher than the coach’s explanation.
Common Mistakes
The common errors are a pause after the regain, both wingers running toward the ball, the 9 dropping before pinning a centre-back, and every player chasing the final action. Correct these with a bonus point for a forward pass inside three seconds, outside-lane cones for the wingers, the cue “pin then spin” for the 9, and a red point whenever it can counter through the unprotected centre.
Variations & Progressions
Start with a guided progression: the coach serves directly to blue 6 or 8, red 10 provides only passive pressure for the first two passes, and blue has 12 seconds to finish. This lets players rehearse their running map before the drill becomes chaotic.
For the main progression, make the regain authentic. Red 10 begins in possession with a pass from the coach, and blue 6/8 must intercept, tackle or force an error. Keep the 10-second attack limit, but score blue only if the goal comes after a forward pass that breaks a line.
For an advanced challenge, add one recovering red midfielder from behind the ball and reduce the width to 46 m. Now the ball carrier must decide whether to break centrally, release a winger early or protect the ball until the third-man run appears. Limit the blue team to three touches in the regain and release zones, then remove the touch limit in the finish zone.
Age Adaptations
For Under-8 and Under-10, use 40 x 30 m, 4v3 plus a goalkeeper and 12–15 seconds. Use simple roles and coach: “Win it, look forward, run forward.”
For Under-12 and Under-14, use 55 x 40 m, 5v5 plus goalkeepers, name the three zones and keep one player connected behind the attack.
For Under-16 and open-age, use the full layout and authentic-regain progression. Demand position-specific behaviour from 2, 3, 6, 8, 7, 11 and 9.
Finish each block by asking players one question: “When we win it, what is our quickest route to a shot without losing our protection behind the ball?” Their answer should be visible in the next repetition, not just heard in the huddle.
