Football
Quick Advantage Throw-In: Set, Bounce and Break
Coach a fast, repeatable right-touchline throw-in that creates a third-man receiver beyond the first line of pressure.

What you need
8 footballs, 20 flat discs, 12 cones, 2 sets of bibs, 1 whistle, 1 full-size goal
Overview
The Quick Advantage Throw-In turns an ordinary restart near the right touchline into a rehearsed three-player overload. Rather than launching the ball down the line, the thrower uses a short, legal throw to create a clean first touch for the No. 6, then uses the thrower’s immediate overlap and the No. 8’s delayed third-man run to break the first line. The desired outcome is a forward-facing receiver in the inside channel, with the No. 7 holding width and the No. 9 pinning the nearest centre-back.
Use it in the middle or attacking third before the opponent has set its pressing line, particularly against teams that chase the first receiver. The play remains within Law 15: use both hands, deliver from behind and over the head, keep part of each foot on the line or outside it, and require opponents to stay at least 2 m away.1
Coach’s intent: Do not coach the throw-in as a dead-ball action. Coach it as the first pass of a fast possession sequence: scan, set, release.
| Item | Session standard |
|---|---|
| Target environment | Right touchline, middle-to-attacking third on a 100 m × 64 m pitch |
| Core numbers | 5 attackers: 2 RB, 6 DM, 8 CM, 7 RW, 9 CF; 3 active defenders |
| Time to complete | 5–7 seconds from the throw to the third-man reception |
| Main success measure | No. 8 or No. 7 receives beyond the first pressing line facing forward |
Setup
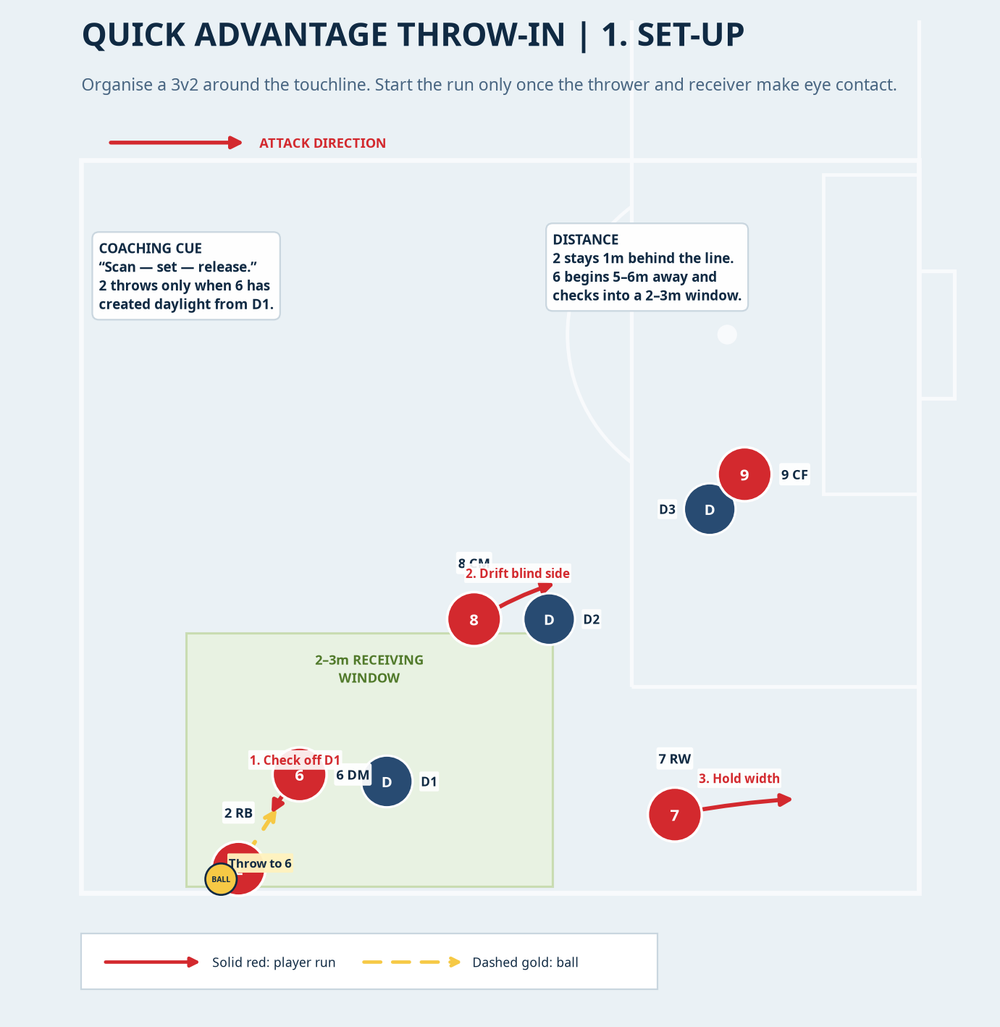
Use a full-size pitch measuring 100 m × 64 m, which sits within the standard 11-a-side pitch range of 90–120 m in length and 45–90 m in width.2 Mark a 32 m long by 25 m deep right-side corridor with flat discs: start the corridor 8 m inside the halfway line and run it toward the opposition goal. Place a cone 1 m outside the touchline for No. 2’s legal starting point. Set a 2–3 m receiving window inside the line, plus a 10 m × 12 m third-man channel beyond the first defender.
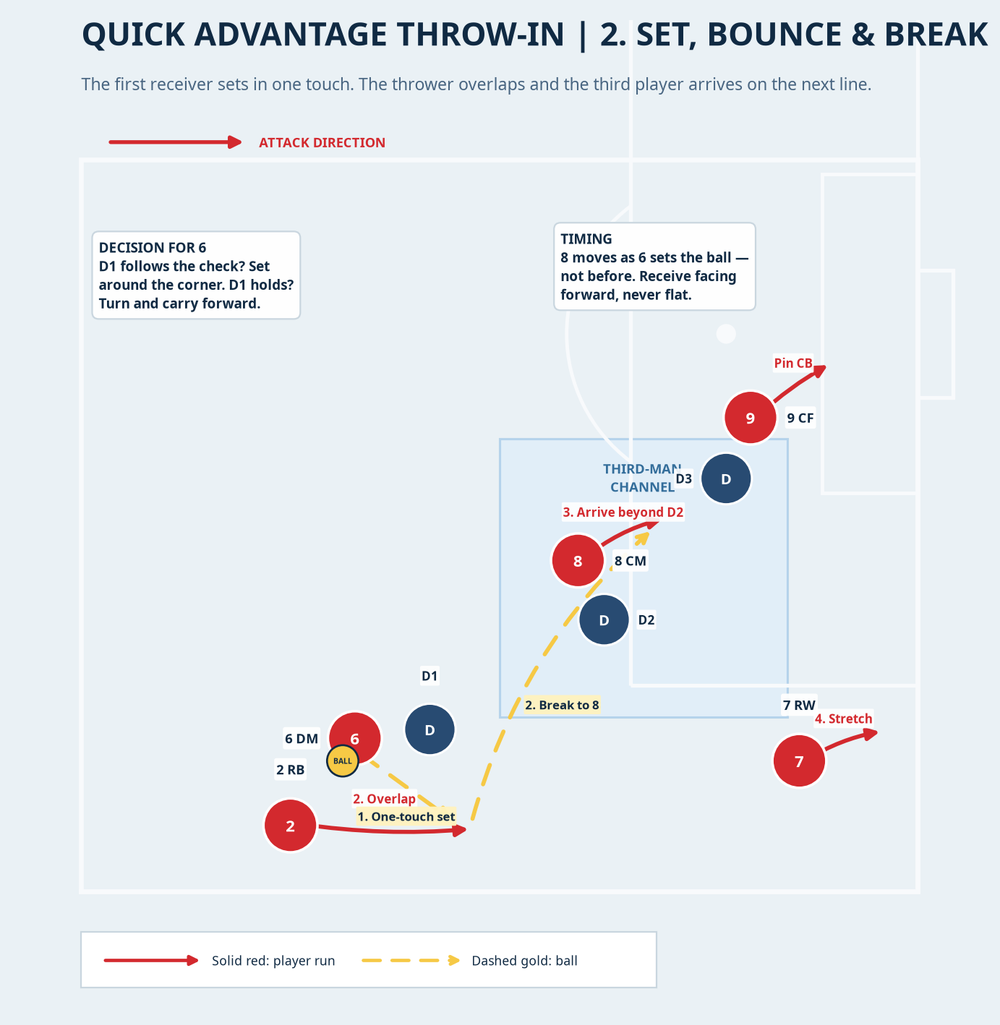
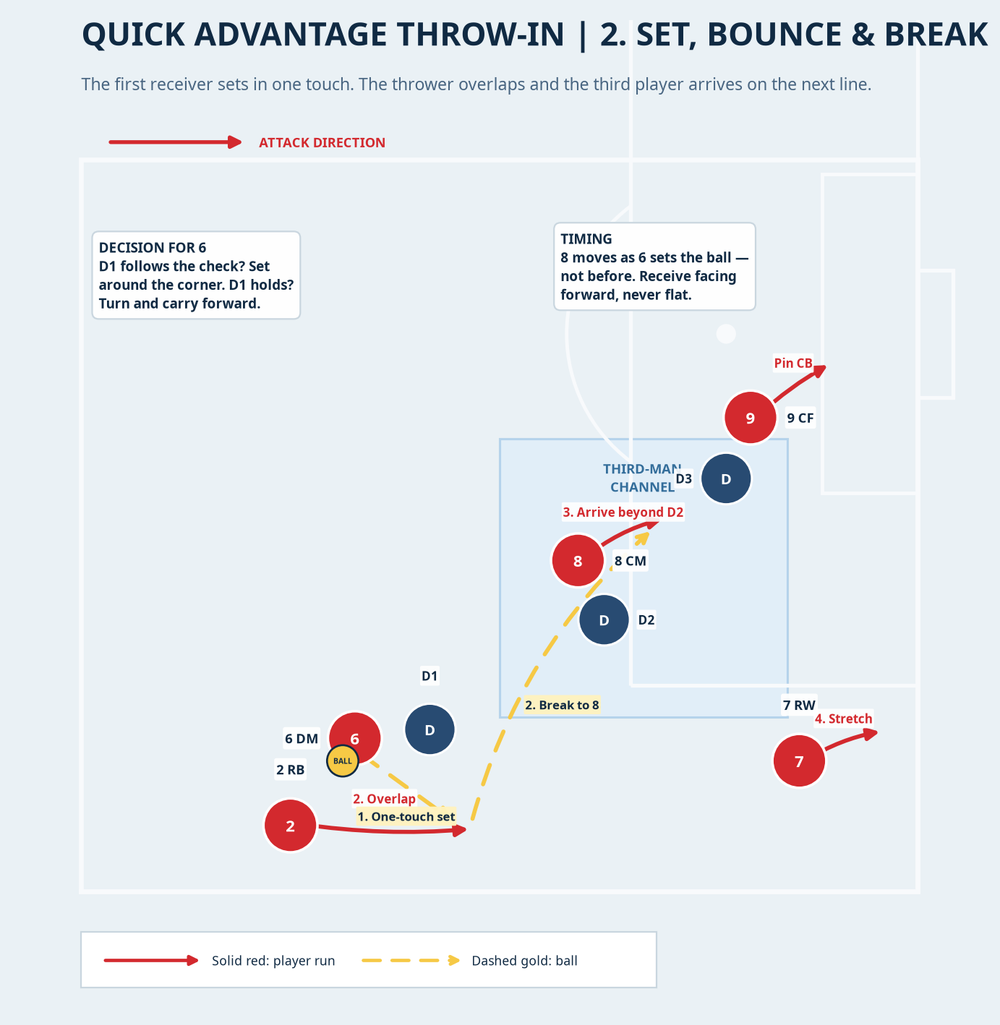
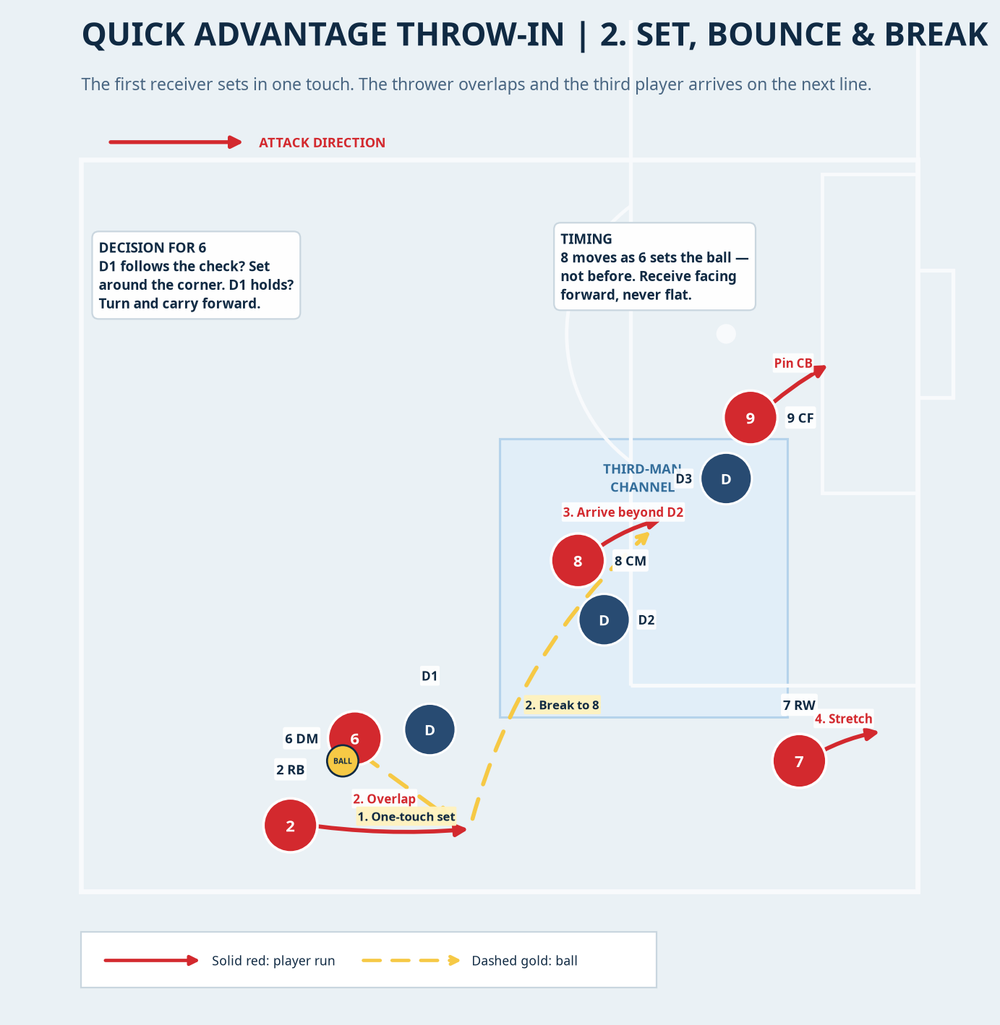
No. 2 is the right-back and thrower. No. 6 begins 5–6 m inside the field. No. 8 starts 10–12 m ahead and inside, outside the defender’s eyeline. No. 7 stays wide and high. No. 9 pins the nearest centre-back. Use D1 to screen No. 6, D2 to protect the inside channel, and D3 to track No. 9.

Coach organisation
Start with three unopposed rehearsals, then make the three defenders live after the ball enters play. Award one point for reaching No. 8 or No. 7 facing forward and two points for then finding No. 9 or finishing within eight seconds. Rotate No. 2 every two repetitions.
Step-by-Step Instructions
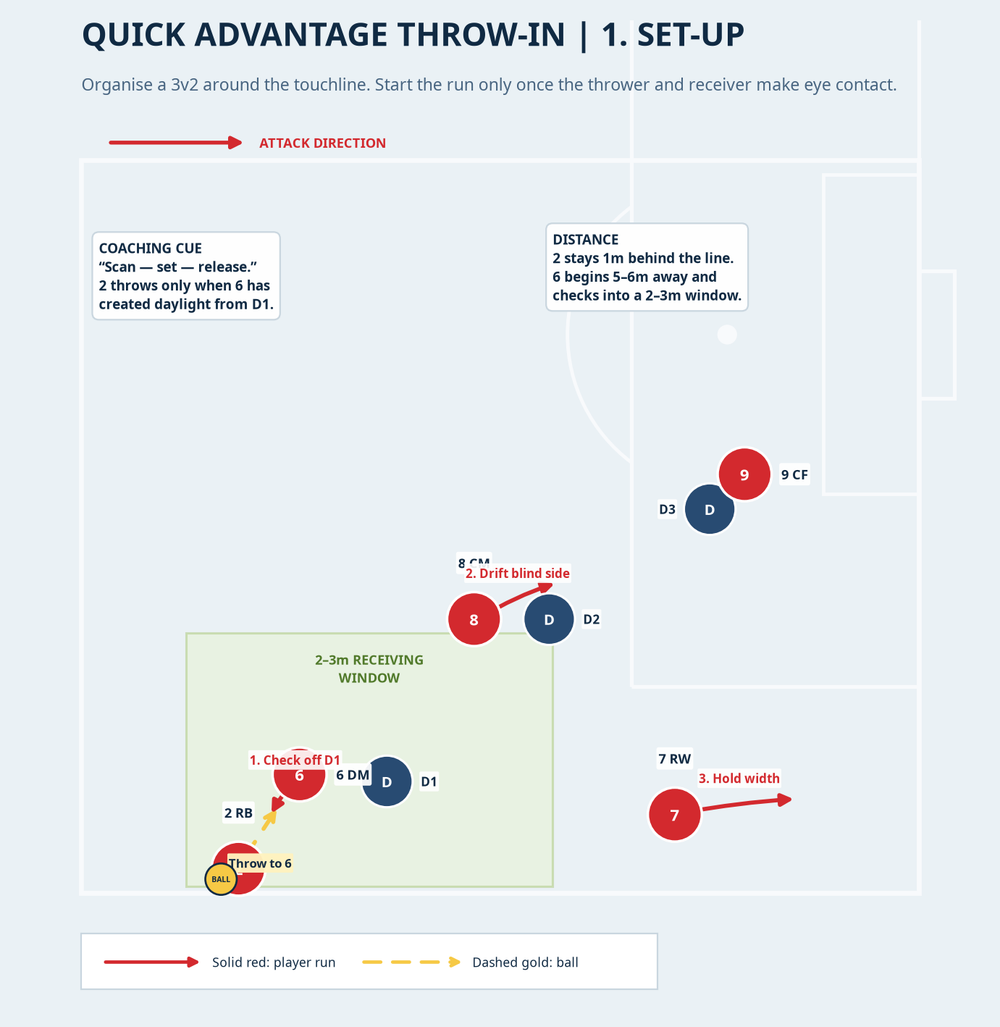
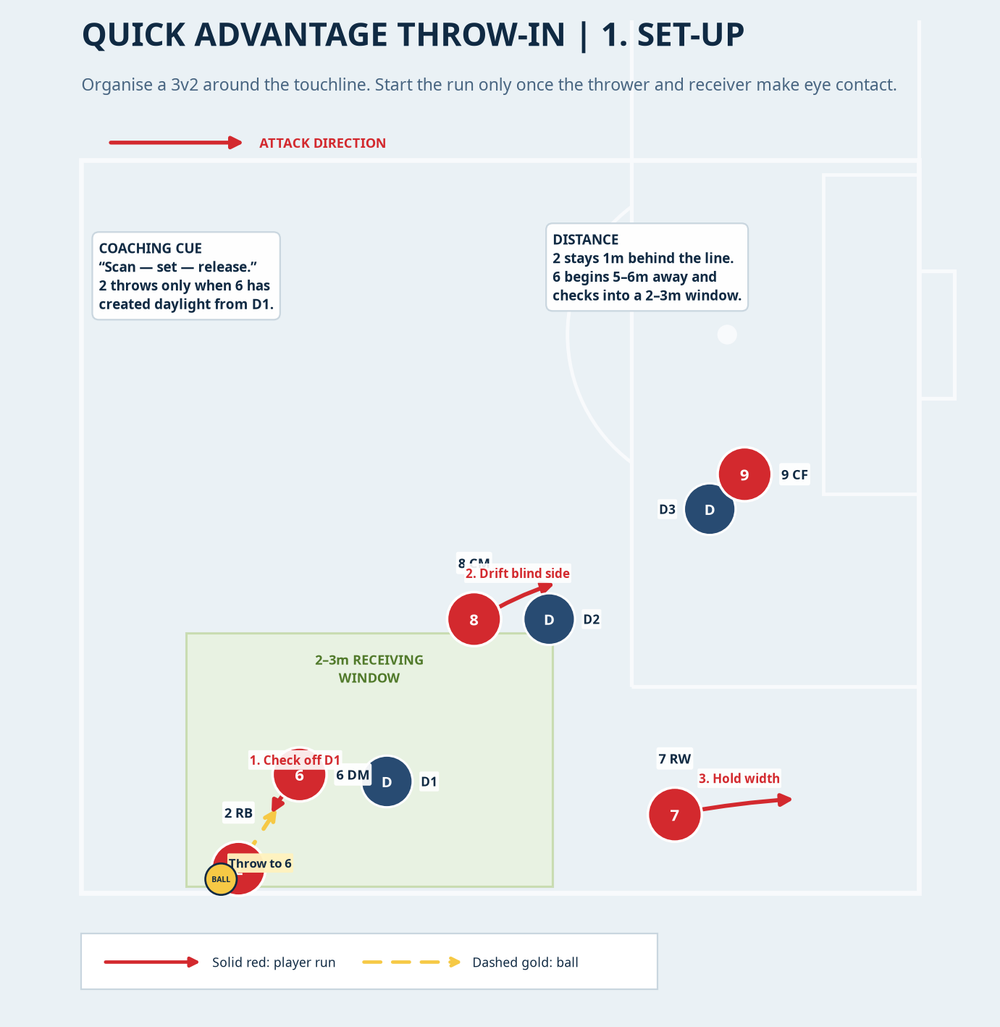
Set the picture before the restart. No. 2 holds the ball 1 m behind the touchline and scans D1, D2 and the No. 8. No. 6 stands 5–6 m away, side-on, and makes eye contact with No. 2. No. 7 stays high enough to keep the wide defender from squeezing inside; No. 9 pins the centre-back.
Create the first receiving window. On No. 2’s verbal cue, No. 6 makes a fast, curved check away from D1 and back toward the touchline. The target is not No. 6’s feet exactly; it is the 2–3 m space in front of the open body. No. 2 throws firmly into that window, never down the line into traffic.
Set the ball with the first touch. No. 6 uses one touch whenever possible to set the ball around the outside of D1 and into No. 2’s forward path. If D1 holds position rather than tracking, No. 6 turns and carries forward for two touches before releasing. The receiver’s first action must tell the team what the next action is.
Release the third player on the trigger. No. 8 waits until the instant No. 6 sets the ball. Then No. 8 drifts beyond D2 into the inside channel and receives on the half-turn. No. 2 overlaps after the throw to give the bounce option. The timing matters: an early No. 8 run allows D2 to pass the runner on; a late run leaves the ball behind the player.
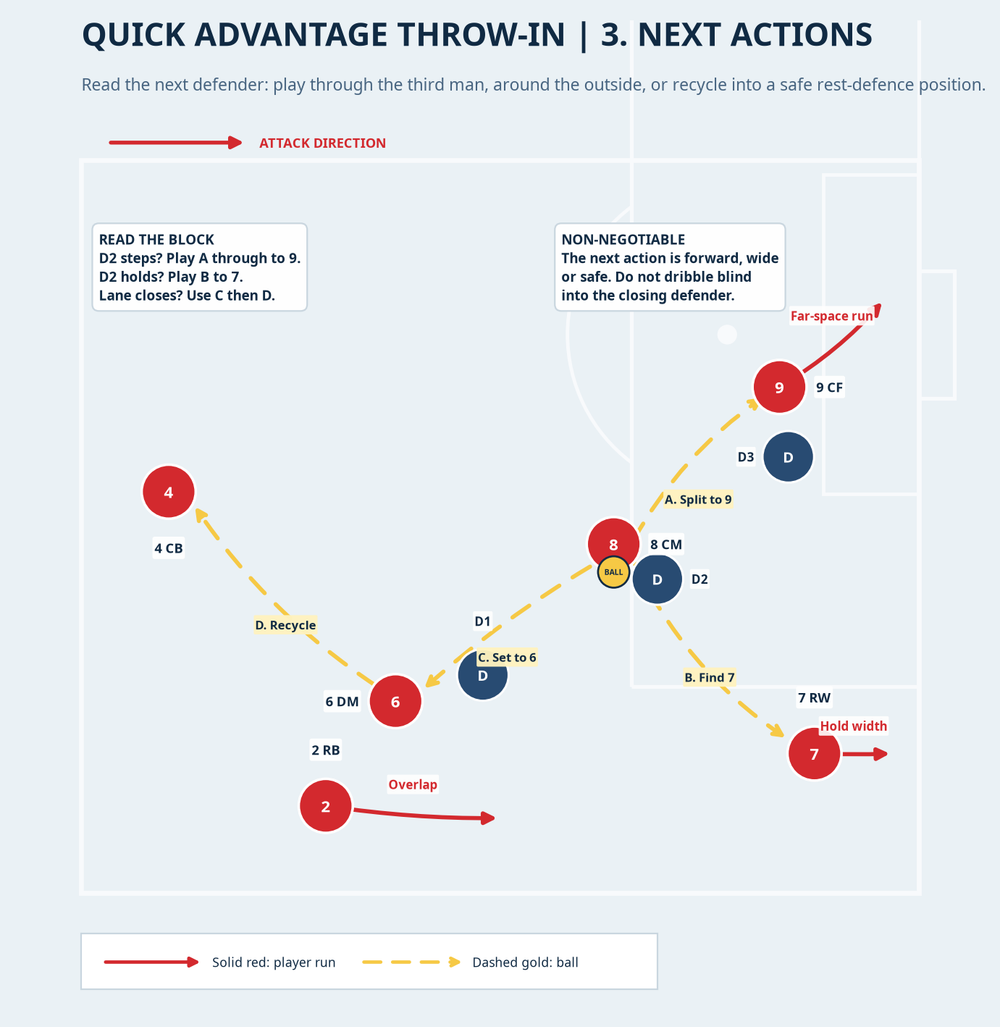
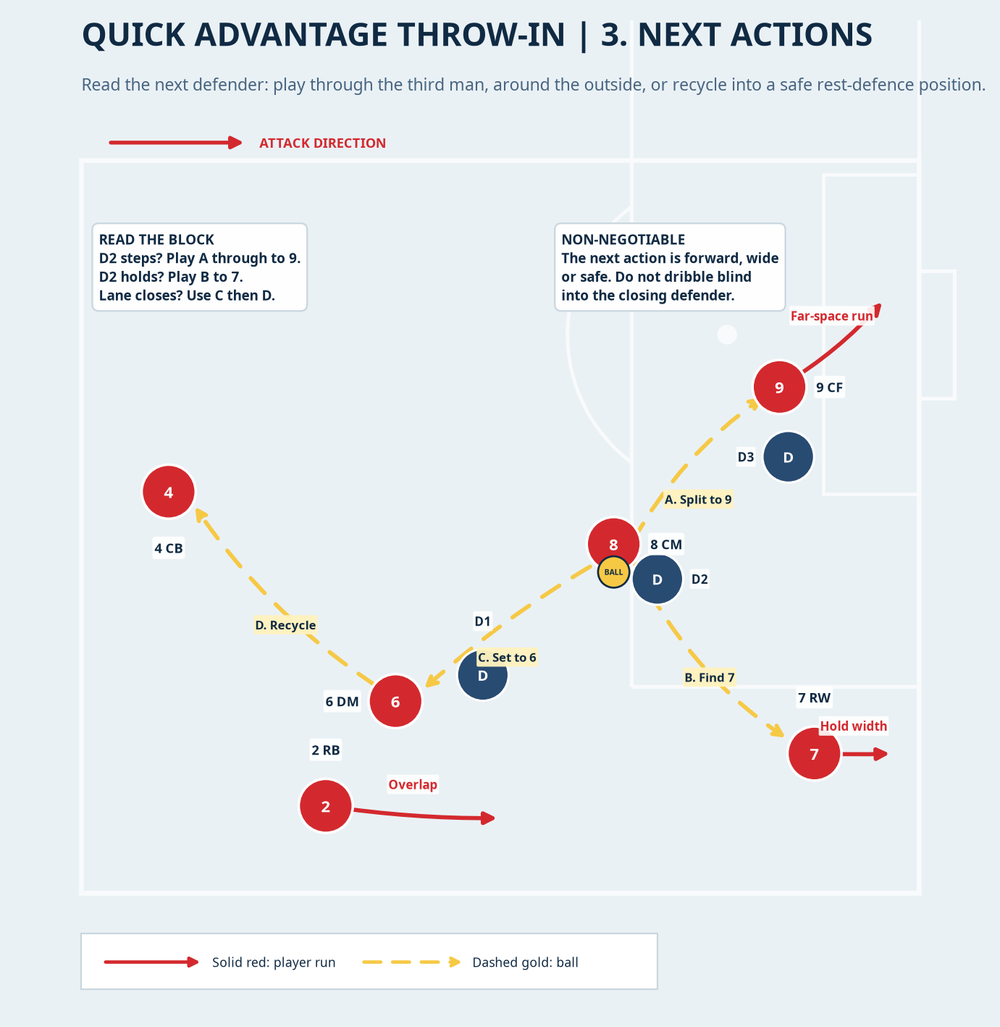
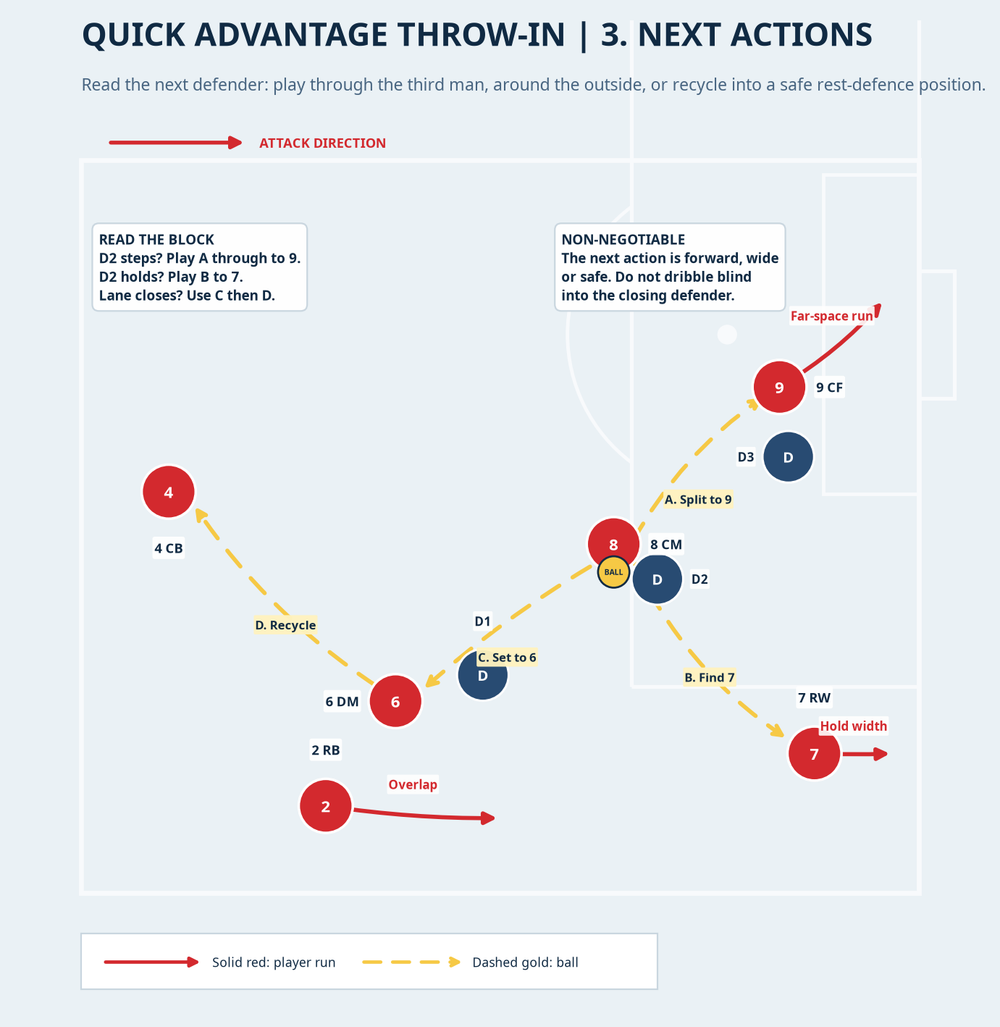
- Exploit the second phase. With No. 8 facing forward, scan D2. If D2 steps, split the pass into No. 9’s run. If D2 protects the central lane, find No. 7 in the wide lane. If the channel is closed, set back to No. 6, who recycles to No. 4 or changes the point of attack. The team’s rest-defence stays intact; do not force a low-percentage pass simply because the pattern is rehearsed.
Key Coaching Points
| Coaching detail | What the coach should demand |
|---|---|
| Throw quality | A quick, flat throw into the receiver’s front foot. A looping ball invites pressure and kills the advantage. |
| Body shape | No. 6 receives side-on, hips open to the pitch, with a clear view of No. 2 and No. 8. |
| Timing | No. 8 moves only on the set; No. 2 runs immediately after release. The three actions must feel like one rhythm. |
| Disguise | No. 6 checks as if receiving to feet, then curves away from D1. No. 9 pins rather than showing early. |
| Width and depth | No. 7 stays wide and No. 9 stays high until the line is broken. Do not allow both to collapse toward the ball. |
| Decision discipline | “Forward, wide, or safe.” If the overload has gone, recycle with control rather than donating possession. |
Use short coaching language during the live phase: “Eyes first,” “set outside,” “eight on the trigger,” “hold the width,” and “next action.” Freeze only when a spacing or timing error repeats. Otherwise, let the players experience the pressure and use a quick replay to correct the detail.
Common Mistakes
The most common error is No. 6 standing still and receiving square. Move the starting cone 1 m farther inside and demand a curved check that loses D1’s shoulder. A second error is No. 8 starting too soon; the trigger is the set, not the initial throw. Third, No. 2 watches the pass rather than overlapping; make the thrower the immediate next runner.
Coaches should also watch No. 7 drifting inside too early, which allows the opposing full-back to narrow onto No. 8, and No. 9 coming short, which removes the depth that makes the third-man channel valuable. Finally, correct illegal or slow restarts. Rehearse the feet, two-hand delivery and quick ball presentation so the team does not lose the restart before the pattern begins.1
Variations & Progressions
Begin with a two-player bounce variation for younger or newer groups: No. 2 throws to No. 6, receives the return, and drives five metres before passing to No. 7. The decision is removed, but the habit of moving after the throw remains. For a central overload variation, move No. 8 3 m more central and ask No. 7 to make an inside decoy; No. 2 then plays No. 8 directly after the bounce.
To increase difficulty, make D1 and D2 fully live before the throw and limit No. 6 to one touch. Add a recovering defender from behind No. 8, so the third player must scan and choose between No. 9, No. 7, and the recycle. In the final progression, run the pattern in an 8v8 directional game and award double points only when the team regains the ball and restarts within four seconds.
Age Adaptations
For Under-8 and Under-10, use a 20 m × 15 m grid, three attackers against one passive defender, and teach just “throw, set, run.” Allow the first receiver two touches and remove the No. 9 pin. For Under-12, use four attackers against two defenders in a 25 m × 20 m corridor; introduce the No. 8’s delayed run but give clear floor markers for the receiving channel.
For Under-14 and Under-16, use the full 32 m × 25 m corridor with live D1–D3, one-touch set conditions, and a real end product. For open age, vary the touchline and defender starts, and require players to call the option before the ball arrives. The pattern is a recognition tool, not a rigid script.
References