

Football
Wing Overload to Penetrating Cross
A coach-ready 4-3-3 wing-overload pattern that creates a 3v2, releases the overlapping full-back, and coordinates three finishing runs.

What you need
10 footballs, 16 cones, 12 flat markers, two colours of bibs, one full-size goal, two mini-goals
1. Overview
Wing Overload to Penetrating Cross is a repeatable 4-3-3 attacking pattern that creates a 3v2 on the right flank before releasing the overlapping right-back to the byline. The purpose is not simply to get wide; it is to make the opposition left-back choose between the ball carrier and the overlapping run, then punish the decision. The pattern gives the final delivery a clear picture: the No. 9 attacks the near post, the No. 10 arrives for the cut-back around the penalty spot, and the far-side winger attacks the far post.
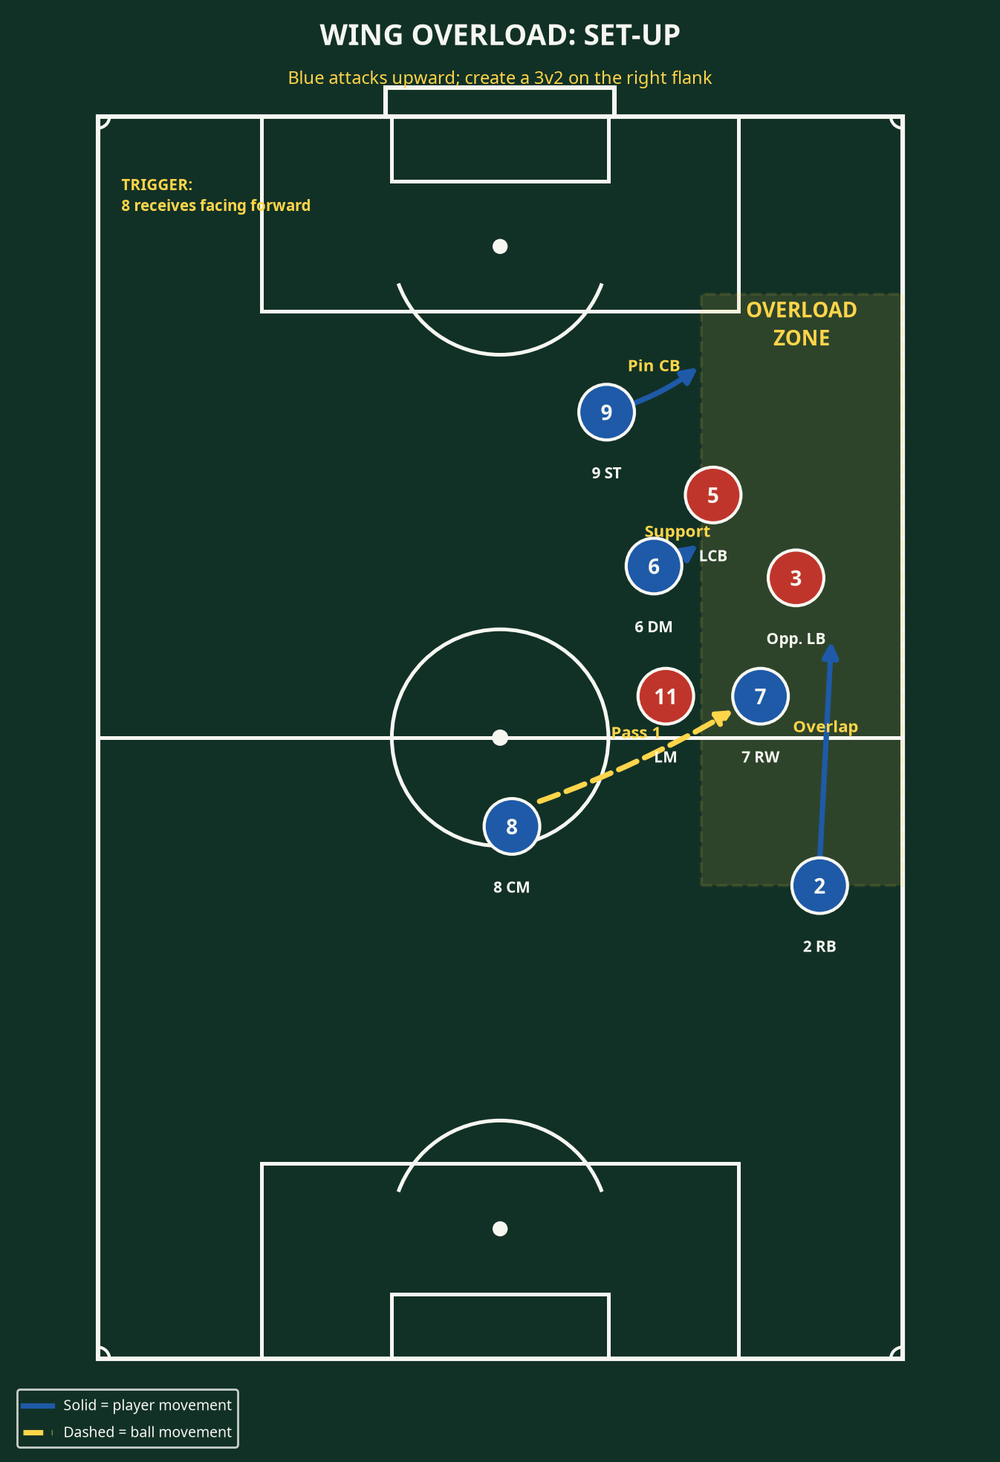
Use it against a narrow mid-block, a wide midfielder who does not track the full-back, or immediately after a switch of play. Trigger the pattern when No. 8 receives facing forward in the right half-space, 35-45 m from goal. Fix a defender, run beyond them, then deliver with runners in three separate lanes.
2. Setup
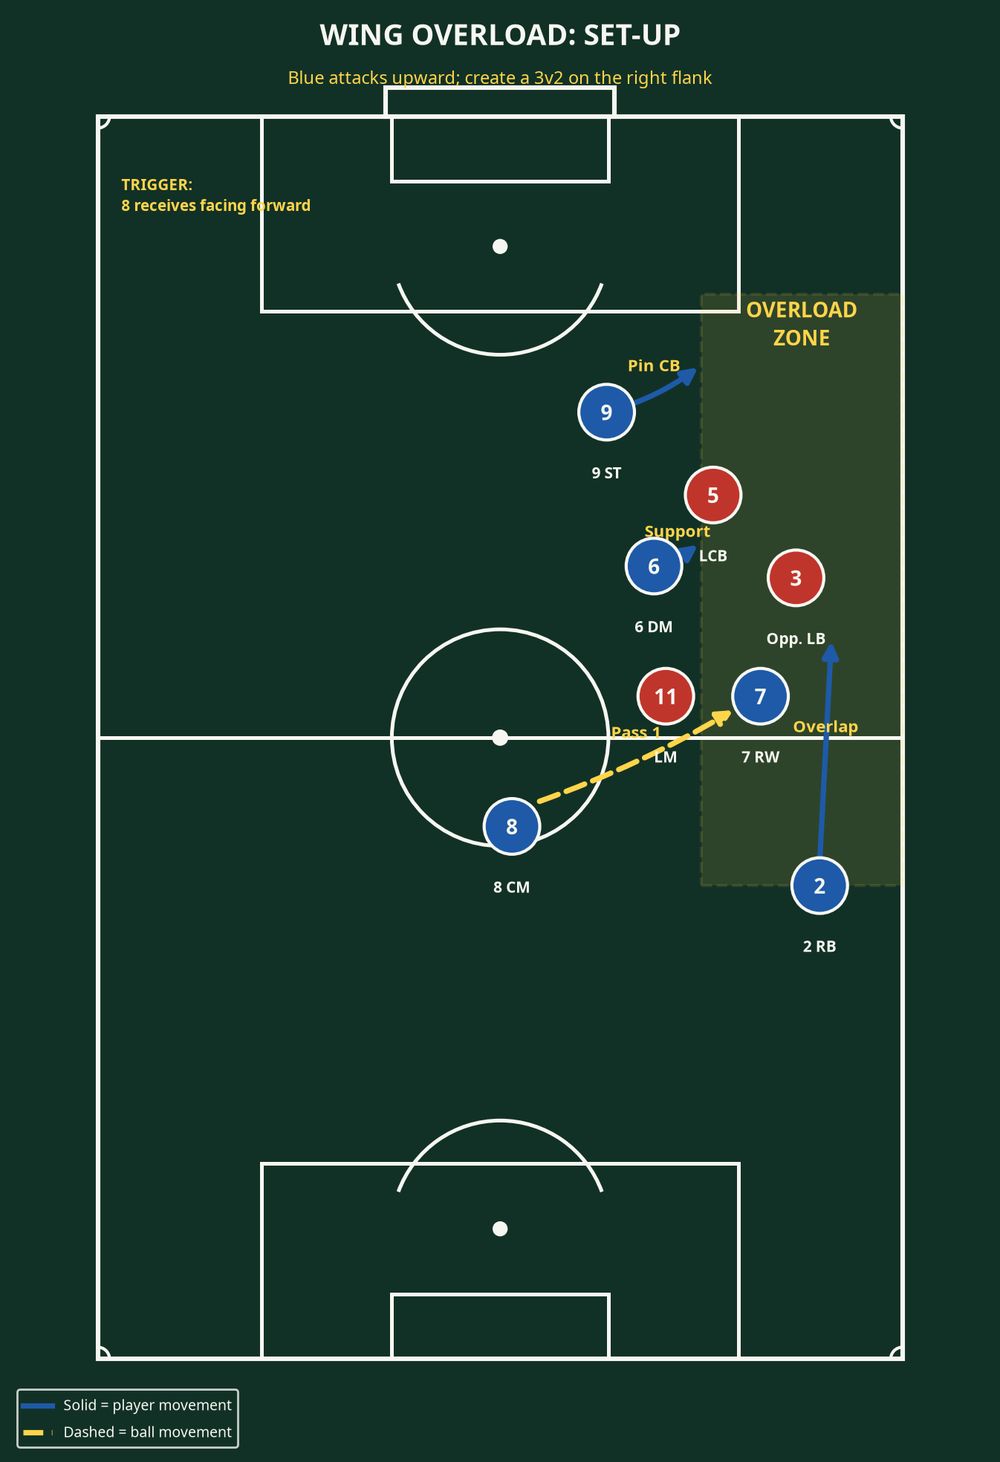
Use a full 105 x 68 m pitch where available; it sits within the 100-110 m x 64-75 m adult-pitch range. For a focused practice, use a 70 x 64 m two-thirds pitch with one full-size goal and a recovering counter-goal at halfway. Mark an 18 m-wide overload channel along the right touchline and place balls with No. 8.
| Item | Detail | Coach's purpose |
|---|---|---|
| Players | 11 attackers in a 4-3-3 and 8 defenders, including a goalkeeper | Keeps the attack realistic while making the 3v2 overload visible. |
| Core attackers | 2 RB, 7 RW, 8 right CM, 9 ST, 10 AM, 11 LW | These players make the overload, penetration, and three finishing runs. |
| Core defenders | Opposition 3 LB, 11 LM, 4/5 centre-backs, goalkeeper | They give the ball-side defensive decisions real meaning. |
| Equipment | 12 flat markers, 16 cones, two bib colours, one goal, 10 footballs | Cones define the channel; balls support fast repetitions. |
| Work/rest | 4 sets of 4 attacks, 20-25 seconds between attacks and 90 seconds between sets | Maintains speed while leaving time for precise coaching. |
Start with two unopposed rehearsals, add the opposition No. 3 and No. 11, then introduce the full defensive unit and transitions. Award one point for a controlled delivery, a second for a first-time finish, and one defensive point for playing through the halfway gate within six seconds of a regain.
3. Step-by-Step Instructions

Phase 1 — Establish the overload
- No. 8 begins 5-8 m right of the centre circle, checks their shoulder, and receives from No. 6 or a centre-back with an open body. The first touch goes diagonally into the right half-space to draw the opposition No. 11.
- On that first touch, No. 7 drops 4-6 m inside the channel, arriving as the ball travels. No. 9 moves across the nearest centre-back to pin the line.
- No. 8 plays a firm 12-16 m ground pass into No. 7's front foot. No. 6 slides behind the ball as the counter-pressing screen while No. 10 offers a central bounce option 8-10 m below No. 9.
Phase 2 — Fix, release, and penetrate
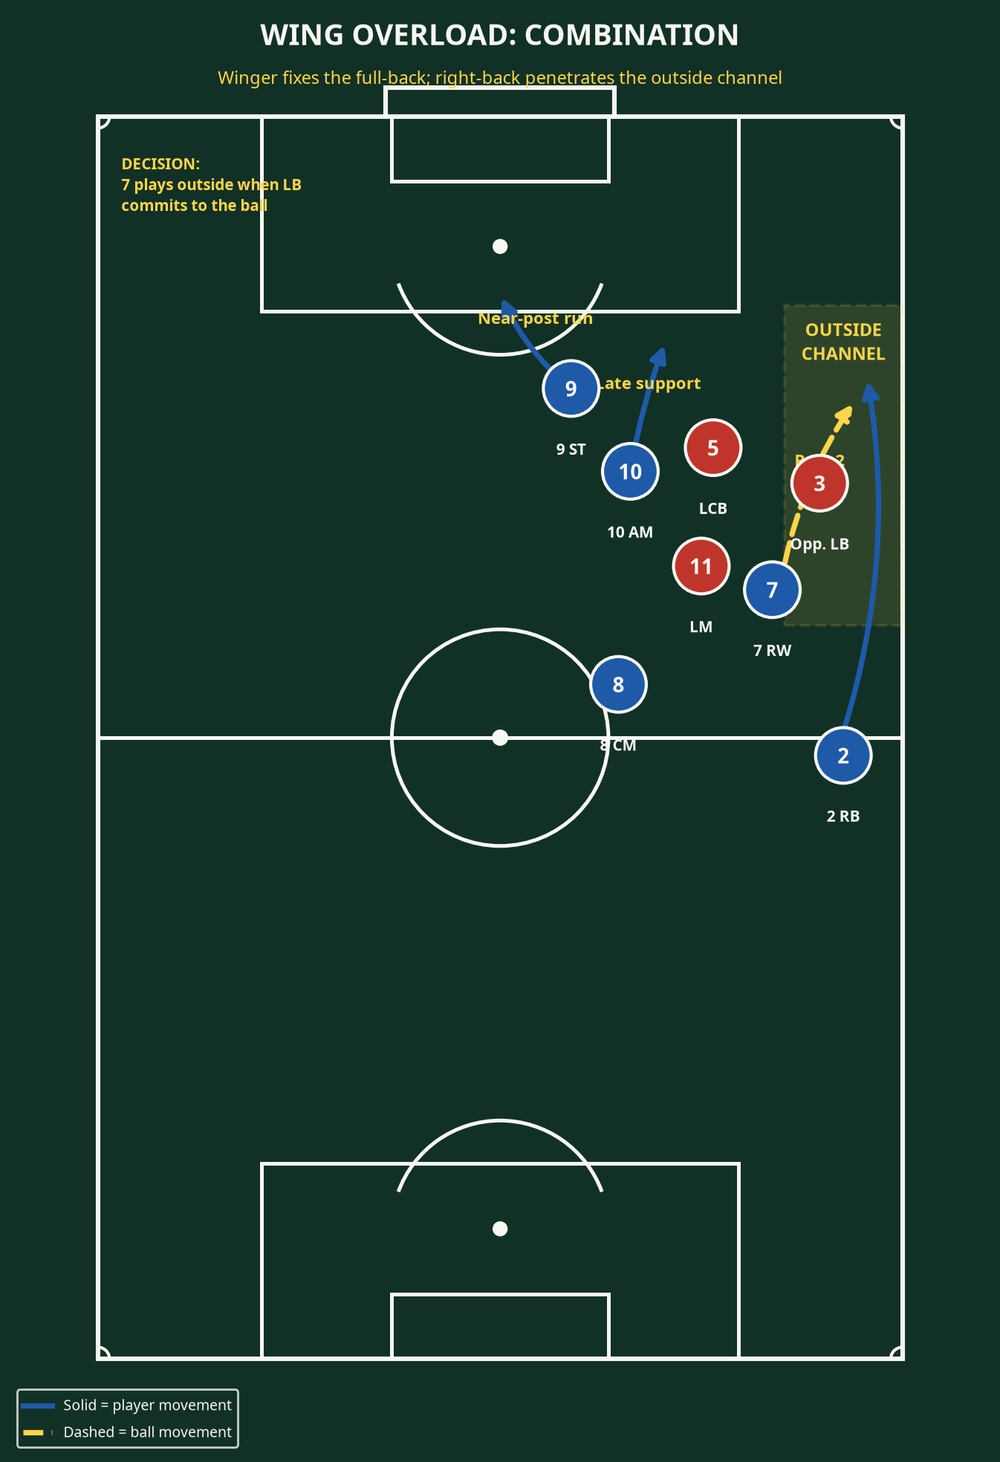
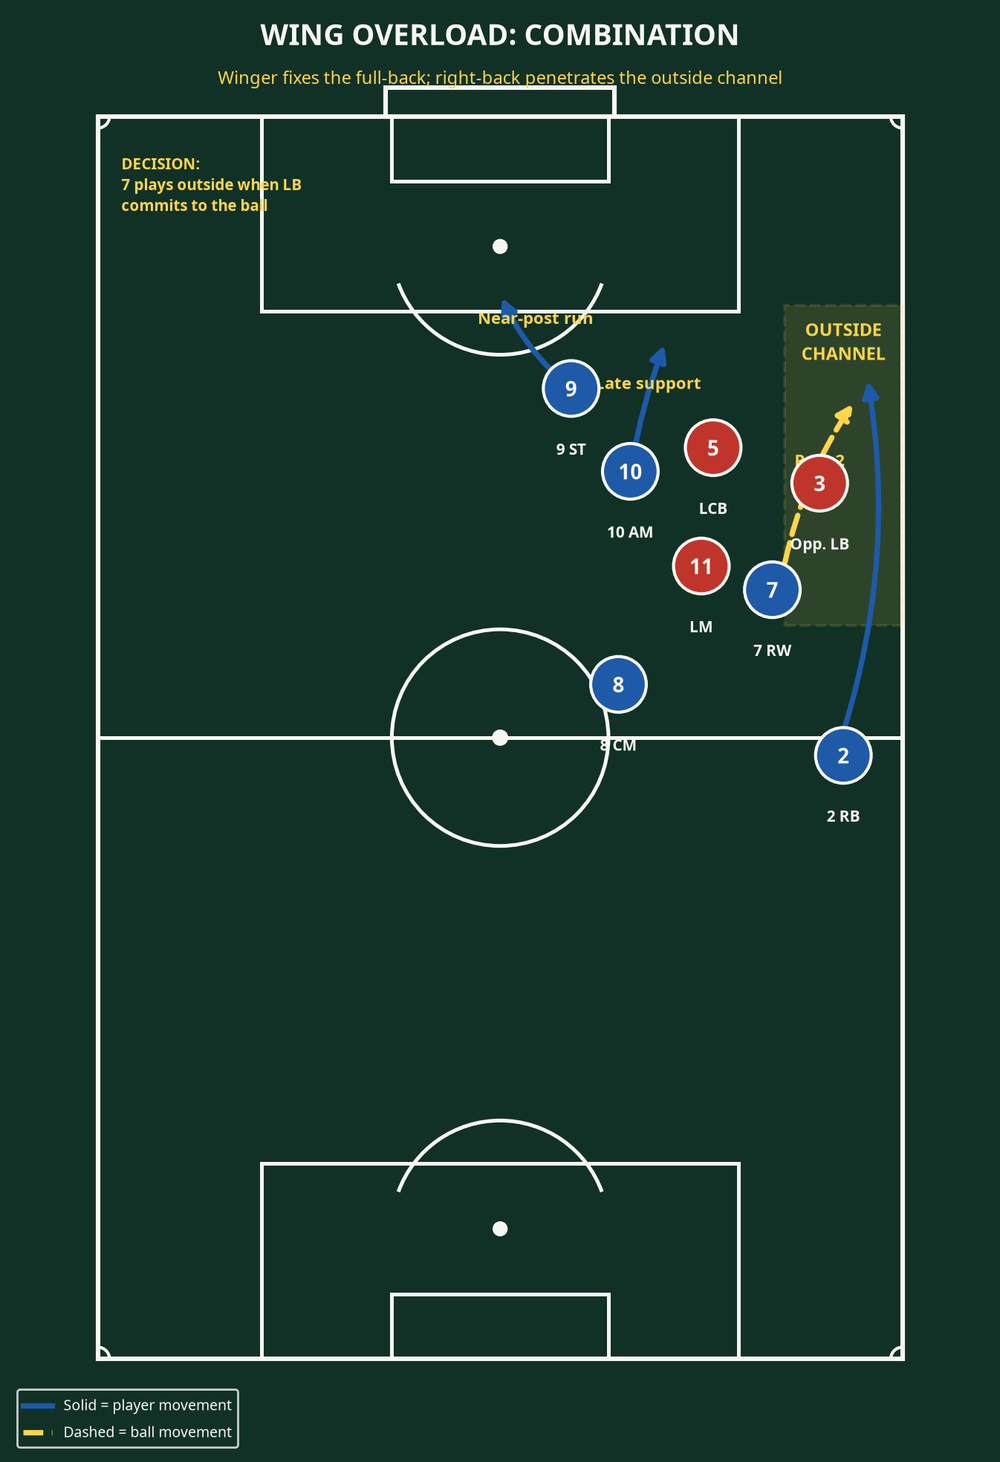
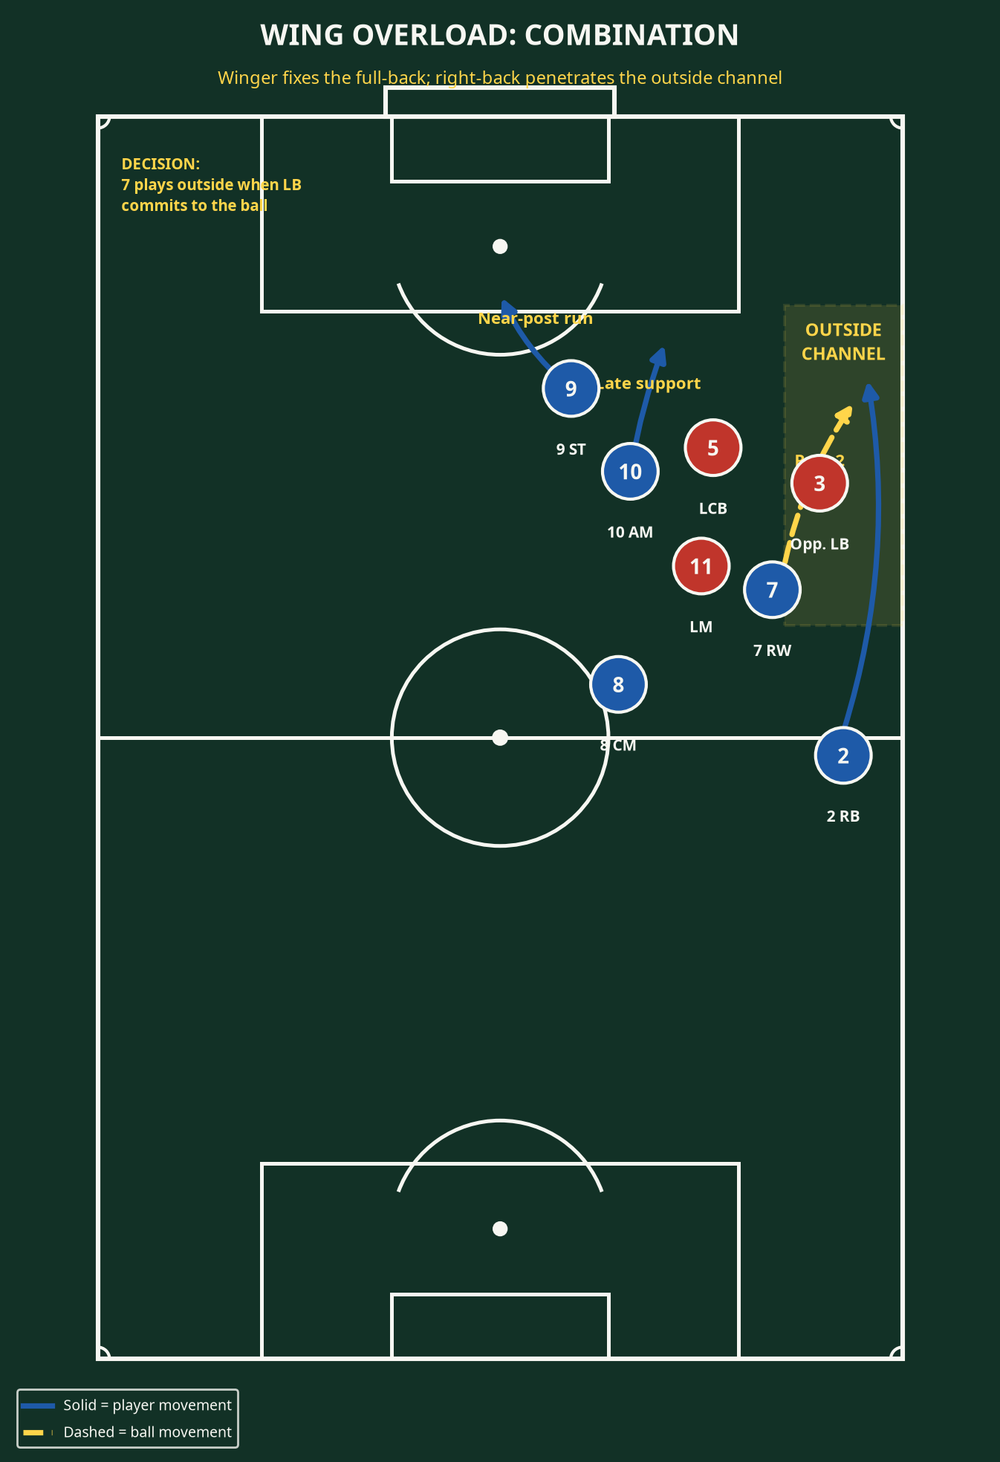
- No. 7 receives half-turned and takes the ball 1-2 m inside to engage the left-back. Scan before receiving: drive inside or combine with No. 10 if the defender protects the outside; use the outside lane if they step in.
- No. 2 starts 0.5-1 second after No. 7's first touch. Curve the run from 2 m inside the line to 1-2 m outside No. 7, arriving on the move.
- Once the left-back is fixed, No. 7 plays 3-5 m ahead of No. 2, before the runner reaches the final 12-15 m. It is a pass into space; No. 8 holds 10 m behind for protection.
Phase 3 — Deliver and finish
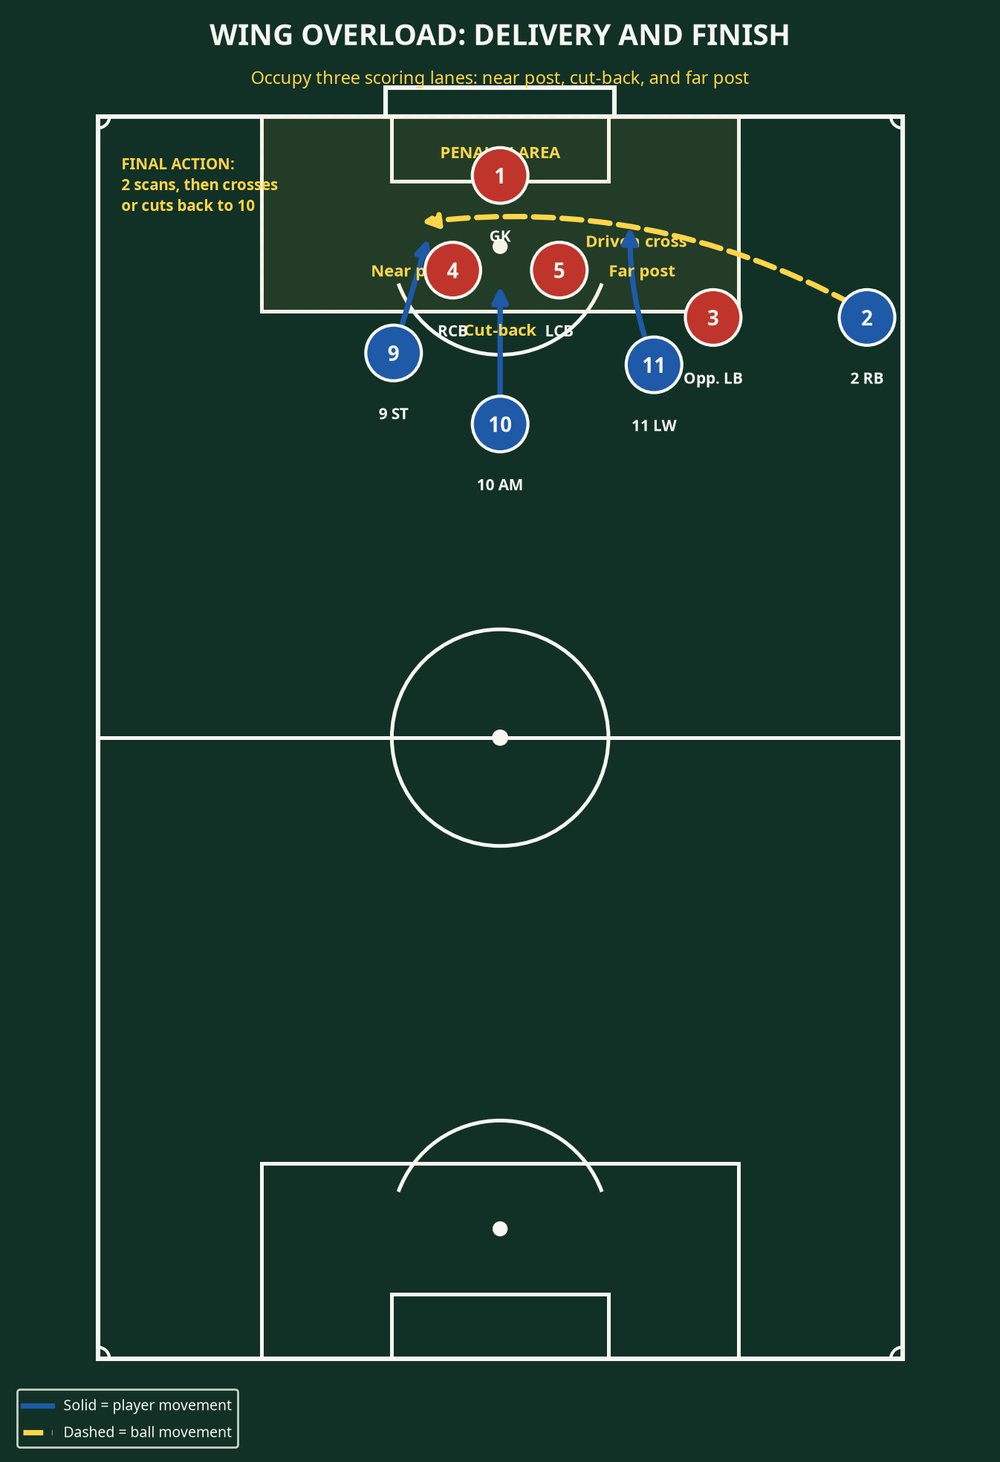
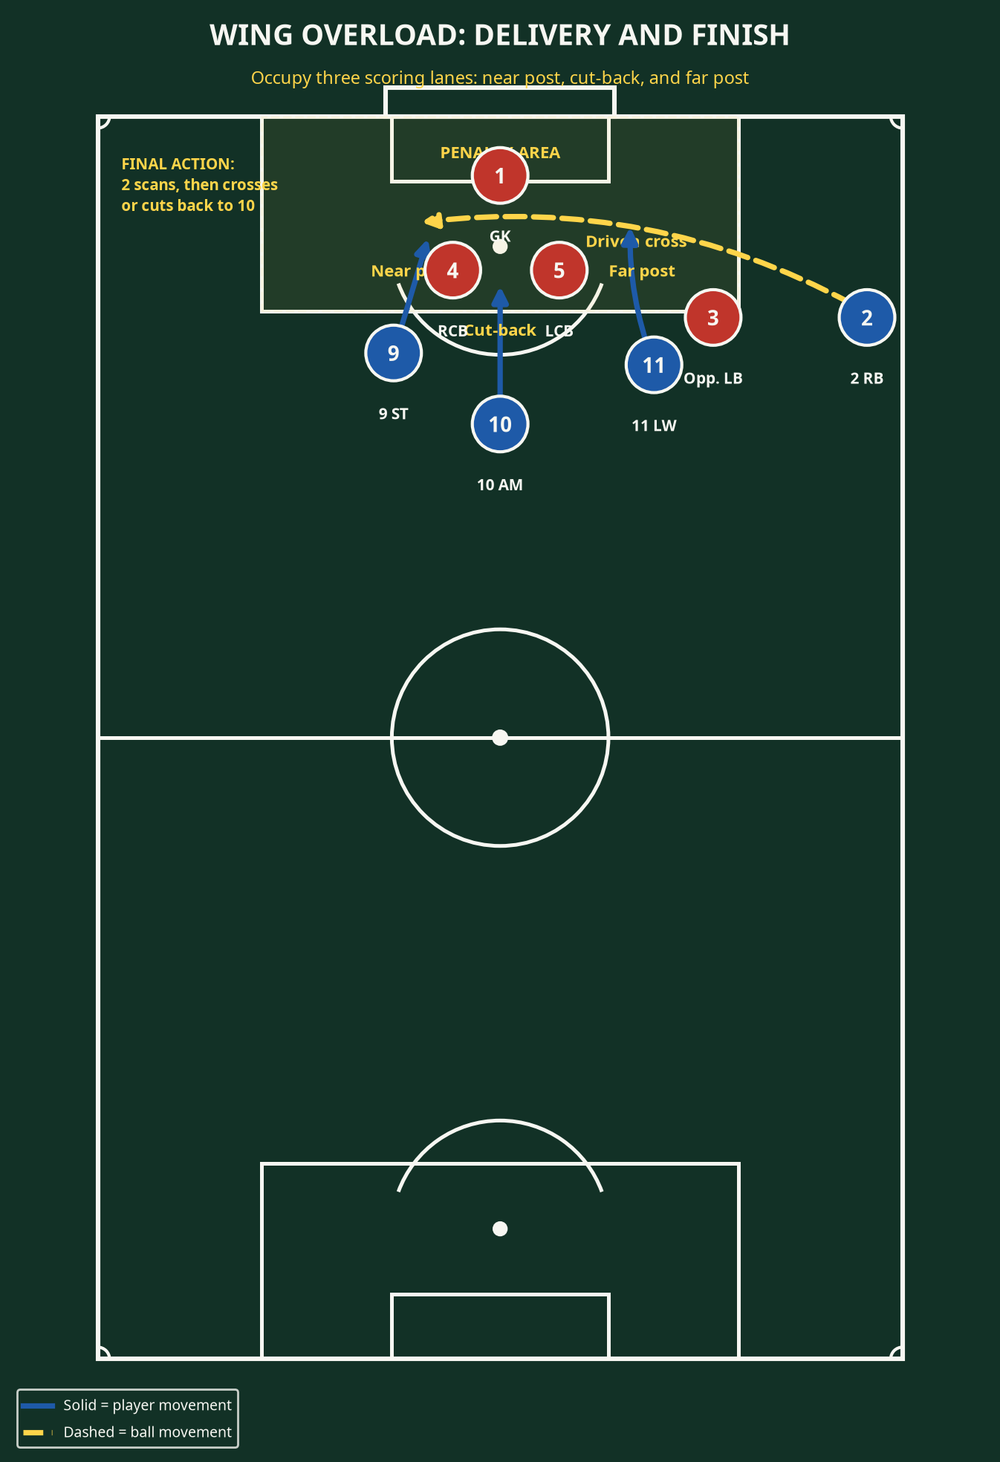
- No. 2 takes the first touch toward the byline and scans across the box on the second stride. Coach a decision, not a pre-planned cross.
- No. 9 attacks the near-post corridor; No. 10 delays for the penalty-spot cut-back; No. 11 attacks the far post. Keep 4 m between runners.
- No. 2 drives across the six-yard box if No. 9 wins the front space, clips to the far post if the line drops, or cuts back if defenders protect goal. No. 6 and No. 8 counter-press any loose ball.
4. Key Coaching Points
| Theme | Head-coach language | Observable standard |
|---|---|---|
| Timing | “Show late, then go late.” | The No. 7 arrives as the No. 8 releases; the No. 2 leaves after the winger's first touch. |
| Fixing the defender | “Make the full-back make a choice.” | The winger's inward touch engages the left-back before the pass is released. |
| Pass quality | “Play the run, not the player.” | The through ball is 3-5 m ahead of No. 2 and keeps their crossing stride intact. |
| Occupation of the box | “Three lanes, not three bodies.” | Near post, penalty spot, and far post are occupied with clear separation. |
| Final action | “Scan, select, deliver.” | The right-back looks up before choosing a driven cross, clip, or cut-back. |
| Rest defence | “If it breaks down, win it back here.” | The No. 6 and No. 8 are connected behind the ball and stop the first forward pass. |
5. Common Mistakes
The No. 2 runs too early. The wide midfielder tracks the overlap and turns it into a predictable 2v2. Hold No. 2 until No. 7's first touch has drawn the left-back.
The No. 7 receives square. A closed shape forces the winger backward. Rehearse check, scan, and half-turn, with the back foot ready before the pass.
The pass is to feet. It stops the runner and allows recovery. Set a target cone 4 m ahead of No. 2 and reward passes through it.
All three attackers run into one lane. Freeze the picture and reset No. 9 near post, No. 10 cut-back, and No. 11 far post.
6. Variations & Progressions
For the underlap variation, ask No. 2 to run inside the No. 7 instead of outside when the opposition left-back is already protecting the touchline. The winger stays wide and either plays the underlap or delivers an early cross. This develops the players' ability to read the defender rather than run a memorised route.
For an early-cross variation, release No. 7 down the line directly from No. 8 and ask No. 2 to support underneath. The No. 7 crosses before the final 15 m, while No. 9, 10, and 11 make the same three-lane box runs. This is useful when the defence retreats quickly and does not allow the full-back to reach the byline.
For a decision-making progression, play 8v8 plus goalkeepers on the 70 x 64 m area. The attacking team has 12 seconds from the No. 8's first touch to finish, while defenders can counter through two mini-goals at halfway. This forces clean passing, genuine scanning, and a strong rest-defence reaction.
7. Age Adaptations
| Age group | Adaptation | Coaching priority |
|---|---|---|
| Under 8 | Use a 30 x 24 m area and a simple 2v1: winger plus full-back against one defender. Finish into mini-goals or a wide target gate. | Recognise the overlap and play into the runner's path. |
| Under 10 | Use a 40 x 30 m area with 3v2 and a goalkeeper. Remove the offside line and use three clearly marked finishing gates. | First touch away from pressure and basic near/far support. |
| Under 12 | Use a 55 x 40 m area with the No. 8, 7, 2, and 9. Add a recovering midfielder after three successful repetitions. | Timing of the overlap and a purposeful final pass. |
| Under 14 to Under 16 | Use two-thirds of a pitch with live transitions and the three finishing runs. | Scanning, delivery selection, and counter-pressing shape. |
| Open / senior | Use full-pitch constraints, a live back four, and a six-second defensive transition rule. | Opponent-specific cues, faster execution, and rest defence. |
Run this as a 20-minute attacking block after a dynamic technical warm-up. In the final two minutes, remove the coach's call and let the No. 7 decide whether to play outside, underlap, bounce with No. 10, or drive inside. That is where a set pattern becomes game intelligence.
