

Football
Build-Up From the Back: Beat a High Press with a 1–4–3–3
A coach-ready 35-minute practice that teaches an 11-player 1–4–3–3 to create the spare player, play through the No. 6, and escape a high press with purpose.

What you need
1 full-size goal, 2 mini-goals or 4 cone gates, 20 footballs, 24 flat cones, 2 sets of bibs, whistle, stopwatch
Overview
This is an intermediate build-up-from-the-back pattern for a 1–4–3–3 against an aggressive front press. The objective is not merely to complete a first pass. It is to draw the opponent forward, identify the free player and enter the next line with control. Use it when your team wants to start attacks from goal-kicks or goalkeeper restarts rather than concede possession with a long clearance.
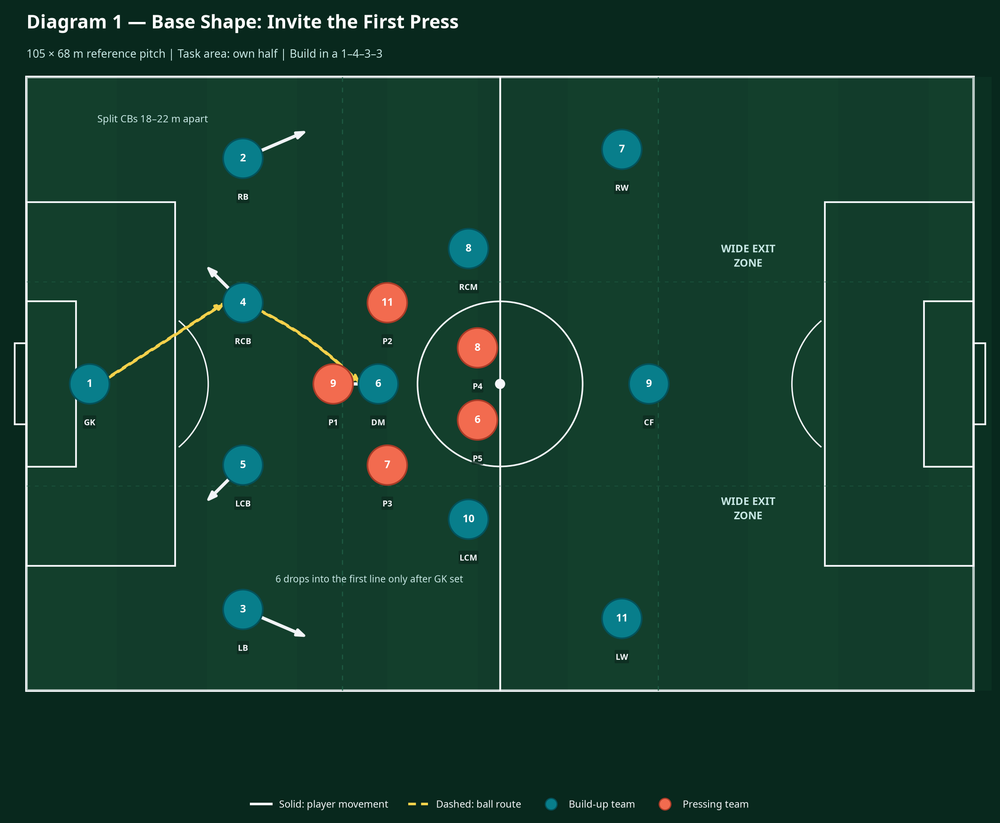
The reference pitch is 105 × 68 m, which sits within the normal senior-football range of 100–110 m by 64–75 m. The coached area is the first 52 m from goal, full width. The build-up team uses all 11 players; the pressing team begins with nine players so that the coach can expose the spare-player principle before adding the final two defenders. The central picture is simple: No. 1 (GK), No. 4 (right centre-back), No. 5 (left centre-back), No. 2 (right-back), No. 3 (left-back) and No. 6 (defensive midfielder) create the first solution; Nos. 8 and 10 connect it; Nos. 7, 11 and 9 pin the next line.
Coaching intention: make the press travel, then play into the space it leaves. The players must recognise whether the exit is through the No. 6, around the press via a full-back, or directly into the advanced line.
Setup
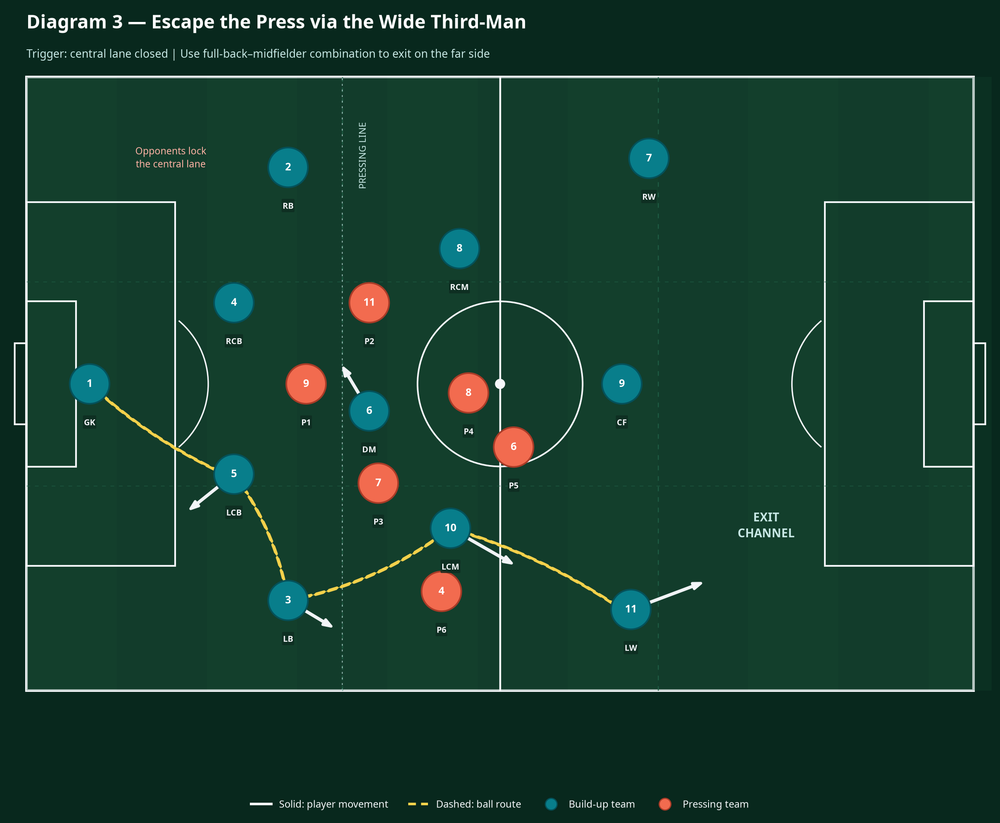
Use one full-size goal, 20 balls, 24 flat cones, two colours of bibs and a supply of markers. Mark a 52 × 68 m build-up area from the goal line to just short of halfway. Split the final 17 m of the area into two wide exit channels, each 12 m wide. Place two mini-goals or cone gates on the halfway line in those channels; a controlled pass or carry through either gate is the attacking team's scoring action.
| Role | Starting instruction | Detail for the coach |
|---|---|---|
| No. 1 GK | Start central, 6–8 m in front of goal line | Open body to receive and see both centre-backs. |
| Nos. 4 and 5 CBs | Split 18–22 m apart, just outside the penalty box | Receive at an angle, not square to No. 1. |
| Nos. 2 and 3 full-backs | Start high and wide, 8–10 m inside touchline | Fix the opposition wide player before arriving for the next pass. |
| No. 6 DM | Begin behind the first press, then move late | Show in a new passing lane rather than standing beside a centre-back. |
| Nos. 8 and 10 | Occupy different half-spaces, 8–12 m beyond No. 6 | Present a forward-facing option after the first line is beaten. |
| Nos. 7, 9 and 11 | Stretch the last line | Hold their defenders narrow or deep; do not crowd the ball. |

Start with No. 1 and a 10-second countdown once the goalkeeper touches the ball. The attacking team gains one point for crossing an exit gate under control and a second point if the first pass beyond the gate finds an advanced midfielder or winger. The pressing team gains one point for a regain and two points for scoring into the main goal within six seconds. That consequence creates realistic urgency without asking players to force a pass.
Step-by-Step Instructions
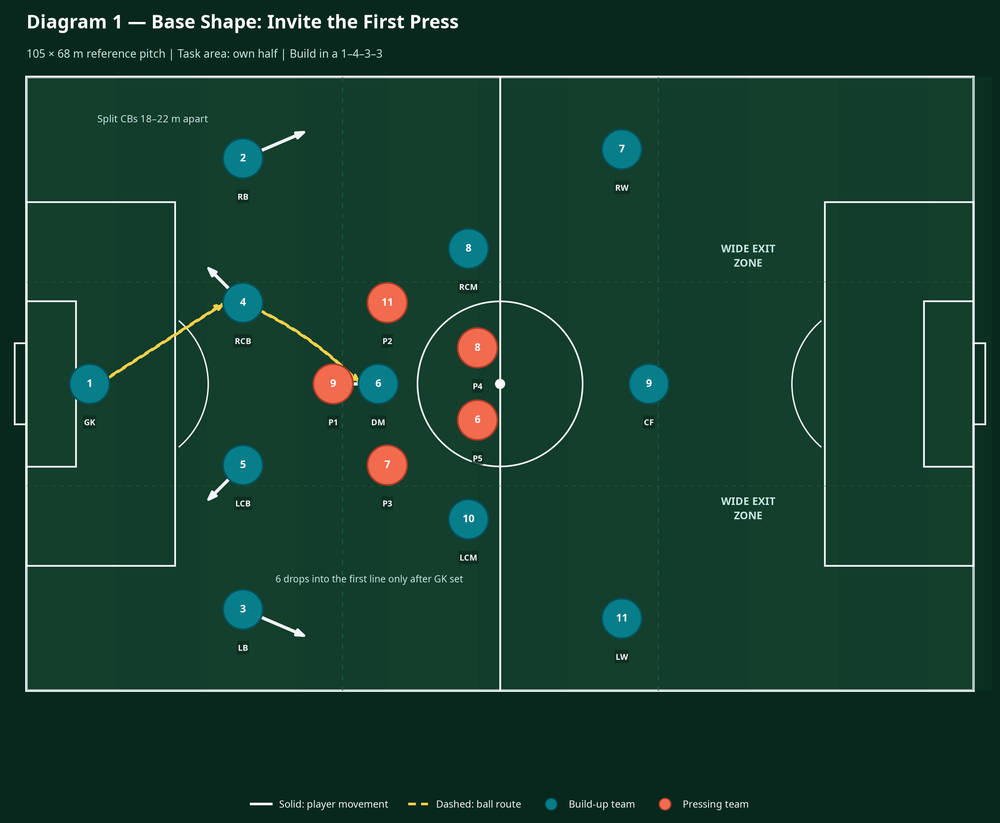
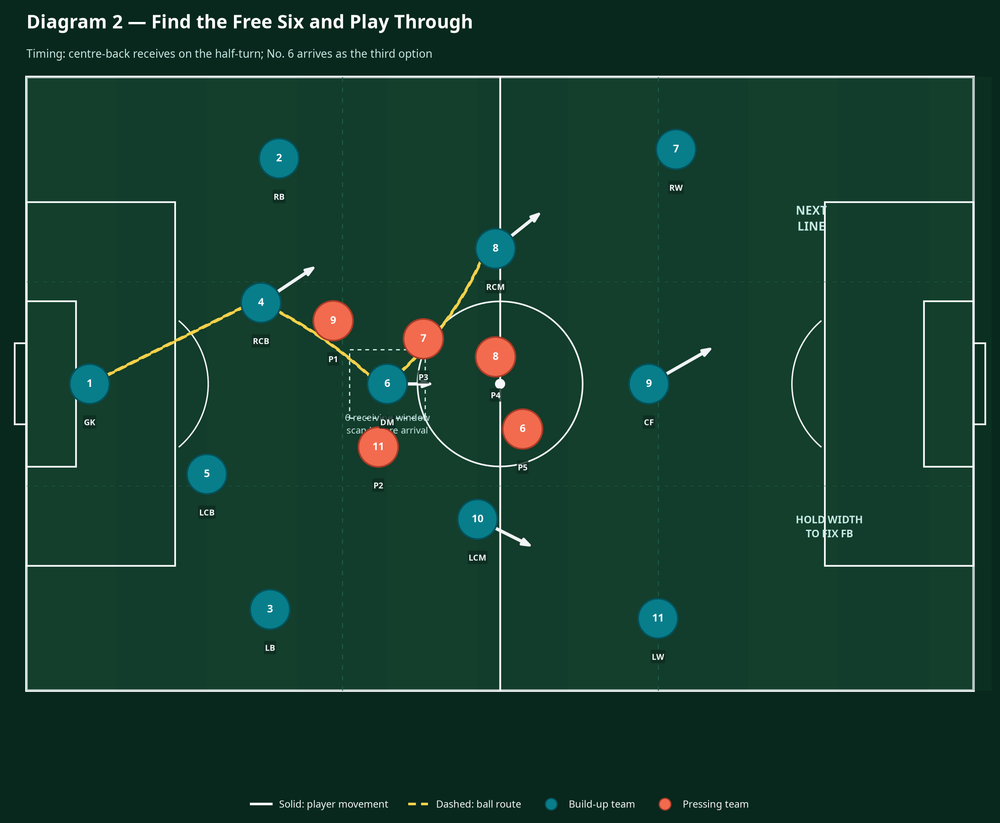
Set the starting picture. Put the ball with No. 1. Position Nos. 4 and 5 at opposite edges of the penalty area; No. 6 is central but screened by the first presser. Start the pressing team with a front three and two midfielders in a compact 4–5 m vertical spacing. Freeze the picture first: ask, “Where is our spare player if their No. 9 runs to the goalkeeper?”
Use the goalkeeper to attract pressure. No. 1 takes the first touch away from the approaching No. 9 and plays to No. 4 or No. 5 with enough pace to arrive on the receiver's back foot. The ball should travel in two touches or fewer. The far centre-back stays connected as the safety pass, not as a spectator.
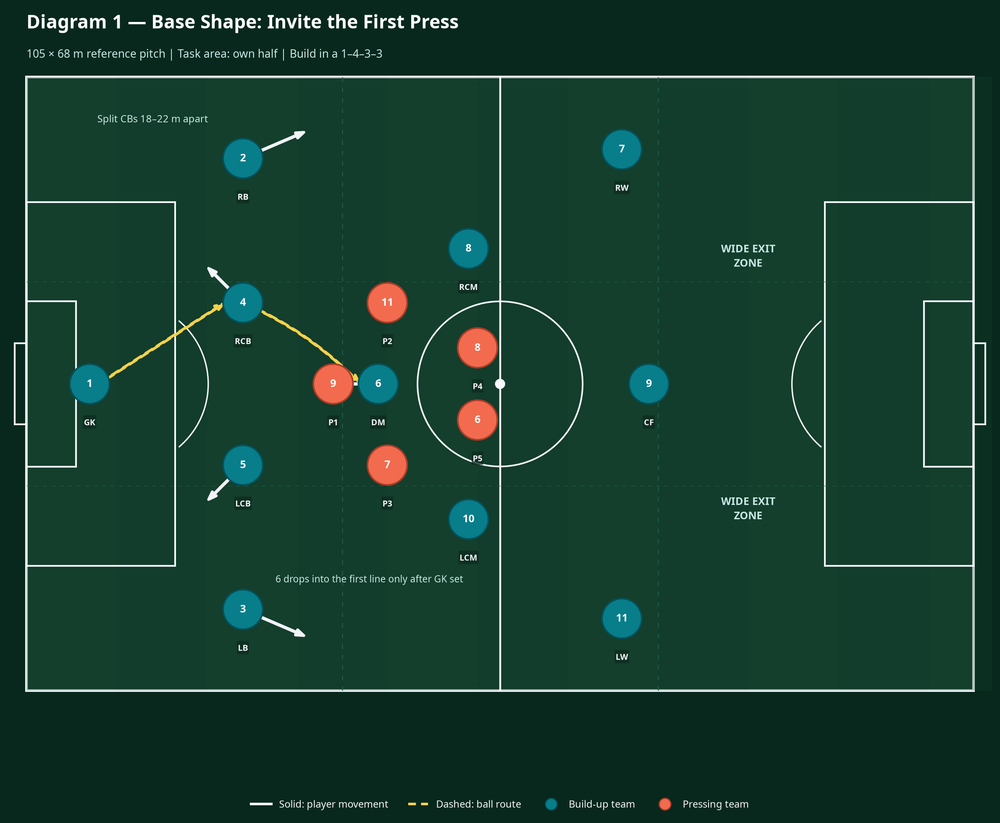
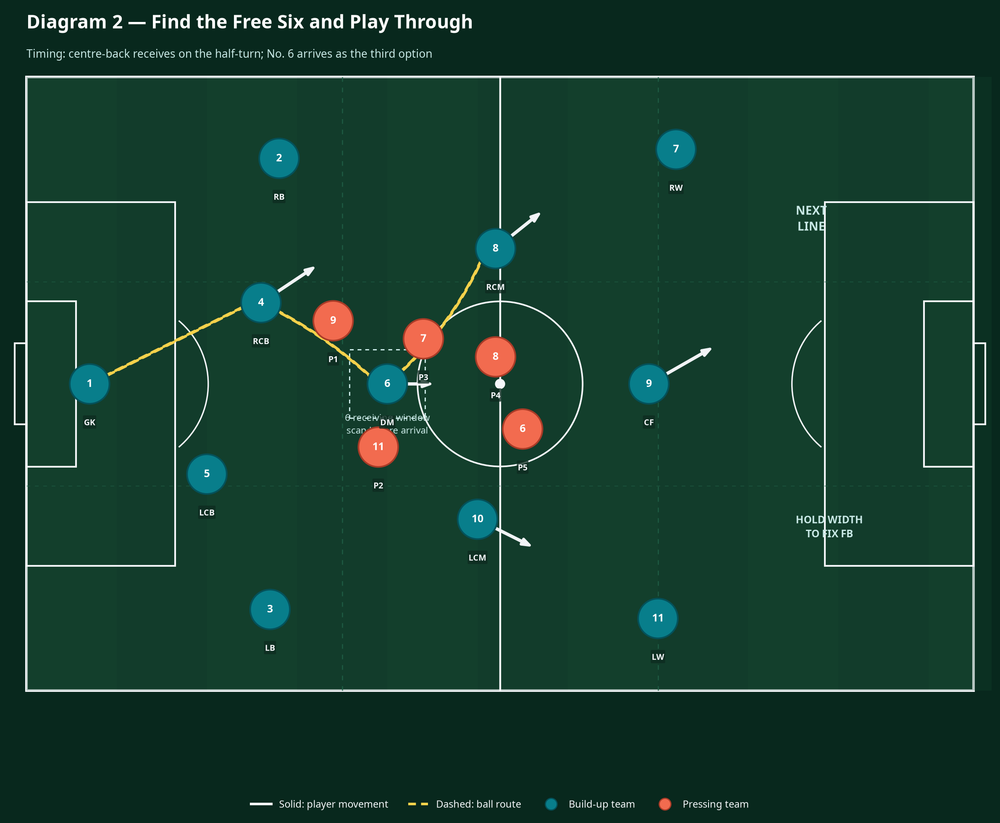
Create the receiving window for No. 6. As the ball travels to the centre-back, No. 6 scans twice—once over each shoulder—then shifts 3–5 m away from the cover shadow. The movement is late. If No. 6 arrives early, the opponent can stand on him; if he arrives as No. 4 receives, the passing lane is visible for a moment.
Play through if the line opens. No. 4 receives half-turned, assesses the first presser and, when the lane is clear, finds No. 6 on the far foot. No. 6 takes the first touch away from pressure and plays forward to No. 8 or No. 10 within the next two touches. Reward this sequence even if the final gate pass fails: it is the behaviour you want repeated.
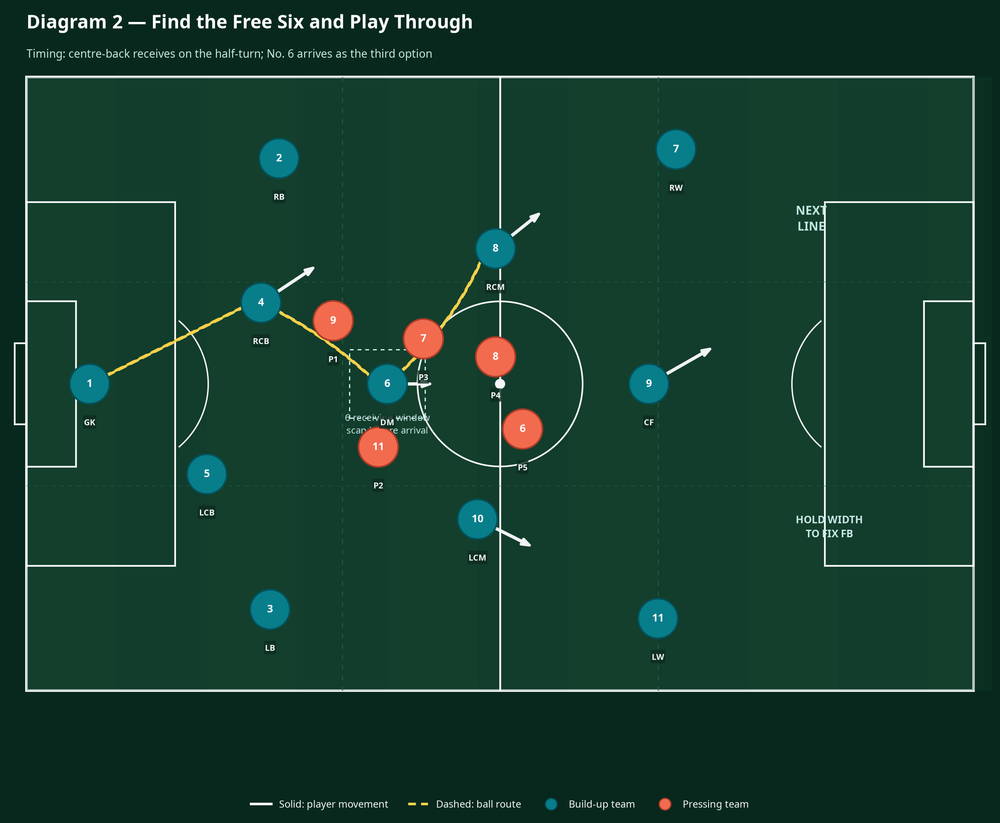
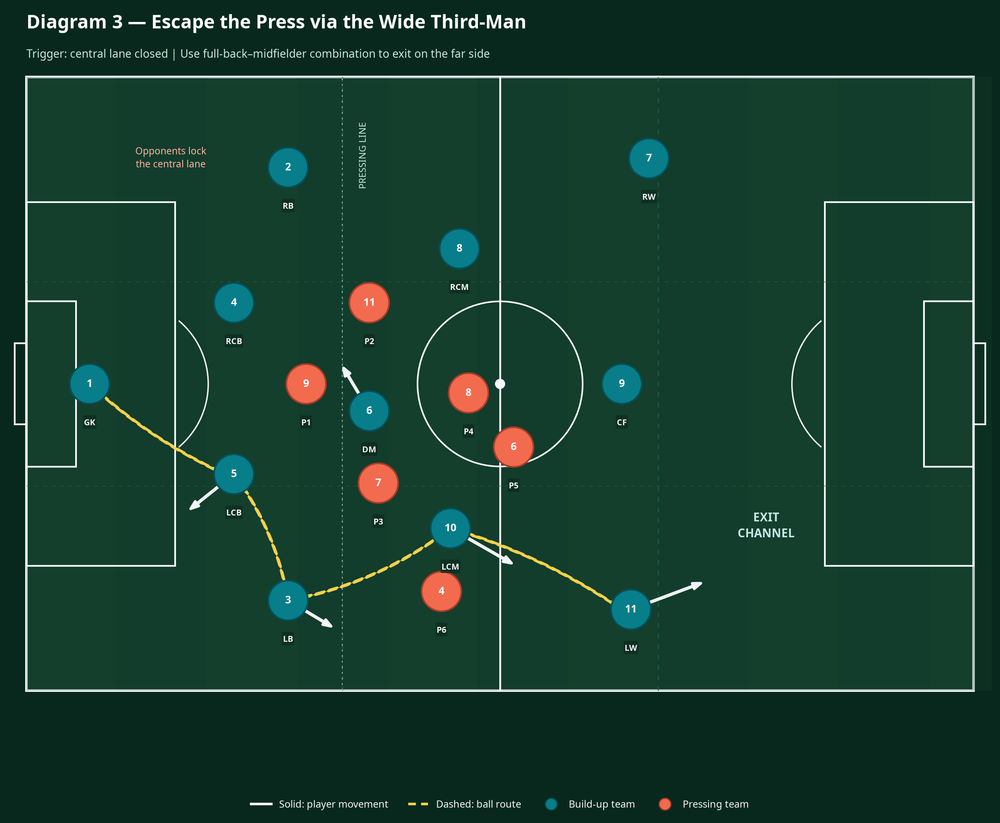
Go around if the centre is locked. When the press blocks the No. 6, No. 5 uses No. 3 as the first wide solution. No. 3 should receive facing forward or set a third-man pass into No. 10. No. 11 stays wide until the ball reaches No. 10; only then does he threaten the exit channel. The coach should insist that the far-side winger remains wide enough to make a switch a genuine option.
Finish the exit. The attack is complete only when a player carries or passes through an exit gate with control. Once the gate is crossed, allow five seconds of free play into a mini-goal or target player. This links patient first-phase circulation to a positive forward action.
Rotate the pressing demand. After every four restarts, swap two pressers and reset the ball with No. 1. In the final block, let the pressing team press live from the goalkeeper’s first touch. Run four sets of four 60–75-second repetitions, with 45 seconds of coaching and water between sets.
Key Coaching Points
| Coaching point | Detail the coach should demand |
|---|---|
| Angle before distance | The first support angle must allow a forward next action. A flat pass between square players simply moves pressure sideways. |
| Arrive late, receive early | No. 6 moves after the ball leaves No. 1, but scans before the ball arrives. This wins the small time window. |
| Use the far foot | Centre-backs and No. 6 receive on the foot furthest from the closest presser; first touch must protect or progress. |
| Fix before you free | Full-backs and wingers hold width until the opponent commits. Moving too early narrows the opponent's problem. |
| Pass with a purpose | Every pass needs a named next option: “4 to 6 to 8,” or “5 to 3 to 10.” Demand communication before the ball moves. |
| Rest defence stays live | The far centre-back, No. 6 and goalkeeper maintain a triangle behind the ball so a turnover does not become an immediate shot. |
Use brief, precise interventions. If the ball carrier cannot see the next pass, stop the player’s body shape. If No. 6 is hidden, replay the previous ball travel and adjust his arrival line. Avoid long tactical lectures during the live block; one clear correction, one repetition, then let the game teach the decision.
Common Mistakes
The most common error is centre-backs receiving square, which leaves them with only a backward pass. Correct it by moving their starting cone 2 m wider and asking for a back-foot first touch. Secondly, No. 6 often drops too close to the ball and brings his marker into the same space. Correct this with a 5 m “no-stationary” zone around the centre-back: No. 6 can pass through it but cannot wait in it.
Another issue is full-backs racing forward before the ball is secured. That removes the reliable wide escape. Tell them to hold their line until the centre-back's first touch, then make a positive movement. Finally, players may force the vertical pass just because it is the planned pattern. Reinforce the decision rule: through when the lane is open; around when the cover shadow closes it; back only to reset the press.
Variations & Progressions
Begin with a 7v4 unopposed-to-semi-opposed version: No. 1, back four and No. 6 face a front three plus one screening midfielder in a 40 × 52 m area. Allow unlimited touches for the build-up team and no counterattack. This gives younger or less experienced players time to learn their distances.
Progress to the main 11v9 practice described above, then add the final two pressers for 11v11. In this final progression, remove the 10-second countdown but award the press three points for scoring from a regain. The attacking side must decide whether to play out or reset based on the actual pressure picture.
For a harder tactical variation, start the press in a 4–4–2 diamond. This crowds No. 6 and asks the back line to recognise the far full-back and third-man combination sooner. Award a bonus point when the ball reaches No. 7 or No. 11 after a switch that travels through the opposite half-space.
Age Adaptations
| Age group | Adaptation | Coaching emphasis |
|---|---|---|
| Under-8 / Under-10 | Use 6v4 in a 35 × 25 m area, no offside, two wide scoring gates. | Open body, spread out, take the ball away from pressure. |
| Under-12 | Use 7v5 in a 45 × 35 m area, introduce No. 6 and a 7-second exit target. | Scan before receiving and choose wide or central. |
| Under-14 / Under-16 | Use the 11v9 format in a 52 × 68 m area, then progress to 11v11. | Timing of No. 6, third-man support and counter-press shape. |
| Open age | Replicate the opponent’s actual press and use your match vocabulary. | Detail, decision speed and realistic restart cues. |
Finish by asking your players three questions: Who made us the spare player? What told us to play through rather than around? Where was our safety after the exit? Their answers tell you whether the pattern has become an understanding rather than a memorised route.
Reference
[1]: https://downloads.theifab.com/downloads/laws-of-the-game-2025-26?l=en — IFAB Laws of the Game: dimensions of the field of play
